nopAccelerate
Install Solr 5.0 And Configure Solr 5.0 to use with nopAccelerate
Solr is the popular, blazing fast, open source NoSQL search platform from the Apache Lucene project. Its major features include powerful full-text search, hit highlighting, faceted search, dynamic clustering, database integration, rich document (e.g., Word, PDF) handling, and geospatial search. Solr is highly scalable, providing fault tolerant distributed search and indexing, and powers the search and navigation features of many of the world’s largest internet sites.
Install Solr 5.0
Step 1: Download Solr
Just go to this link and download below Solr 7.0.0 version. Select the preferred file, we recommend you to download “Solr 6.4.2 version”. We are assuming you’re installing this on Windows.
Step 2: Copy downloaded Solr version
Extract the downloaded file somewhere and give the folder name as you want, (Assuming you extracted it to “C:\” drive and gave folder name “Solr”, So your Solr path becomes “C:\Solr”).
Step 3: Install JAVA Latest Version
Go to this link, Download latest Java Version, and Install Java. You can choose the version as per your system requirements but we prefer “Windows Offline (64-bit)” setup.
(a) How to check JAVA path?
- For Windows 32 bit: “C:\Program Files (x86)\Java”
- For Windows 64 bit: “C:\Program Files\Java”
After successful JAVA installation, it’s time to define the “JAVA_HOME” Environment Variable which will helps Solr 5.0 to find the JAVA location.
(b) Steps to define “JAVA_HOME” Environment Variable
-
- Go to My Computer > Right Click > Properties > Click Advanced system settings from left
- One “System Properties” popup will open then select “Advance” tab, click on “Environment Variables..” button at the end of popup
- Another “Environment Variables” popup will open, go to the last “System Variables” list > New > Enter the following details in “New System Variable” popup
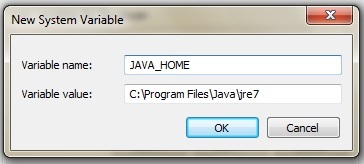
Here, we have installed Java Version 7 (Windows 64 bit) so we’ve entered C:\Program Files\Java\jre7. Before adding “Variable Value”, make sure you’ve checked your installed JAVA latest version by go to C:\Program Files (x86)\Java (Windows 32 bit), or C:\Program Files\Java (Windows 64 bit) and replace the “jre7” with your directory name.
For example, If your directory name is “jre1.8.0_40” under above path, your “Variable Value” should be C:\Program Files (x86)\Java\jre1.8.0_40 (Windows 32 bit), or C:\Program Files\Java\jre1.8.0_40 (Windows 64 bit).
- Click OK, you will see the newly added Variable name “JAVA_HOME” in the list.
Step 4: To Start Solr 5.0 Server
To start the Server, all you need is to run few commands on your command prompt. We are assuming you’ve extracted the Solr folder to “C:\Solr”
C:\>cd C:\Solr\bin
C:\Solr\bin>solr start -p 8983
Step 5: To Stop Solr 5.0 Server
To stop the server, same thing you need to follow but slide change in command.
C:\>cd C:\Solr\bin
C:\Solr\bin>solr stop -p 8983
Step 6: To Restart Solr Server
To restart the server, same thing you need to follow but slide change in command.
C:\>cd C:\Solr\bin
C:\Solr\bin>solr restart -p 8983
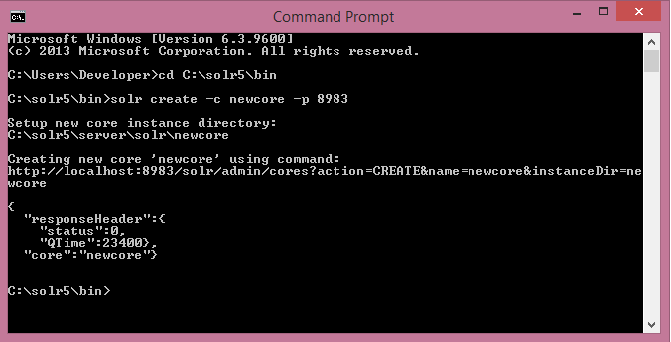
Step 7: To Create New Core in Solr
To create new core, Solr instance must be running on specified port (For example, we are running Solr on 8983 port). Once your Solr Instance is running, all you need to do is write the simple command and core will be created automatically by executing following command.
C:\>cd C:\Solr\bin
C:\Solr\bin>solr create -c <core-name> -p 8983
Ex: C:\Solr\bin>solr create -c newCore -p 8983
Here, “-p 8983” represents Solr Instance running on port 8983. You can change this port if needed.
To check the created core, you can look at C:\Solr5\server\solr\newCore
Basic Solr 5.0 Configuration
It is very important to configure Solr correctly before you proceed with using nopAccelerate Solr Plugins for your nopCommerce store.
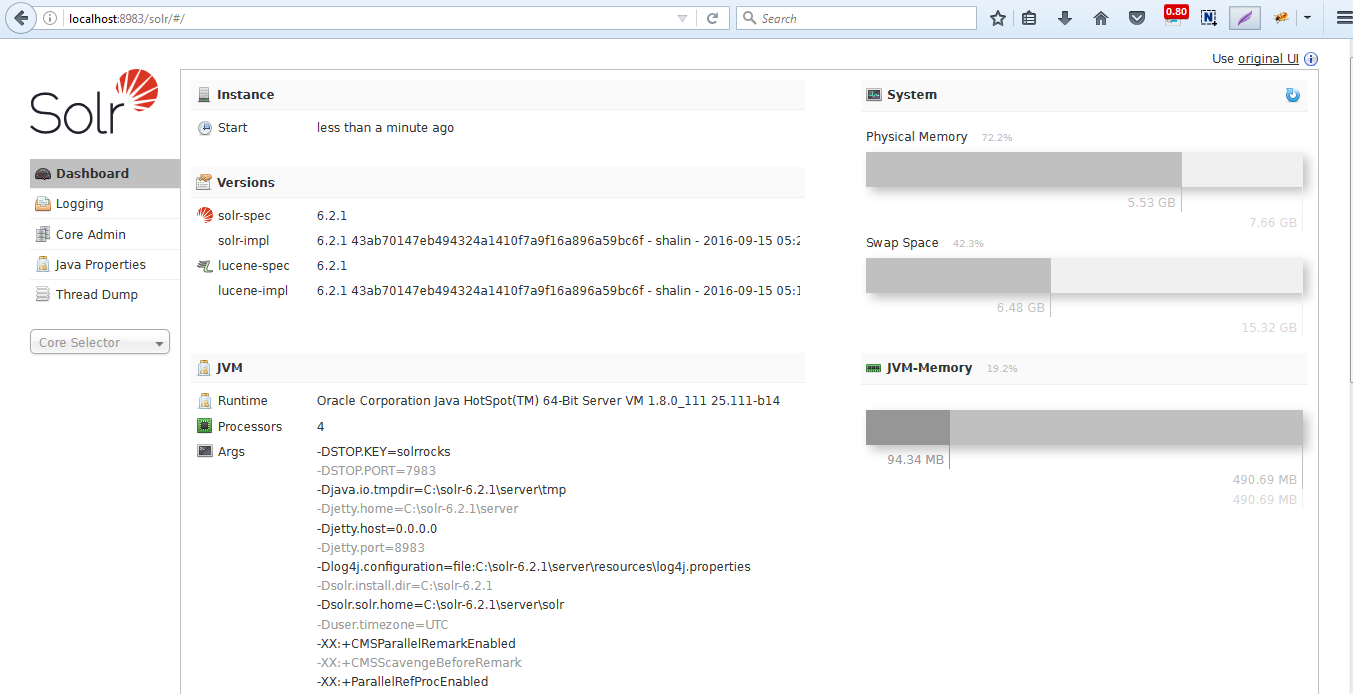
Step 1: Open Solr Admin
Go to Solr Admin URL, eg. http://localhost:8983/solr
Step 2: Selecting Solr Core to be used with your nopCommerce Store and Language Integration
Decide Core you’ll be using for your application. You can either create new Core or use default Core created during installation.
Hint: A Core, also referred as Solr Core, is a running instance of a Solr index along with all of its configuration (SolrConfigXml, SchemaXml, etc…). A single Solr application can contain 0 or more cores which are run largely in isolation but can communicate with each other if necessary via the CoreContainer.
If you have default Core created during installation, then skip Step 3 else Create new Core for Integration.
Step 3: Prepare New Solr Core
We’re creating a new solr core named as “newcore” to illustrate the steps involved in creating new solr core. You can name it whatever you like.
C:\>cd C:\Solr5\bin
C:\Solr5\bin>solr create -c <core-name> -p 8983
Here, “-p 8983” represents Solr Instance running on port 8983. You can change this port if needed.
To check the created core, you can look at C:\Solr\server\solr\newcore
Step 4: Copy & Replace Solr Config files for nopCommerce Integration
Now, copy schema.xml, solrconfig.xml, elevate.txt, mapping-FoldToASCII.txt, and mapping-ISOLatin1Accent.txt file provided with nopAccelerate Plugin to replace existing file at C:\Solr\server\solr\newcore\conf\.
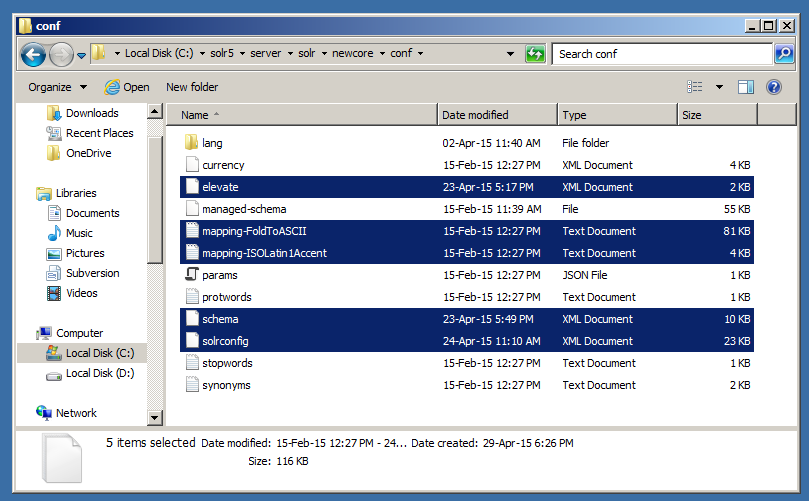
Note: You need to delete managed-schema File from C:\Solr\server\solr\newcore\conf\ directory if exist.
To check core is created successfully or not by go through http://localhost:8983/solr/#/newcorethis link. Replace your core name if you have created core name other than newcore in above URL.
Your Solr Core is now ready to be used with nopAccelerate.
Proceed with next step to Configuring nopAccelerate Solr Plugin→
Need more help?
- Ask your question in the Forums (free with your plugin purchase)
- Go back to Documentation
Latest Posts


Our Products
Support
Latest Blog Posts
Contact Info