Enjoyed this post?
Be sure to subscribe to the nopAccelerate newsletter and get regular updates about awesome posts just like this one and more!
When we set out to explore a nopCommerce IIS setup with multi-store configuration, our goal was simple: to simulate a production-ready, multi-tenant eCommerce platform in a local environment. However, as every developer knows, the journey from idea to implementation is rarely straightforward. This guide is more than just instructions; it’s a step-by-step walkthrough covering configuration, SSL certificates, and multi-store challenges, along with common errors and fixes.
Whether you’re testing locally before deployment or simply curious about how nopCommerce manages multi-store setups, this post provides practical insights and a structured process you can easily follow and learn from.
Like every journey, ours started at GitHub.
We began by cloning the official nopCommerce GitHub repository with the following command:
git clone https://github.com/nopSolutions/nopCommerce.git
With the code in hand, we opened the solution in Visual Studio, restored the NuGet packages, and built it. The build process completed smoothly.
Next, we created a new site in IIS with the following settings to expose the application on a proper domain locally:
We created and assigned a new Application Pool targeting .NET 6.
Cause: Missing IIS modules and rewrite components.
Fix: Installed the IIS URL Rewrite Module, enabled ASP.NET features via Windows Features, and restarted the server.
Once that hurdle was cleared, we updated our hosts file (note: editing the hosts file requires administrator privileges):
127.0.0.1 nopcom.local
Security was next. We didn’t want any store exposed without HTTPS.
Using PowerShell, we created a self-signed certificate for the domain:
New-SelfSignedCertificate -DnsName “nopcom.local” -CertStoreLocation “cert:\\LocalMachine\\My”
We bound the certificate in IIS with Server Name Indication (SNI) enabled. However, HTTPS was still marked as insecure.
Problem: Certificate was untrusted by the system.
Fix: Imported the certificate into Trusted Root Certification Authorities.
Now, accessing https://nopcom.local worked flawlessly.
Note: For production, consider using trusted certificates from providers like Let’s Encrypt.
Opening https://nopcom.local in a browser launched the nopCommerce installation wizard.
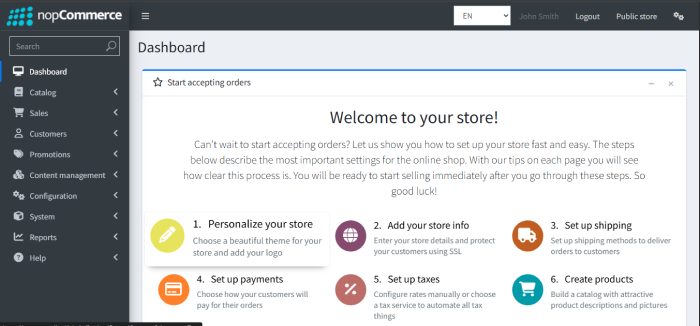
We configured the database, created the admin user, and the store came to life. The familiar dashboard confirmed a successful setup.
One of nopCommerce’s powerful features is multi-store management. This lets you manage multiple region-specific stores from a single admin panel.
We set up three stores targeting:
Japan
Sweden
Canada
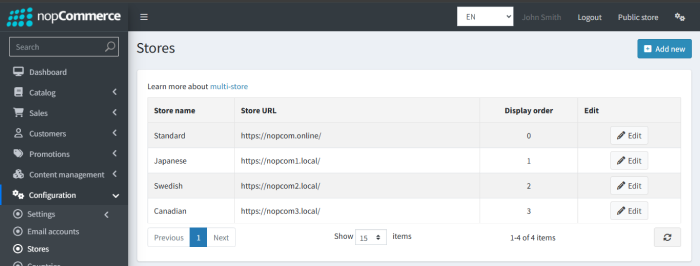
Admin → Configuration → Stores:
To map these domains locally, we updated the hosts file:
127.0.0.1 nopcom1.local
127.0.0.1 nopcom2.local
127.0.0.1 nopcom3.local


Cause: Certificates were not bound for the new domains.
Fix: Created individual self-signed certificates for each store and added SNI-based bindings in IIS.
To give each store a native feel, we added:
English (US)
Japanese (JP)
Canadian English (CA)
JPY (Japanese Yen)
SEK (Swedish Krona)
CAD (Canadian Dollar)

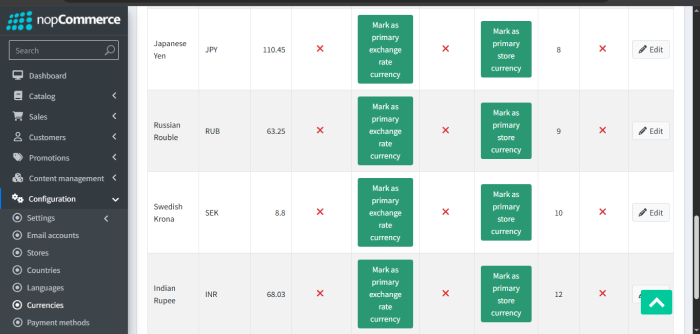
If languages or currencies don’t appear correctly, ensure HTTPS is properly configured and store domains are correctly mapped.
For each new store domain, we generated self-signed certificates via PowerShell:
New-SelfSignedCertificate -DnsName “nopcom1.local” -CertStoreLocation “cert:\\LocalMachine\\My”
New-SelfSignedCertificate -DnsName “nopcom2.local” -CertStoreLocation “cert:\\LocalMachine\\My”
New-SelfSignedCertificate -DnsName “nopcom3.local” -CertStoreLocation “cert:\\LocalMachine\\My”
These certificates were then bound in IIS with SNI enabled.
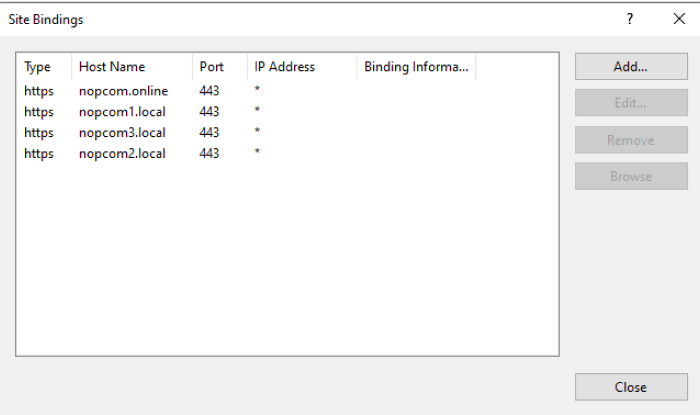
This allowed SSL check boxes to be enabled in Admin → Configuration → Stores for each individual store.
We visited each store to verify configurations:
https://nopcom1.local (Japanese store)
https://nopcom2.local (Swedish store)
https://nopcom3.local (Canadian store)
All stores displayed their correct language and currency.
SSL certificates validated successfully.
The admin panel reflected per-store settings correctly. Success!
| Issue | Cause | Fix |
| HTTP Error 500.19 | Missing IIS modules | Install URL Rewrite Module, enable IIS ASP.NET features, restart |
| SSL Certificate Issues | Certificate untrusted | Import certificate into Trusted Root Certification Authorities |
| SSL Store Assignment | No certificates bound to new store domains | Create and bind individual certs for each store domain |
| Language/Currency Not Loading | Store domain not loading via HTTPS | Bind SSL correctly, clear browser cache |
From cloning the repository to configuring a full multi-store e Commerce solution with SSL and localized languages and currencies, this setup mimics a miniature enterprise architecture. It closely simulates deployment and highlights the importance of configuration and environment parity.
Whether you’re a solo developer or part of a team prepping for deployment, setting this up locally gives you both confidence and clarity, helping you troubleshoot effectively before production issues arise.
Pro Tip: For production environments, always use trusted SSL certificates and configure real DNS records rather than self-signed certificates and local hosts file edits.
Leave A Comment