nopAccelerate

Faster, scalable and reliable nopCommerce.

How to add CSS and JS resource files into nopCommerce Plugin Views

If you are a nopCommerce developer you will definitely come across a situation where you need to add a custom resource files like CSS and JS to your nopCommerce plugin’s view files.

For most developers working on the nopCommerce for the first time, the simplest way to add such files is to directly add their references into plugin’s view files. However, this is highly not recommended. For your nopCommerce plugin to work correctly, you need to ensure that you’re using the standard way to add your resources.

If you already know, nopCommerce do a bundling of the JS and CSS files on the fly for performance optimization. However, if you’re using a direct link to resource files, it won’t include your JS and CSS files during bundling. Moreover, there may be chances of other issues as well.

So here are the simple steps for you to add your custom resource files into your nopCommerce plugin’s view files.

Before you begin, you should have a well organized plugin folder structure. For CSS you can use Content folder, and for storing your JS files, you may use Script folder. Here is the screen shot from one of the existing plugin of nopCommerce.

nopcommerce plugin folder structure

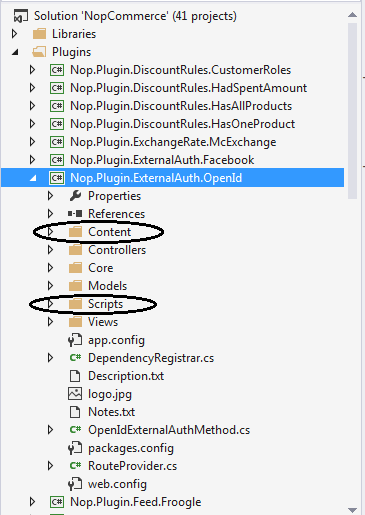
Screenshot of nopCommerce Plugin Folder – Displaying how to organize your CSS and JS files

Move your CSS and JS files into appropriate folder. It is not compulsory to follow this folder structure, but if you’re using standard structure then it becomes easier for your and others working on it in future, and you don’t need to remember where you stored it.

Now, to load resource files correctly you need to add its references into your plugin’s view files.

You can use Html.AddScriptParts() or Html.AddCssFileParts() helper methods.

  • Html.AddCssFileParts() method has two parameters first is optional and second is required.
  • Html.AddScriptParts() method has three parameters first and third is optional and second is required.

You can check into more details about this methods by going to its definition in your nopCommerce projects.

Coming to the point, here is how you can add resources into your Plugin’s view file.

@{
//Loading CSS file
Html.AddCssFileParts(ResourceLocation.Head, "~/Plugins/{PluginName}/Content/{CSSFileName.Css}");

//Loading js file
//Third parameter value indicating whether to exclude this script from bundling
Html.AddScriptParts(ResourceLocation.Foot, "~/Plugins/{PluginName}/Scripts/{JSFileName.js}", true);
}


If you want to add resource link in the header then you can use ResourceLocation.Head and for footer you can use ResourceLocation.Foot. Note that you need to give correct plugin name and resource file name in above, and then it will work.

If you have any question, make sure to post your issue at nopCommerce forum. And if you’re looking for professional nopCommerce development company, make sure to checkout the amazing nopCommerce services we offer.

How to add a menu item into the administration area of nopCommerce from a plugin?

If you’re a nopCommerce developer, you’ll find yourself using nopCommerce plugins to add your custom features into the nopCommerce. While nopCommerce IAdminMenuPlugin doesn’t allow to add your custom menu items under its default menu items, you can still add your custom menu items into Plugins menu.

In nopCommerce, administration menu is build from the Sitemap.Configuration file which is located in Nop.Admin folder. To add your custom menu items in nopCommerce administration panel, you can add it by extending SitemapNode class of nopCommerce.

To do the same, you can use following sample code which you need to add in your plugins’ cs file, after your plugin’s Install and Uninstall method.

    public bool Authenticate()
        {
            return true;
        }

     public  SiteMapNode BuildMenuItem() // SiteMapNode is Class in Nop.Web.Framework.Menu
        {
            var menuItemBuilder = new SiteMapNode()
            {
                Title = "Title For Menu item",   // Title for your Custom Menu Item
                Url = "Path of action link", // Path of the action link
                Visible = true,
                RouteValues = new RouteValueDictionary() { {"Area", "Admin"} }
            };

         var SubMenuItem = new SiteMapNode()   // add child Custom menu
            {
                Title =  "Title For Menu Chile menu item", //   Title for your Sub Menu item
                ControllerName = "Your Controller Name", // Your controller Name
                ActionName = "Configure", // Action Name
                Visible = true,
                RouteValues = new RouteValueDictionary() { {"Area", "Admin"} },
            };
            menuItemBuilder.ChildNodes.Add(SubMenuItem);

            return menuItemBuilder;

        }

In the above code, you can find comments where you need to replace values depending on your requirements. Moreover, the above code also explains how you can add a child menu items inside main menu.

Note that this code is tested to work on nopCommerce 3.40. Moreover, if you find any issue or need help, feel free to post it into comments or use nopCommerce forum.

How to setup nopCommerce Multi-Store on Shared Hosting Environment

Multi-store is the most awaited feature for nopCommerce using which you can host multiple e-commerce store front-end using single nopCommerce installation. Here is a detailed guide/tutorial which covers the step-by-step guide on How to setup and configure multiple e-commerce stores using nopCommerce multi-store features. (more…)

Fill in form

and we will contact you

How can we help ?

Schedule a quick call, 15-minute meeting with one of our experts:

Thank You !

Our consultant will contact you in 24 hours.

Delivering generous mobile apps for Entrepreneurs, Startups & Businesses


Have a look at nopAccelerate Demo Store with 80,000+ products with nopAccelerate Solr and CDN Plugin.

download-trial Start Trial