Enjoyed this post?
Be sure to subscribe to the nopAccelerate newsletter and get regular updates about awesome posts just like this one and more!

NopCommerce is a feature-rich eCommerce platform that facilitates the development of interactive eCommerce websites. It is the best open-source eCommerce platform capable of supporting both individual entrepreneurs and large businesses.

NopCommerce an Open-Source & Free E-commerce Solution!!
Compared to other open source e-commerce solutions, nopCommerce project structure is well organized, highly scalable and easy to customize. The best thing about nopCommerce is that it is “Free” there are no hidden fees or any other traps.
NopCommerce is an open-source E-commerce solution based on ASP.NET MVC 4.0 and MS SQL Server 2008. Its development started in 2008 by Andrei Mazulnitsyn in Yaroslavl, Russia. NopCommerce was officially launched in October 2008 for small to medium-sized businesses.
With a version release cycle of 5–6 months NopCommerce continuously evolves to create and maintain a world-class e-business solution for customers from all around the world. NopCommerce now is one of the most stable, secure, and extendable eCommerce platforms
Its popularity may be attested by the fact that in December 2016, Builtwith.com reported 30,950 ecommerce websites were using nopCommerce and its software installation package was downloaded more than 1.7 million times.
In 2010 and 2011, nopCommerce reached the final of the Packt Open Source E-Commerce Award. NopCommerce has been listed in top 20 most downloaded applications provided by Microsoft Web Platform Installer. In 2013, nopCommerce was selected as the best finance app by the Russian WebReady awards. In January 2016, NopCommerce got the CMS critic’s award for “ Best eCommerce for SMB“.
Before we begin I like to share the link of nopCommerce demo store on our Nopaccelerate website, as I will be using screenshots from the demo to explain nopCommerce CMS and features. This demo provides you an immediate access to a sample admin account and the storefront. It will give you an insight to the rich features and functionality provided by nopCommerce, so keep it open.
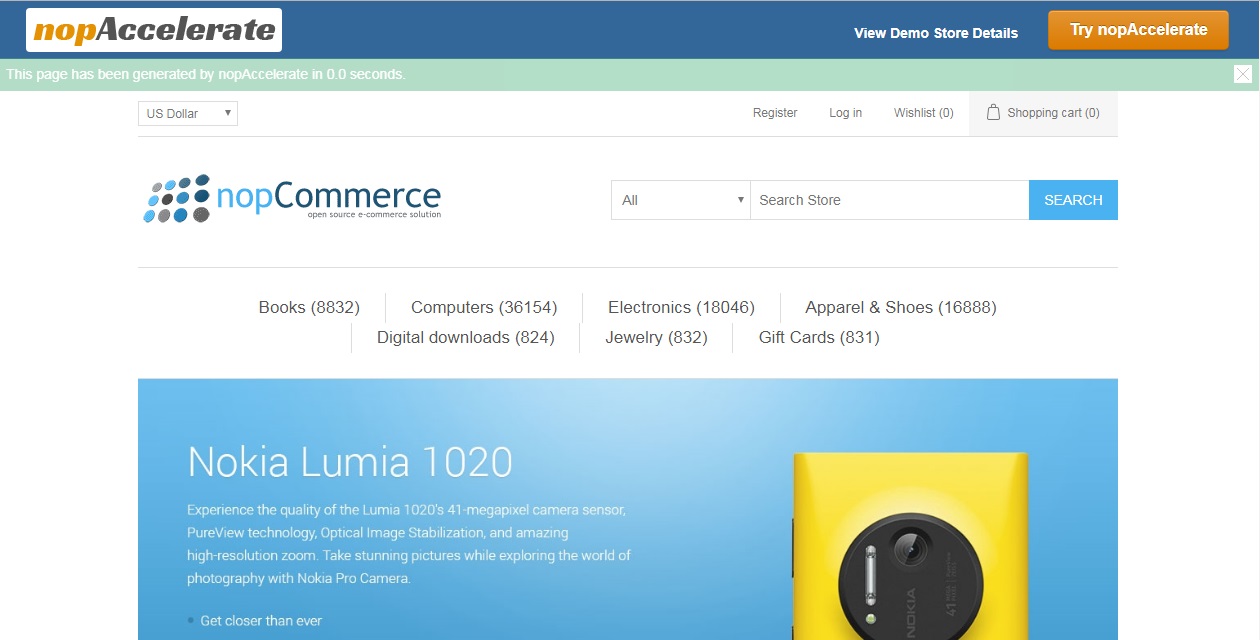
As we are using our Nopaccelerate extension on the demo store, it will also demonstrate our expertise to speed up your eCommerce website. Let us get started…
“A Dollar saved is a Dollar earned…”
For a startup, anything that saves money is a bonus. “NopCommerce is Free” and it beats other platforms when we talk about the cost of running an e-commerce business in the long run.
Besides being, “Free” NopCommerce offers loads of features and capabilities out of the box that will help you to create an online store you desire. It comes embedded with the essential tools that you need to start an ecommerce website, these features include:

Considering the fact that mobile devices are generating more than 2/3rd of global traffic, a mobile responsive website is necessary, you cannot choose to ignore it. In 2017, retail ecommerce sales worldwide reached $2.304 trillion. The major contribution in this sale came from mobile Commerce, which totaled $1.357 trillion, i.e. 58.9% of the total digital sale, a 40.2% jump in share compared to 2015.
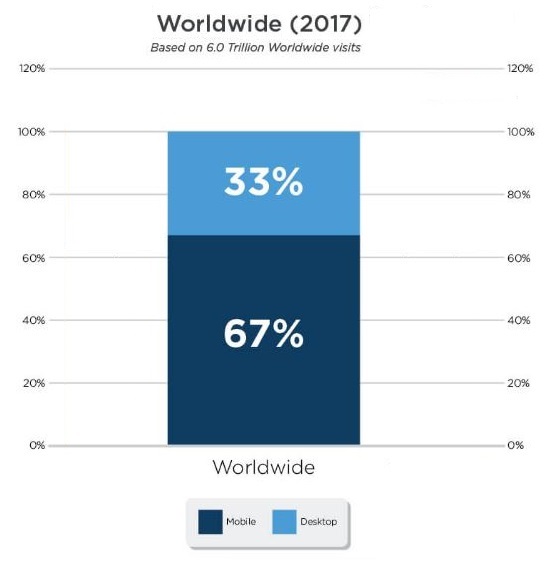
Source: stonetemple.com
The mobile responsive feature is free and available out of the box in NopCommerce. NopCommerce has many well-designed responsive templates that scale appropriately and show appropriate content optimized for all kind of devices and the browsers. One can choose multiple templates and themes, to implement responsive design to support multiple devices.
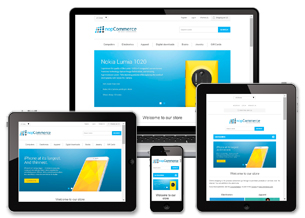
Nopcommerce – Compelling, Feature-Rich and Graphically Pleasing Mobile Webstore…
NopCommerce multi-store feature allows the user to run more than one store with exclusive domains and then manage all of them from the nopCommerce administration panel. The multi-store feature helps the user to do target selling through different domain names from a single administration panel based on region, niche,category, brands, products, B2B, B2C, and so on.
Example: It is like monitoring different domains like eBay.in, ebay.com, ebay.co.uk, ebay.com.au (that are targeting different regions) from one single administration panel.
NopCommerce multi-store feature allows every online store to share a single database wherein you can share products, promotions, and attributes across all your web stores. It also allows your customers to log in to all of your stores using the same credentials. Besides this, the following features can be set up separately for each store:
How can you add Multiple stores in the Nopcommerce Admin Panel?
To add a new store in your Nopcommerce 4.0 Administration Panel, go to “Configuration” on the left side and then click on “Stores”. On the right side, you will see the list of your stores that already added to your panel (if you are starting fresh it will be blank).
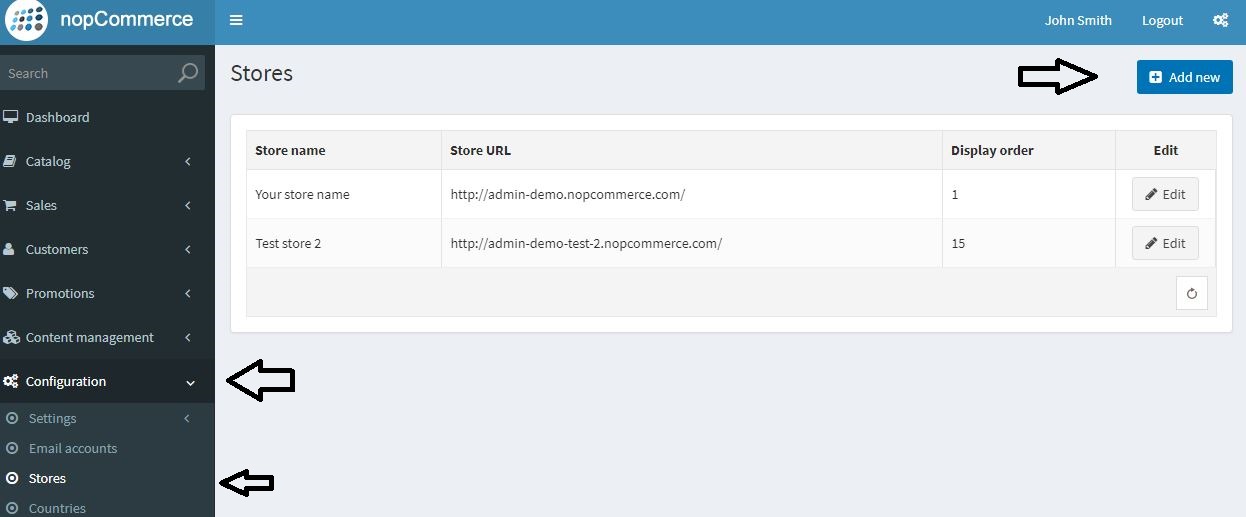
Now click on “Add New” button near the top right corner. It will take you to a new screen where you can fill in the details of your new store. After this click on the “Save” button and a new store will be added to your NopCommerce Administration Panel. You can repeat the same task, again and again, to add multiple stores to your NopCommerce CMS.

NopCommerce Multi-vendor support feature allows multiple vendors to sell on your ecommerce website like Amazon. Products from several independent vendors can be viewed in the common product catalog and your online customers can shop at one web store from any of the vendor as per his or her choice.
The multi-vendor support feature also allows you to provide each vendor with an administrator pane access to manage their products, sales reports, reviews, and order details regarding their products. This feature prohibits vendor interference with each other’s activity.
You can also use the NopCommerce Multi-vendor support feature for Drop shipping by assigning each product to a particular vendor whose details are stored. Once an order is placed on your website, an email is sent to the concerned vendor who sells the product that has been ordered. This email includes products, quantities, etc. The vendor then ships the item to a customer on behalf of the merchant. After a successful delivery, the merchant typically pays each of his or her vendors at the end of the month.
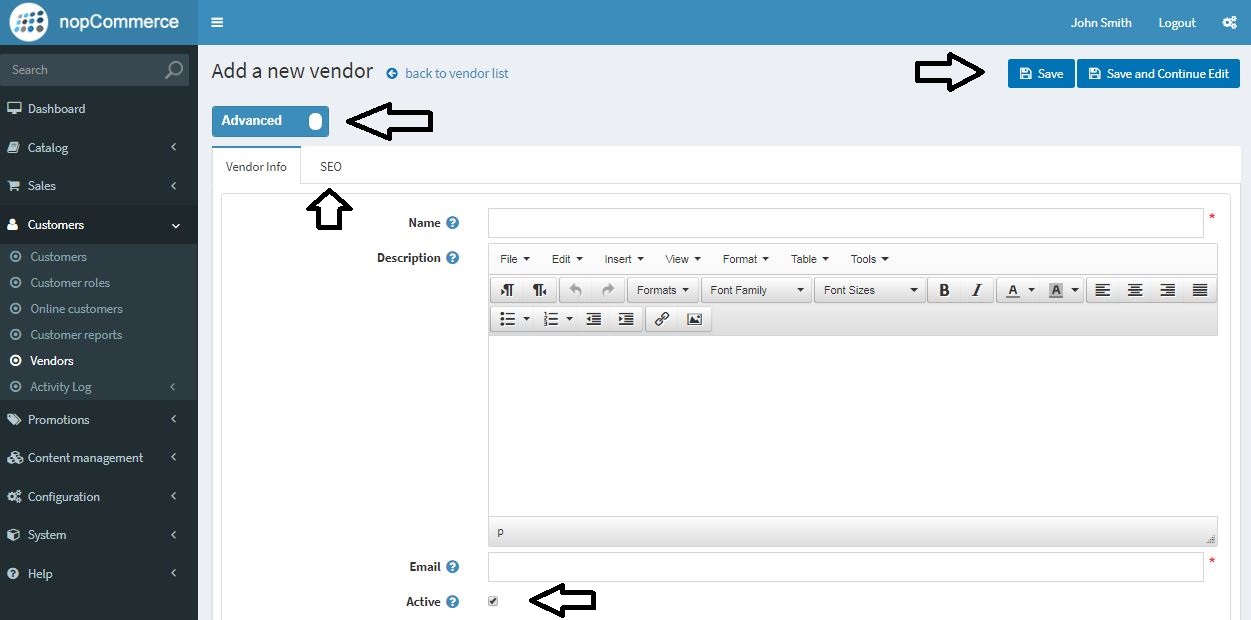
How can you add Multiple Vendors in the Nopcommerce Admin Panel?
To add a new Vendor in your Nopcommerce 4.0 Administration Panel go to “Customers” on the left side and then click on “Vendors”. On the right side, you will see the Vendor list.
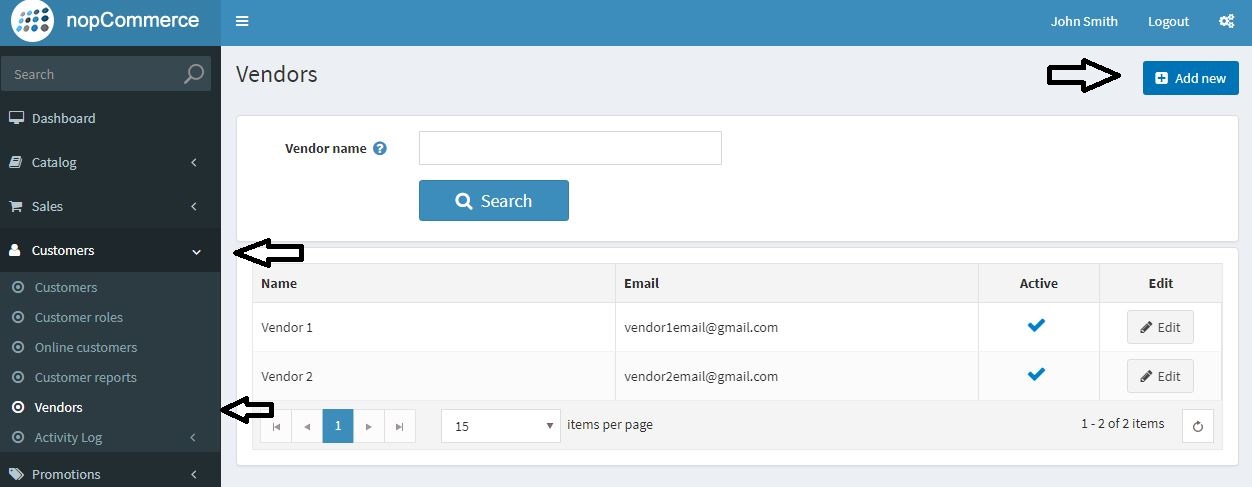
Now click on “Add New” button near the top right corner. It will take you to a new screen where you can fill in the details (like name, email, address, etc.) of your new Vendor. Before you begin filling vendors detail, please make sure you enable the “Advanced” on the left top side to get a detailed vendor form. Also, check the box that says “Active” before clicking on “Save” button. You can repeat the same task again and again to add multiple vendors. Nopcommerce Admin Panel also allows you to perform SEO at Vendor level for better visibility.
eCommerce has reached a level where if you are not providing a WOW experience to your customer, you are losing on sale. An online shopper expects an ecommerce store to provide him or her global standards. The nopCommerce team understands the market need and that is why all essential product features are provided by default. Let us discuss some important product features on nopcommerce: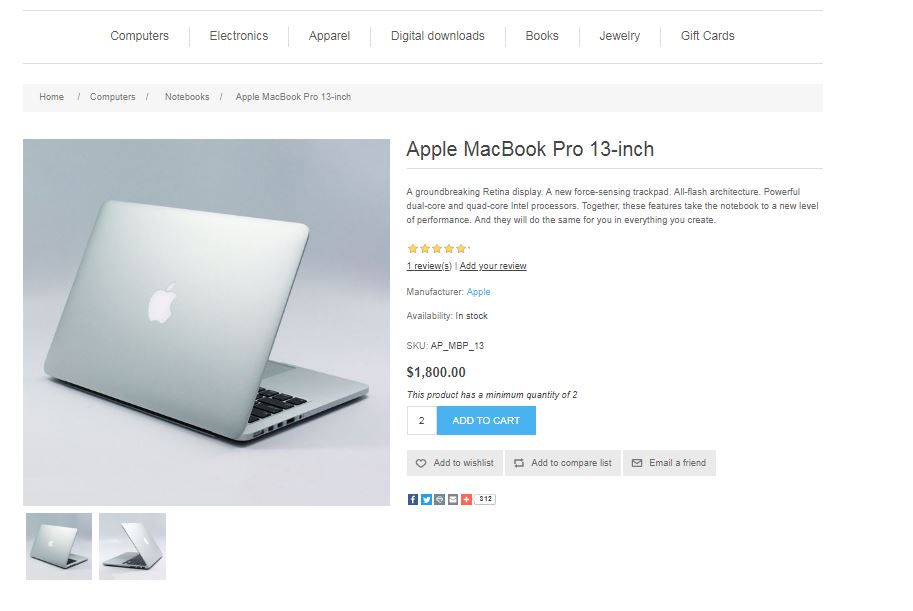
Product attributes: NopCommerce allows its user to create product attributes as per their need there are no restrictions. For example, size and color — each can be created with its own SKU, price, weight, image and stock level. The Store owners can also add text options to products for online buyers to fill in, this is helpful when selling products such as initials for monogrammed products. The online buyers can also upload files in cases where store owners are offering custom prints on shirts, etc.
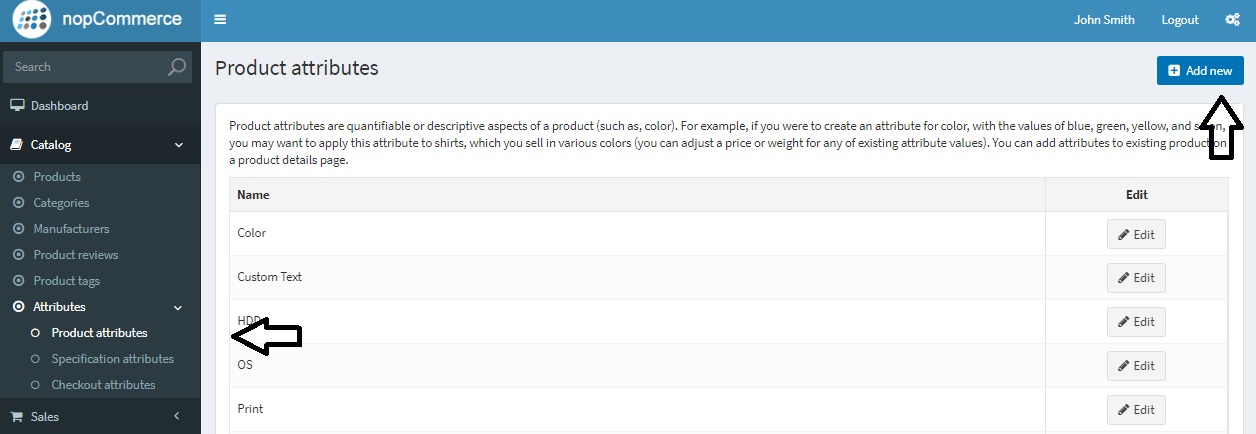
To add a new Product attributes in your Nopcommerce Administration Panel go to “Catalog” on the left side and then click on “Attributes” and choose ”Product attributes”. On the right side, you will see the product attributes list. Click on “Add new” button on the top right of the screen to create a new product attribute.
Product comparison: Product comparison is necessary especially when you are selling electronic products on your ecommerce website. Comparing products side by side removes the guesswork and facilitates customer research. Product comparison also keeps the customer on your website and increases the odds of adding a product to the cart.
Stock management: NopCommerce inventory management feature allows store owners to determine physical stock and available quantities. The Stock management feature allows you to easily manage back-order and pre-order status for each product. It also supports partial deliveries, multiple warehouses, and stock management as per product attributes like size and color.
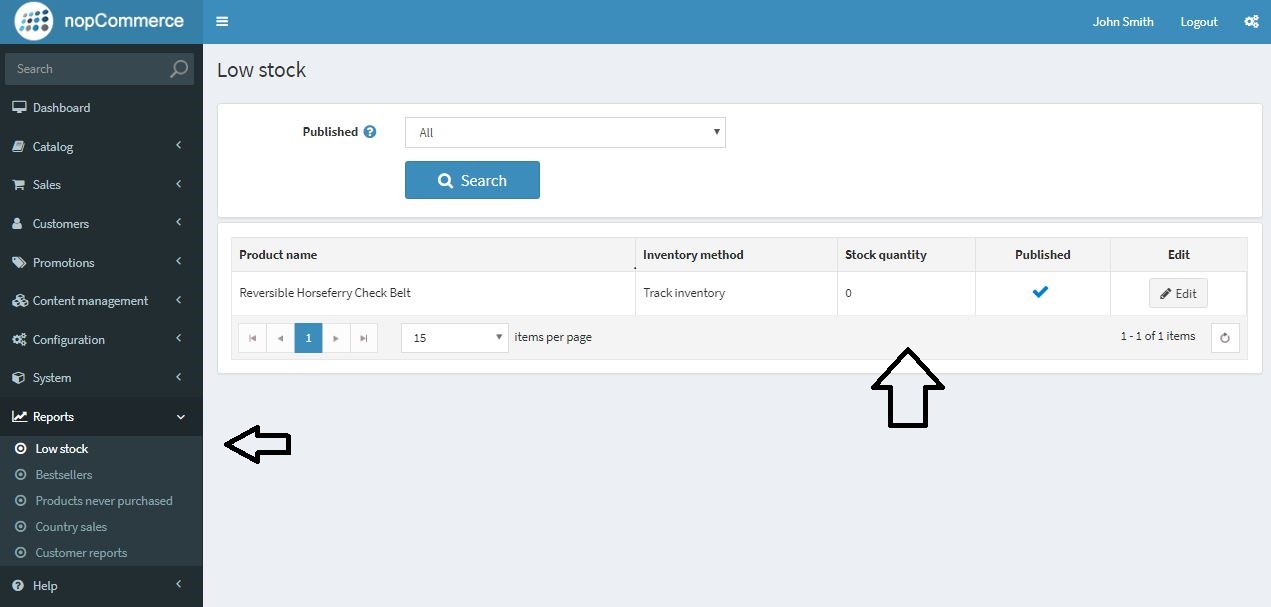
To check low stock products on your eCommerce website go to the NopCommerce Administration Panel click on “Reports” on the left side and then click on “Low Stock”. On the right side, you will see the list of products with low stock.
Prices: The nopCommerce price tool goes beyond simple price tag creation. Ecommerce owners can set different prices for different groups of their customers, hide prices for extra-valuable items. This feature allows you to enable “call for price” option that makes customer contact your sales team for the price. NopCommerce price tool supports “enter your price” functionality in case you are planning for bids and donations.
Downloadable products. NopCommerce also supports the sale of license and user agreement attachments for downloadable products, like music, videos or eBooks. An E-commerce owner can choose from 2 types of download activation: “When order payment status is paid” or “Manual activation”.
Besides these, there are many other product features, such as:
In today’s competitive world, SEO is necessary to increase the visibility of your website in search results. The more visibility your ecommerce website has the more CTR (Click Through Rate) it will have and the more revenue you will earn. NopCommerce offers a comprehensive SEO out of the box. It gives you a full control over keyword tags, customized URLs, Sitemap, etc.
The Default SEO tool in NopCommerce Supports:
Where Can I do Search engine optimization in the Nopcommerce Admin Panel?
In NopCommerce, you can do detailed SEO of the Product, Category, Vendor and Manufacturer
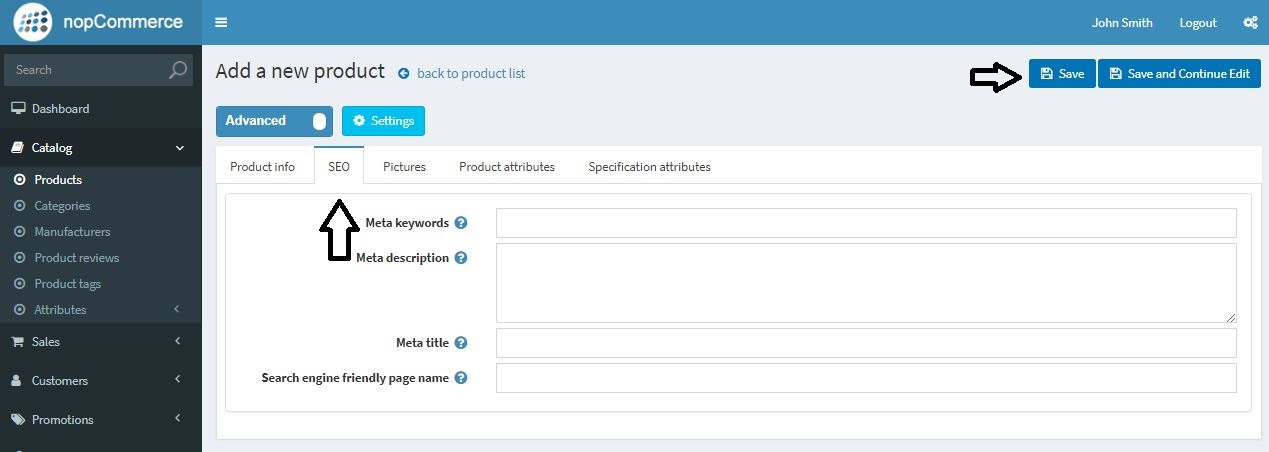
web pages. To SEO your Product Web Page in your Nopcommerce 4.0 CMS go to “Catalog” on the left side and then click on “Products”. On the right side, you will see the Product list.
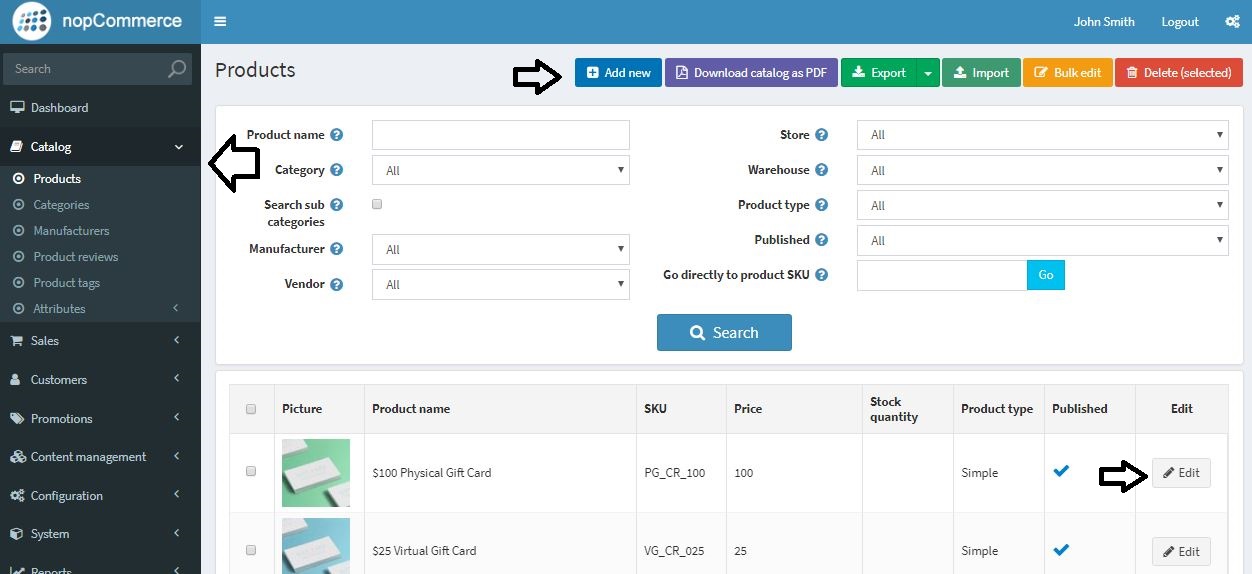
If you want to SEO, the existing products click on “Edit” button in front of the product and if you are adding a new product click on “Add New” on the top. Either way, you will see an “SEO” tab on the next screen, just click on it to optimize your Product Web Page, and then click on “Save” on the top right corner.
The same can be done to perform SEO of Category and Manufacturer web page, just choose the respective entries under Catalog. For Vendor web page SEO, you need to go to “Customers” on the left side and click on “Vendor” and follow the same process as above.
The most crucial moment of a sale is “payment”, the slightest mistake can change customer mood. In the ecommerce business, if the checkout process not implemented well one can experience high bounce rates from online shoppers. NopCommerce by default supports well-designed checkout options that are used by most of the ecommerce website these days. The 2 customer-friendly features of this Default Nopcommerce checkout are:
Anonymous checkout: Many online shoppers prefer an option that allows them to buy the products quickly. Anonymous checkout is like a guest account that allows customers to checkout without creating an account.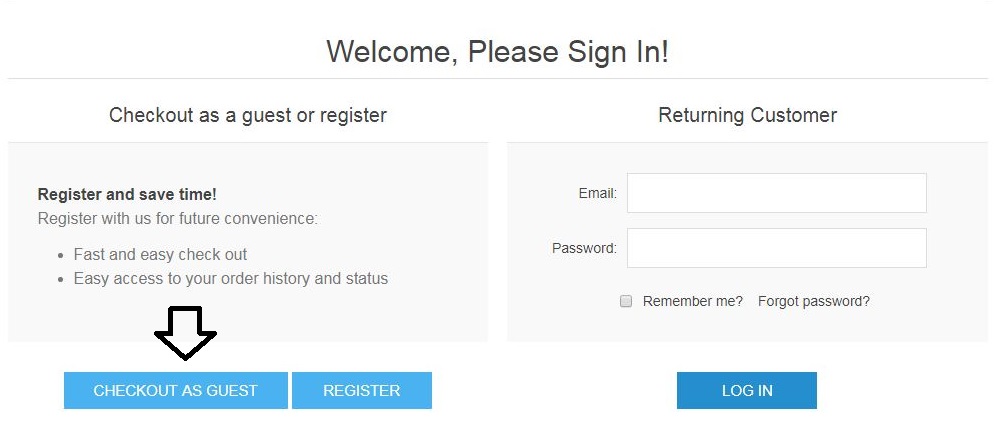
One-page checkout: This feature dramatically reduces the steps and web pages a customer has to go through in the checkout process. Because of its simplicity, the One-page checkout helps you increase revenue and conversion rates by making the checkout easier for customers. 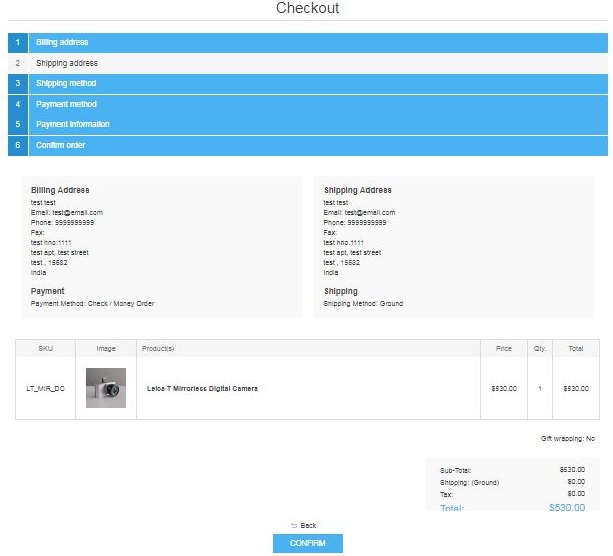
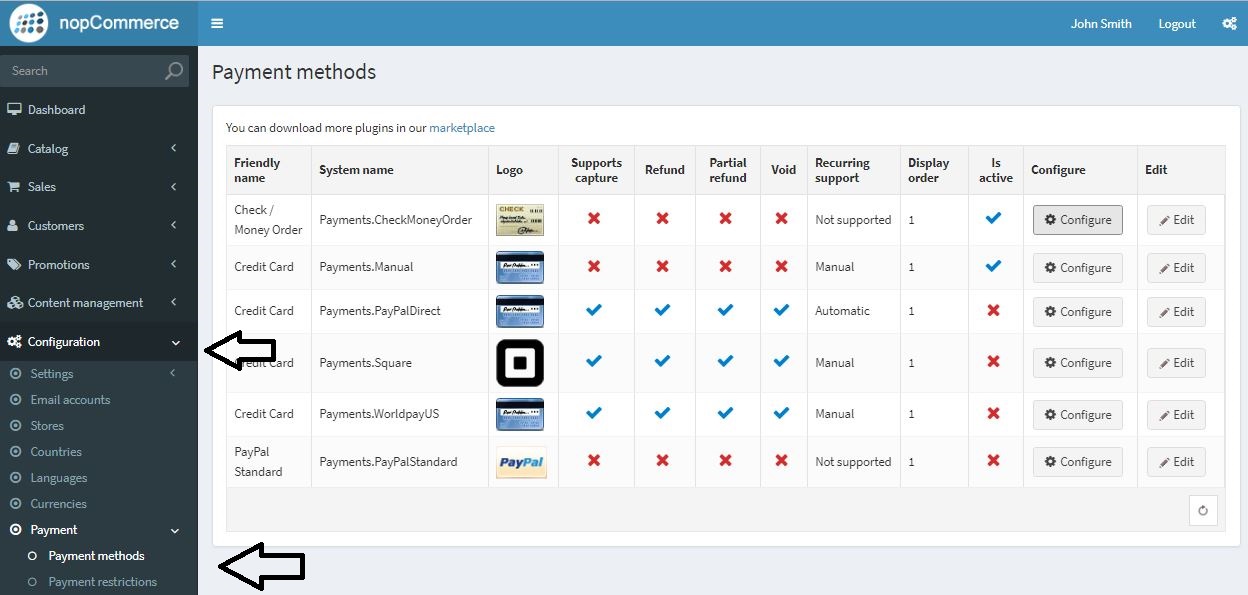
NopCommerce is integrated with more than 50 payment methods and gateways thus giving your customer the freedom to pay the way he or she wishes to pay. All major credit and debit cards are accepted via nopCommerce. You can set the nopCommerce store to authorize only mode, or authorize -capture credit card mode. NopCommerce default payment feature supports refund, partial refund and void functionality.
With nopCommerce you can also set payment preference as per country. NopCommerce has a technology partnership with major payment processors across the globe. This also means nopCommerce users have access to exclusive marketing offers and pricing packages. Some examples of the payment gateways linked to nopCommerce are PayPal, Alipay, Amazon, CCAvenue, WorldPay, and Braintree.
How to implement Payment Method in Nopcommerce?
To implement payment method you need go to the nopCommerce marketplace, select the payment plugin you want and click “Get Extension”. Each Extension has a different process of installation and payment gateway approvals please follow the instruction on the product page. Some examples of nopCommerce payment plugin are Cash on delivery, Pay in store, PayPal, CCAvenue, and so on.
To manage and configure these payment methods in your Nopcommerce 4.0 Administration Panel, go to “Configuration” on the left side and click on “Payment”. On the right side, you will see the Payment Method list, which you can edit and configure them as per your need.
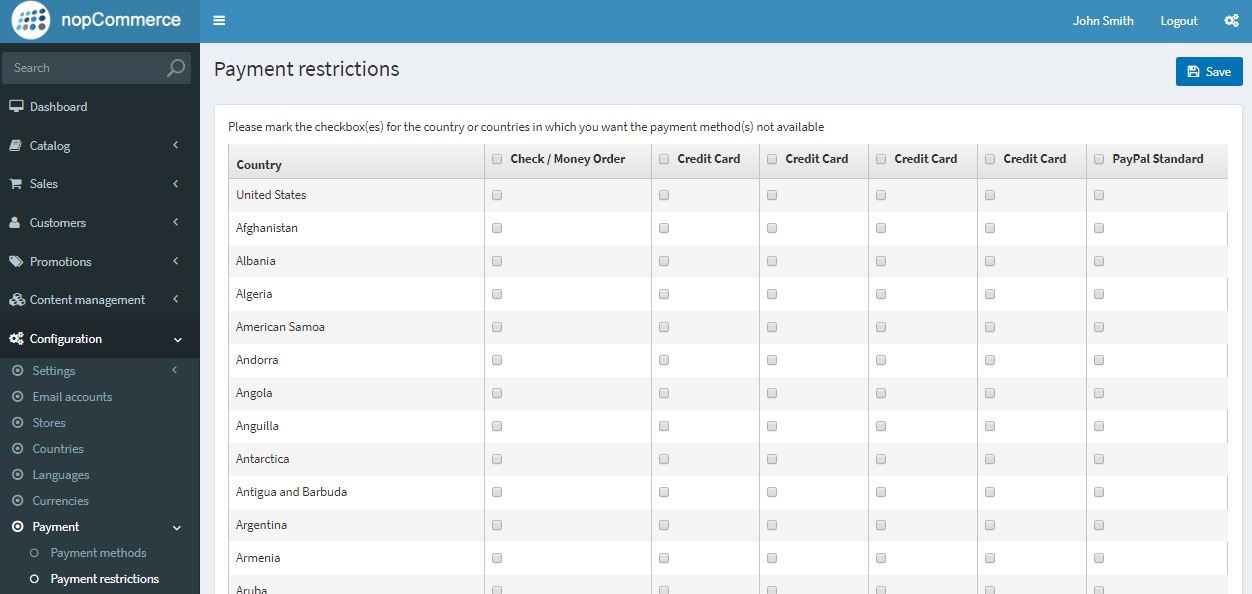
Under option “Payment Restriction”, you can set payment restriction as per country and then click on “Save”.
Marketing tools are necessary for the success of an ecommerce business. NopCommerce offers you a variety of popular marketing features to run marketing campaigns on your ecommerce website. Let us discuss them:
Reward Points System: NopCommerce supports the popular rewards point feature that allows your customers to earn reward points on the money they spend at your web store. This marketing technique makes the customer come back to the website to redeem the earned points to buy additional products on your ecommerce website.
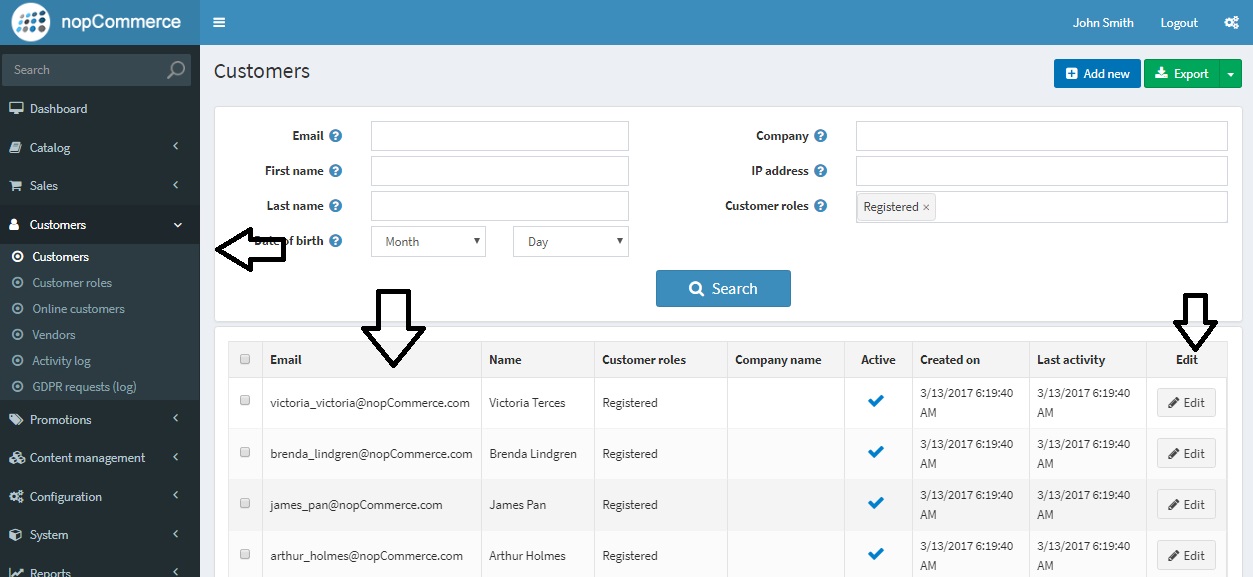
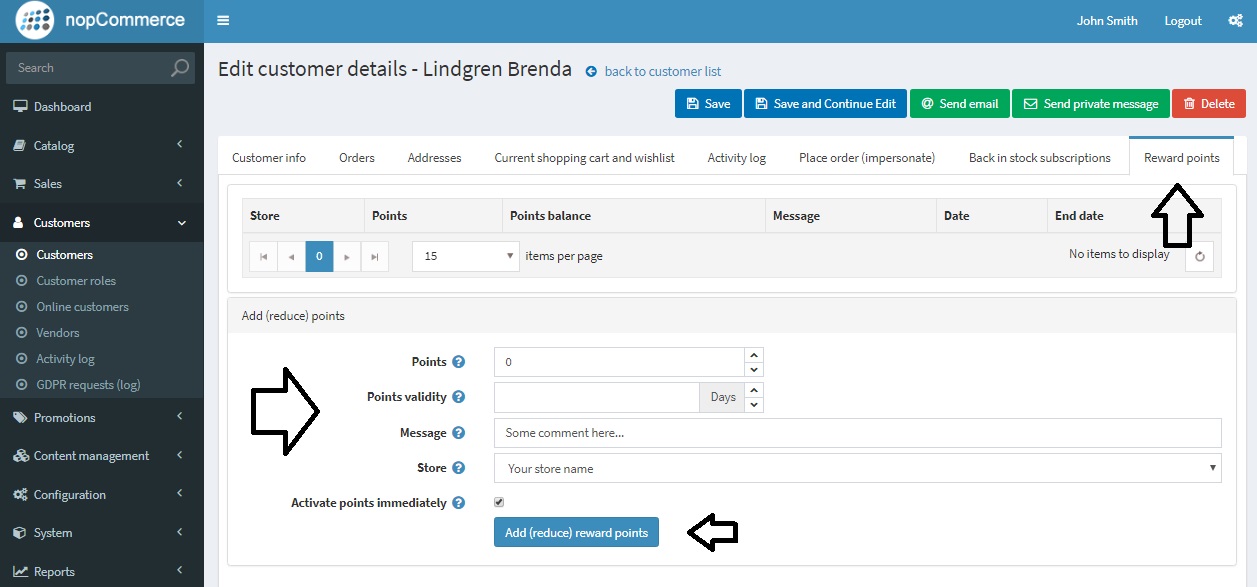
To add reward points in your Nopcommerce Administration Panel, go to “Customers” on the left side and click on “Customers” option. On the right side, you will see the customer list. Click on “Edit” button related to the customer you want to reward.
On the next screen, you will get customer details, click on the last tab “Rewards points”. It will show you “Add (reduce) points” form which you can use to manage reward points. This form allows to add or reduce reward points to a customer account, set validity of those points, add a comment to state reason behind the points and select store ( in case you have multiple stores). Click “Add (reduce) points” button to implement the reward points.
Note: To deduct the redeemed reward points you need to use a negative value.
Related products: Displaying related products is a great tool to upsell while customers browse a product page or before they check out.
Discounts and Coupons: This feature in NopCommerce allows you to:
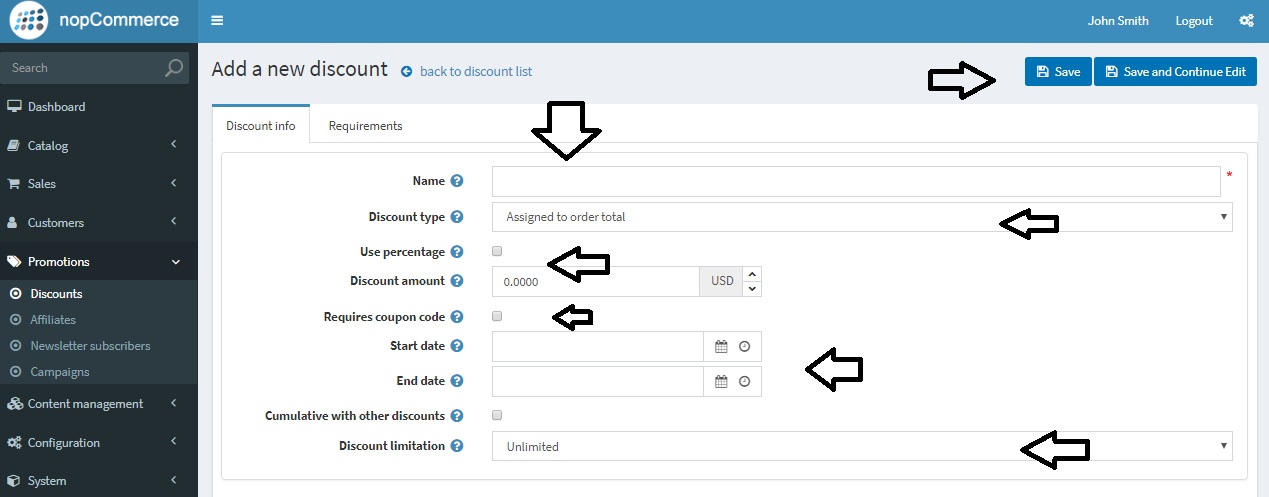
To offer Discounts or Coupons on your eCommerce website log in to your Nopcommerce Administration Panel, go to “Promotions” on the left side and click on “Discounts” option. On the right side, you will see the discount and coupon list. To edit the existing discount or coupon in the list click on “Edit” button related to the discount or coupon you want to edit.
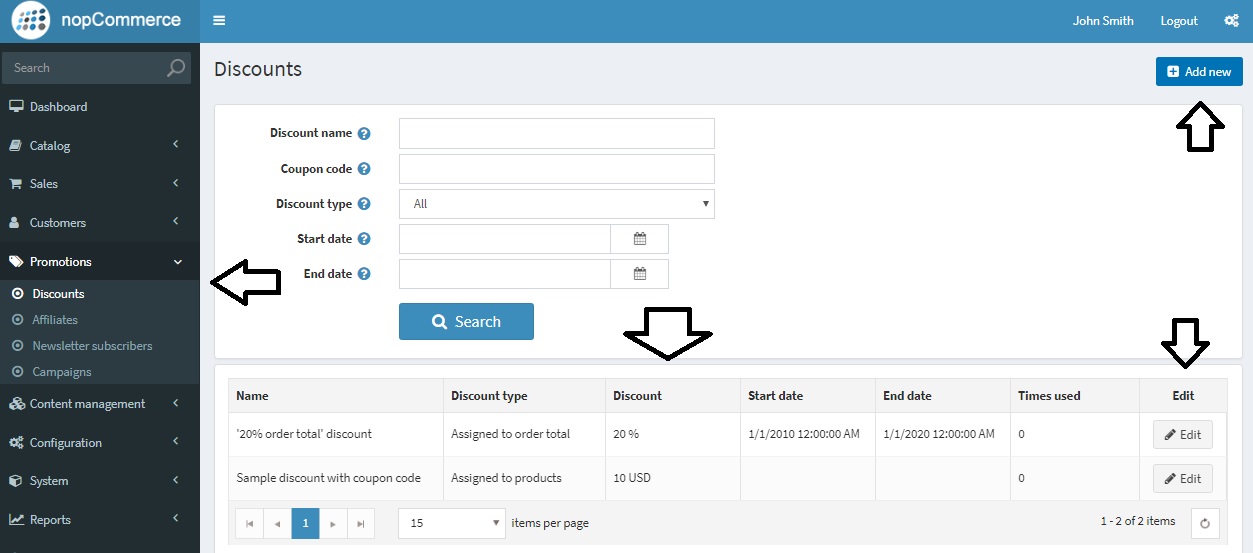
To add new discounts or coupons click on the “Add New” button on the top right of the screen. On the next screen, you will get “Add a new discount” form. You can fill this form as per your need to create new discounts or coupons. This form allows you to set discount types, set percentage or value, set start and end date, and limitations to the discount or coupon you are creating. Click the “Save” button the top right to create the discount or coupon.
Note: If you want to create coupon you need to check the “Requires coupon code” option.
Newsletter subscriptions: Newsletter with offers, promotions, sales news, etc. keeps your customer connected with your ecommerce website. NopCommerce allows your customers to subscribe to newsletters on your ecommerce website. The platform has a tool for creating your own custom newsletters and email campaigns. You can also integrate third-party newsletter services like Mail Chimp, SendinBlue, etc. to your ecommerce website.
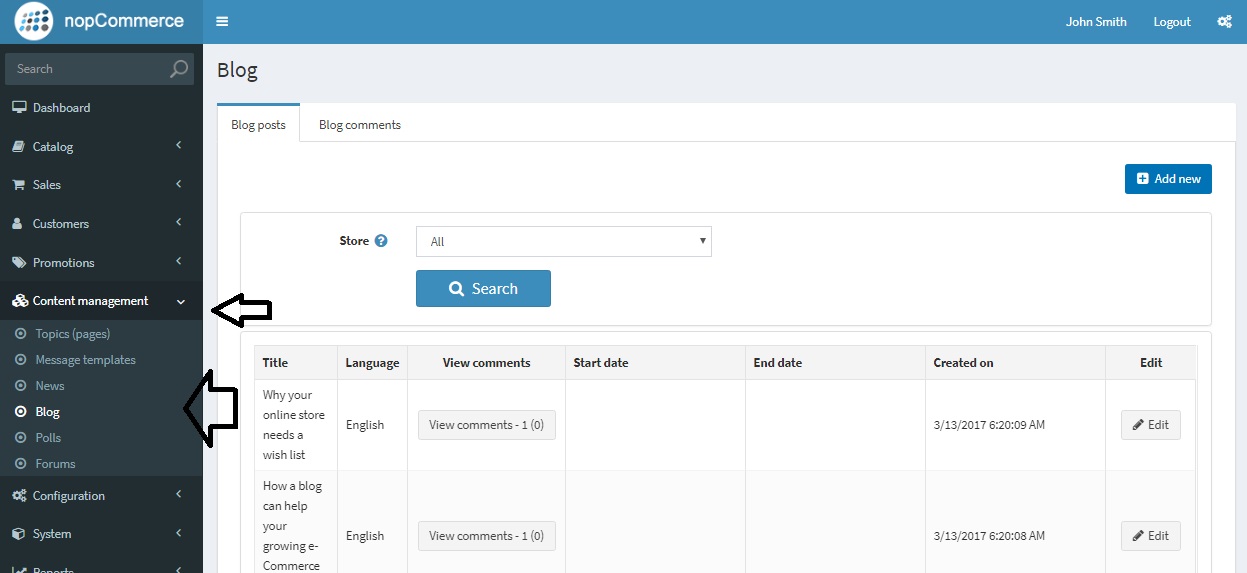
Content: Search engines and customers love fresh content. NopCommerce marketing feature supports news, forums, polls, blog, and custom pages (topics). To publish these from your Nopcommerce Administration Panel, go to “Content management” on the left side and click on the option you want to post.
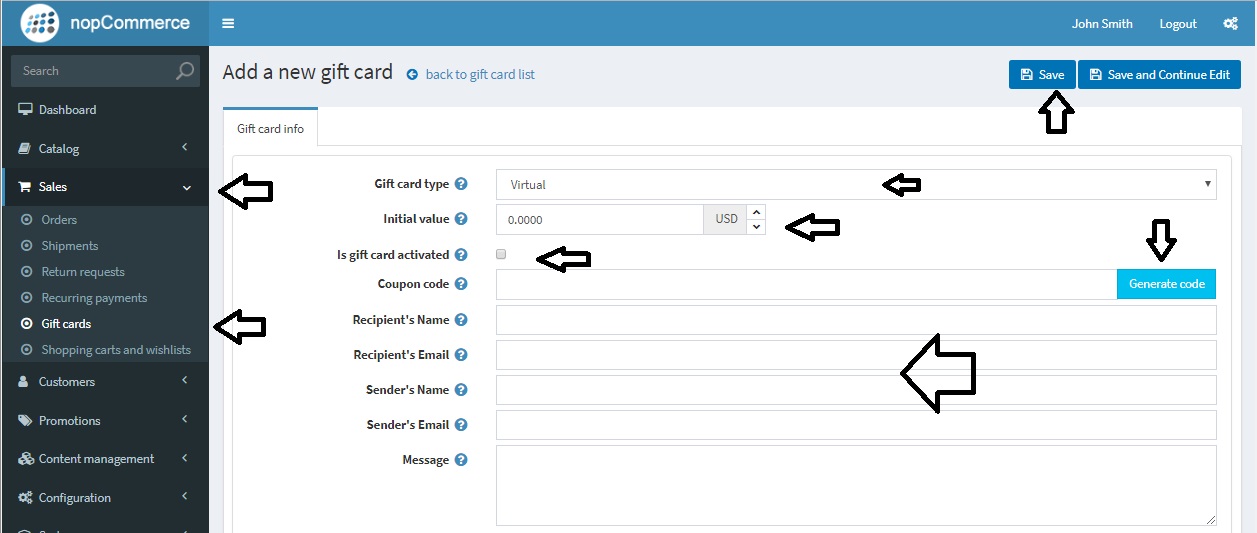
Gift cards: Gift cards functionality is something that every merchant needs, no matter if you are running an online or offline business. NopCommerce supports 2 types of gift cards: classic gift cards the ones sent through the post (physical) and e-gift cards the ones delivered through e-mail (virtual). NopCommerce Gift card feature allows you to generate and maintain unique Gift card code.
To manage or generate a gift card from your Nopcommerce Administration Panel, go to “Sales” on the left side and click on “Gift cards” option. On the right side, you will see the gift card list. Click on “Edit” button related to the gift card if you want to manage it. To add gift card click on the “Add New” button on the top right of the screen.
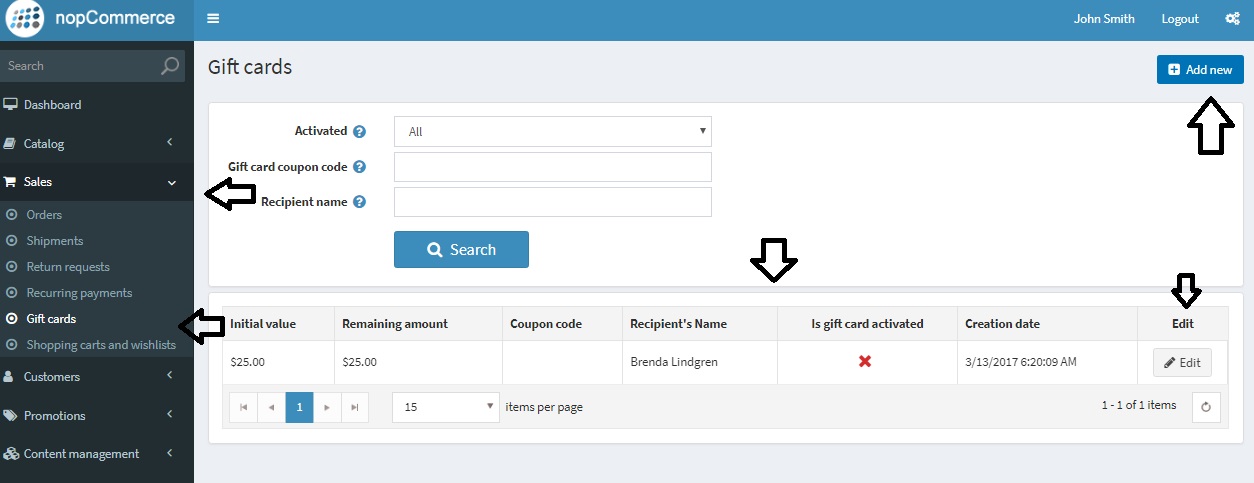
On the next screen, you will get “Add a new gift card” form. You can fill this form as per the customer need or order. The Nopcommerce gift card form allows you to send a virtual or physical gift card, set value, generate a unique code, and customize gift card with customer information. Click the “Save” button the top right to create the discount or coupon.
Note: Do check the “Is gift card activated” to ensure the gift card is active.
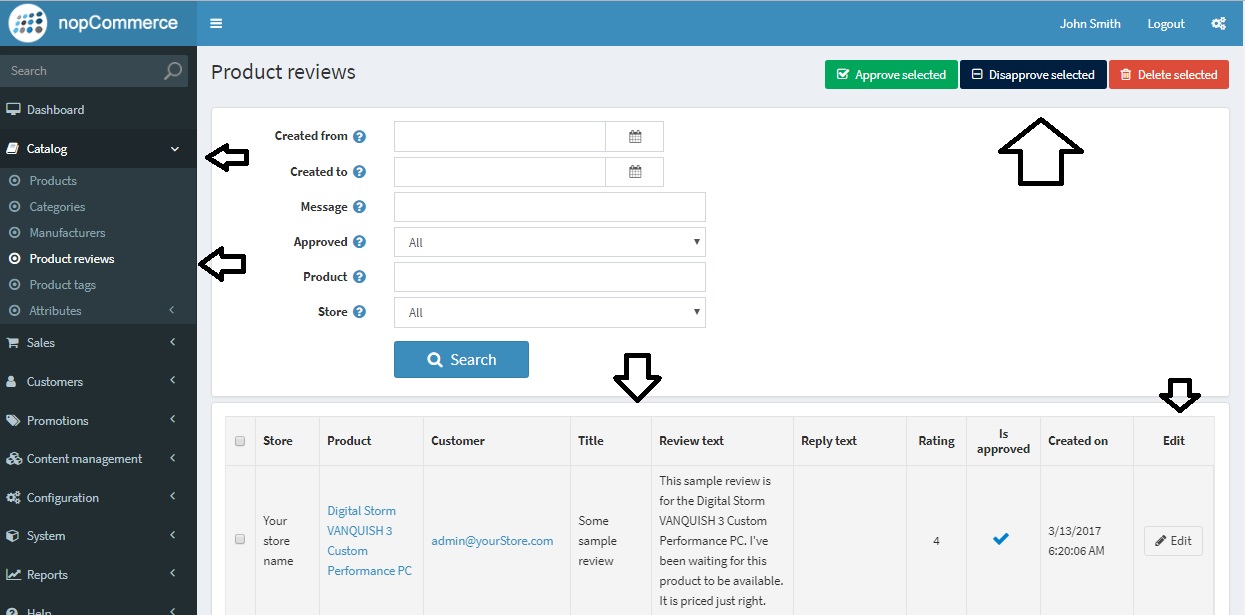
Product reviews and ratings: One of the oldest and the trusted eCommerce Social Proof is Product Review & Rating Product. Reviews and ratings are one of the best ways to do marketing. Asking for feedback on products sold on your ecommerce website gives your customers a voice and at the same time lets the potential customers know what other people think about your products. Along with Reviews and ratings, feature nopCommerce also supports the review helpfulness feature (“Was this review helpful to you?”).
To manage product review and ratings from your Nopcommerce Administration Panel, go to “Catalog” on the left side and click on “Product reviews” option. On the right side, you will see the product reviews list. Click on “Edit” button related to the product review if you want to manage it. To approve, disapprove or delete a review you need to check the box against the review and click the relevant button on the top right of the screen.
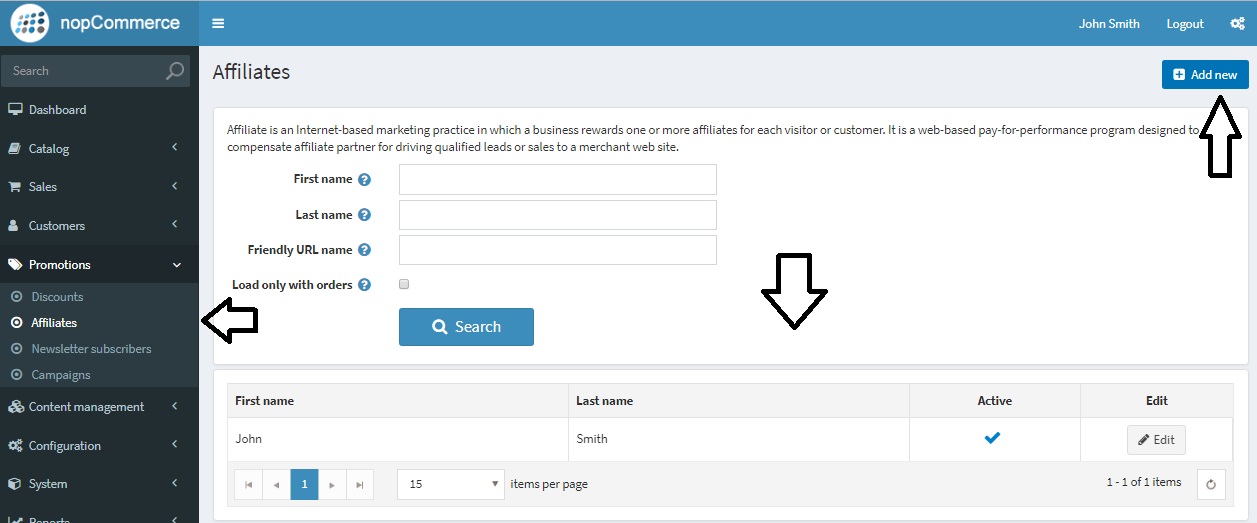
Affiliate program: Affiliate marketing is a type of performance-based marketing in which an ecommerce owner rewards one or more affiliates for each visitor or sale generated by the customer brought by the affiliate’s own marketing efforts.
To add or edit Affiliate in your Nopcommerce Administration Panel, go to “Promotions” on the left side and click on “Affiliates” option. On the right side, you will see the Affiliate list. Click on “Edit” button related to the Affiliate you want to edit. To add an Affiliate to the list click the “Add New” button on the top right and on the next page fill the “Add a new affiliate” form and click “Save” button on the top right.
Product comparison sites: NopCommerce is integrated with all major product feeds such as Google Shopping, Yahoo Shopping, PriceGrabber, and become.com.
Additional Extensions: In addition to out of the box features, you can find many other marketing tools in the nopCommerce marketplace, such as product export to Facebook, SMS notifications to shoppers, etc.
NopCommerce Shipping features are well-designed tools that allow an ecommerce owner to cater their customers throughout the globe. The features are easy to use, flexible and user-friendly. Let us discuss few of them:
Calculation: nopCommerce shipping calculation feature supports flexible calculation mechanisms, you can configure shipping charges in the following ways:
NopCommerce CMS allows you to customize shipping methods as per country. It also allows you to apply “no shipping required” in cases where you are selling downloadable software, downloadable music, services, etc.
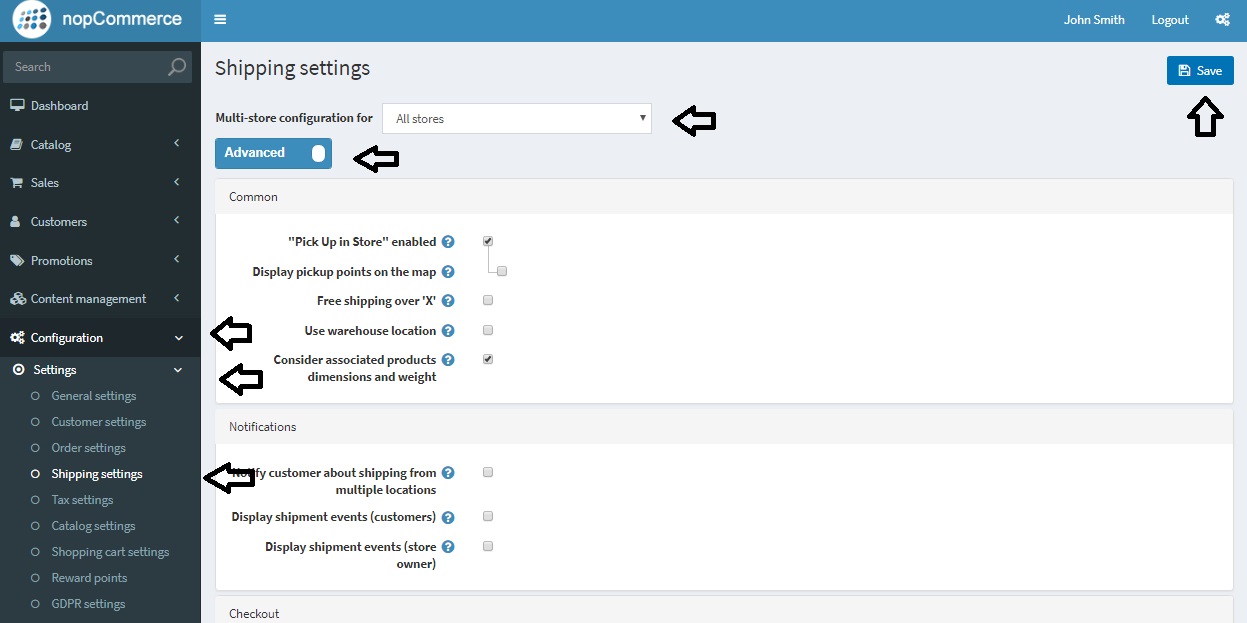
To set shipping settings or calculations in your Nopcommerce CMS, go to “Configuration” on the left side, then choose “Settings” and click on “Shipping settings” option. On the right side, you will see extensive settings for shipping (make sure “Advanced” is turned on). Over here, you can apply your shipping preferences to all eCommerce websites in one go or apply individual settings one at a time. Click on “Save” button on top right to implement the shipping settings.
Addresses: In nopCommerce CMS, you can allow your customers to give two different addresses for billing and shipping. This feature is helpful when a customer wants to send items as gifts. You can also allow the customer to maintain an address book where the customer can maintain as many shipping addresses as he or she wants.
Estimate shipping: This feature helps customers to estimate the shipping rate before starting the checkout process. All the customer needs to do is just enter the country, state and zip code and select one of the shipping options of his or her choice, and their estimated shipping cost will be shown.
Shipping methods: NopCommerce CMS allow the ecommerce owner to define custom shipping methods, for example, Ground shipping, Next Day shipping, 2nd Day shipping, etc. It also allows the ecommerce owner to use popular shipping carriers, for example, UPS, USPS, FedEx, etc. By default, nopCommerce is integrated with major shipping carriers around the world. Your customers can choose their preferred shipping method and carrier based on their experience, budget, or destination.
To manage shipping methods and computation in your Nopcommerce CMS, go to “Configuration” on the left side, then choose “Shipping” and click on “Shipping providers” option. On the right side, you will see the Shipping providers list. Click on “Edit” or “Configure” button related to the Shipping provider you want to edit or configure.

Pickup Points: NopCommerce cms support the in-store pickup feature. This allows the ecommerce owner to configure pickup locations where customers can go to pick up their orders.
To manage Pickup points in your Nopcommerce CMS, go to “Configuration” on the left side, then choose “Shipping” and click on “Pickup points” option. On the right side, you will see the list of Pickup point providers. Click on “Edit” or “Configure” button related to the Pickup point provider you want to edit or configure.

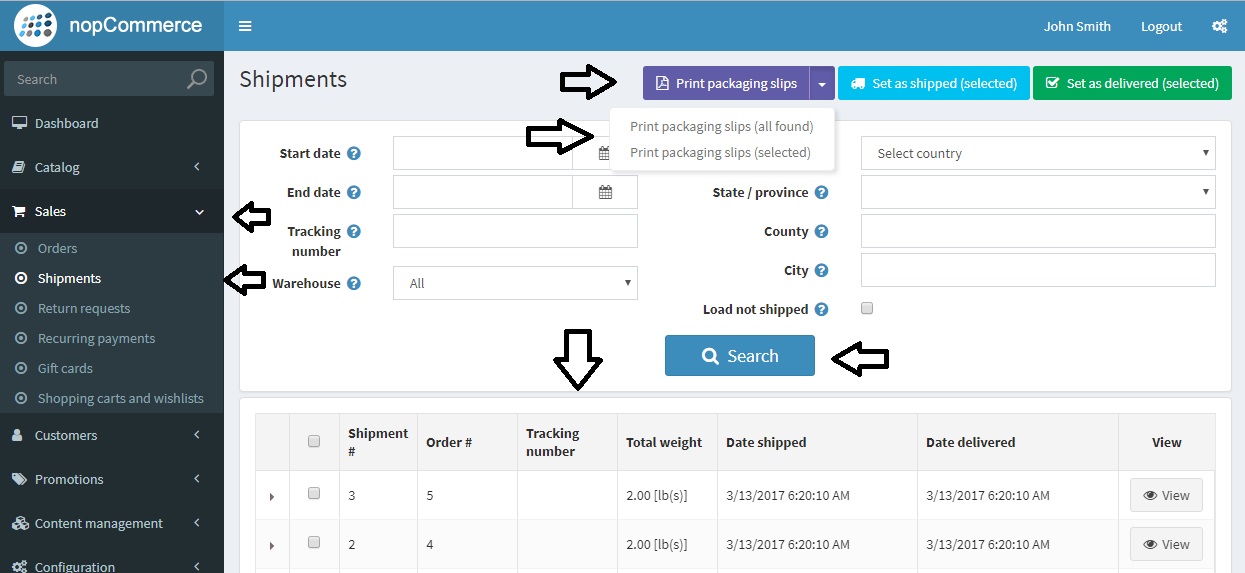
Packing slips: NopCommerce supports the creation of packing slips. This feature also supports multiple shipments per order along with tracking numbers. Customers can easily track where their shipments are at their convenience.
To create packing slips in your Nopcommerce CMS, go to “Sales” on the left side and click on “Shipments” option. On the right side, you will see the list of orders from your eCommerce websites. Over here, you can search for orders that are waiting for shipment. You can generate packing slips in 2 ways “Print packing slips (all found)” based on the order search query or “Print packing slips (selected)” to print selected orders. To generate packing slips click the down arrow on the “Print packing slips” button and choose the desired option.
The Tax feature in nopCommerce allows you to assign tax to the order category wise and country/ state wise. NopCommerce offers you the flexibility to take care of your ecommerce website’s legal requirements, your preferences, and expectations of your customers. You can easily manage all tax settings and details in the nopCommerce administration panel.
Given below is the NopCommerce Tax features list:
How can you set Tax in the nopCommerce admin panel?
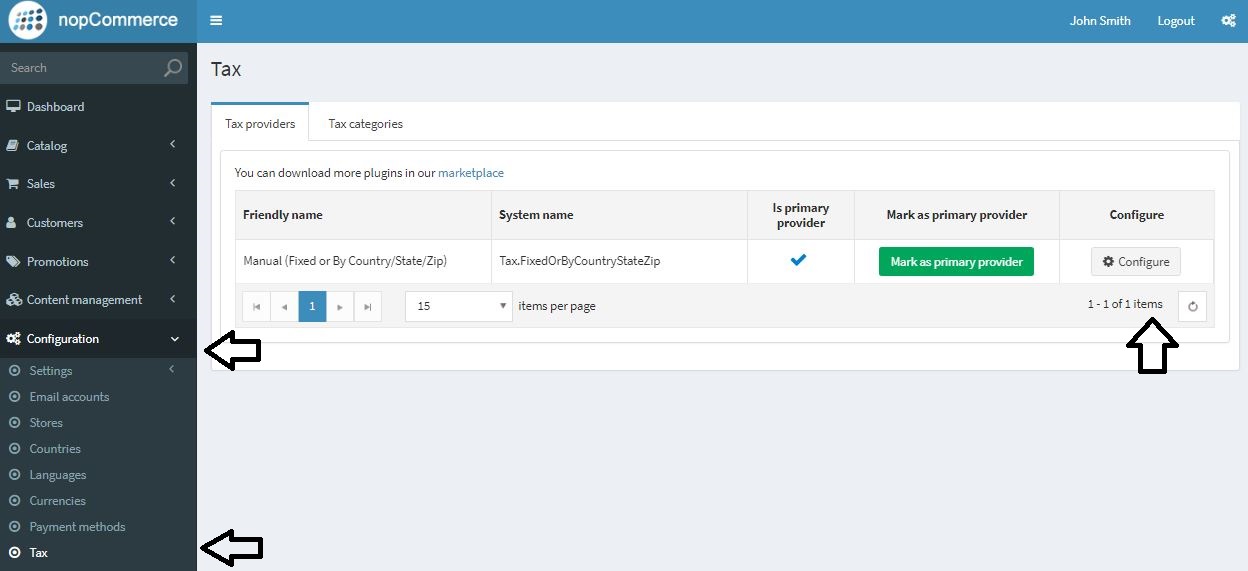
To make changes to tax in your Nopcommerce 4.0 Administration Panel go to “Configuration” on the left side and then click on “Tax” option. On the right side, you will see 2 tabs “Tax Provider” and “Tax categories” . To set taxes you need to click on “Configure” in the “Tax Provider “tab.
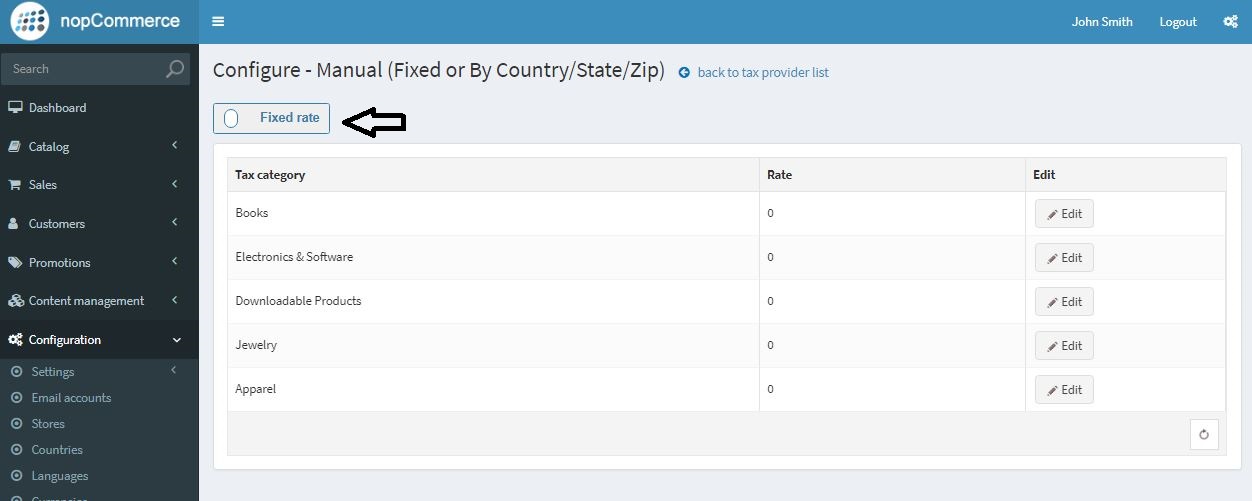
After clicking “configure” you will get 2 options “Fixed Rate” and “By Country”. You need to set your tax as “Fixed Rate” if you are targeting different countries with same category tax or a single country that has same tax across all its states.
Choose “By Country” option if you are targeting regions or countries with different tax slabs. To add different regions or countries under “By Country” option you need to fill the “New tax rate” form, and then click “Add Tax Rate” button. This will add a new tax entry in the List on the same page. You can change the tax setting of each entry whenever you want by clicking “Edit” button for the respective country.
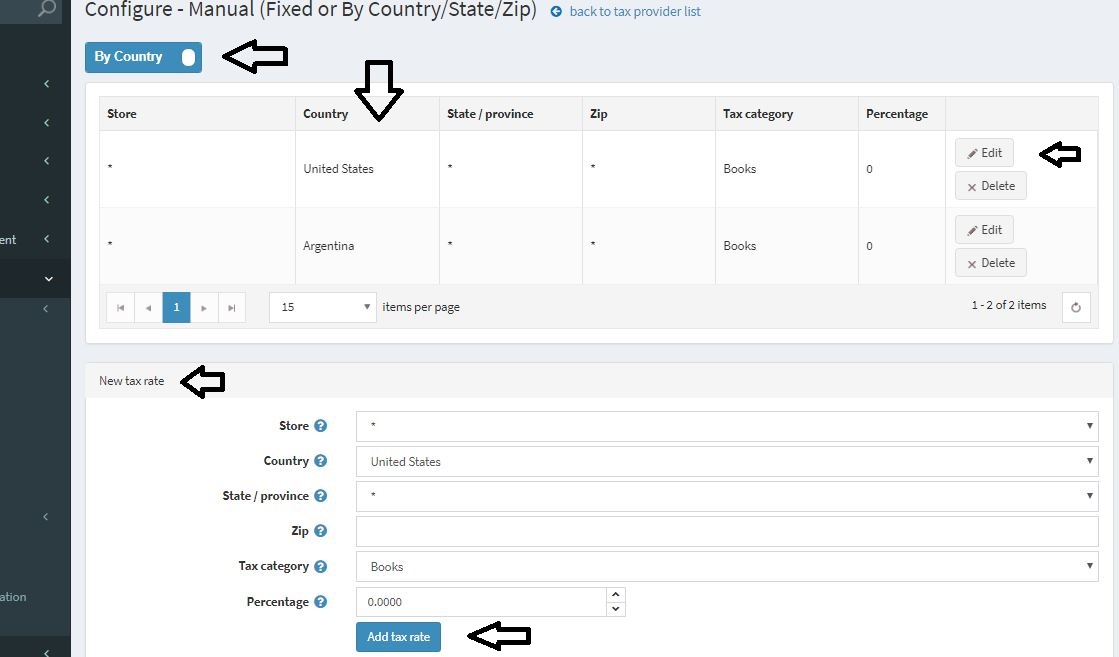
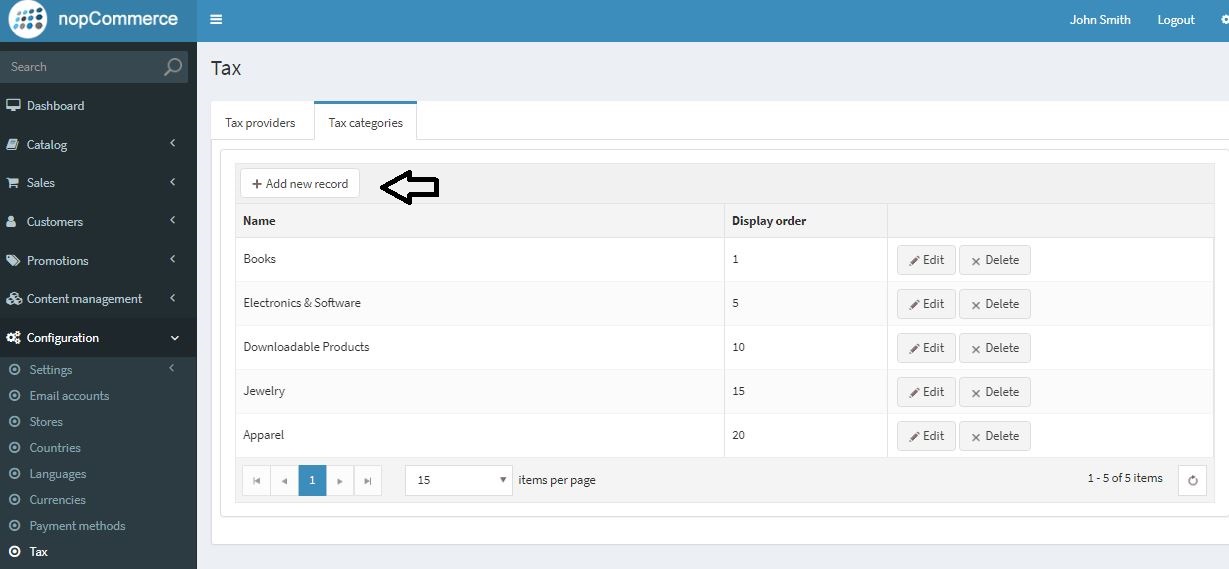
If you are introducing more categories to your nopCommerce store and want to add more tax category click on “Tax categories” tab and then click on “Add new record”. Name the new record and click “Update”. You also can edit the tax for the new category by going to the “Tax Provider” tab and then clicking on Configure.
NopCommerce offers some great customer service tools by default, which can help you, provide High-Quality Customer Experience to your customers through your ecommerce website. Let us discuss some important ones:
Other nopCommerce Customer service features include:
Wherever there is money, there are fraudsters, and to prevent it there is Security. NopCommerce is all about ecommerce, which involves money transaction, thus the nopCommerce team takes security very seriously . Since its founding in 2008, nopCommerce have only had to issue one security patch.
PCI-DSS Compliance Preserves Customer Trust, Ensure Compliance, & Benefit Your Organization.
Today, nopCommerce is PCI-DSS compliant, so you can rest assured that the software powering your ecommerce website is safe, secure, and well equipped in handling your customer’s information and financial transactions. Besides this, all nopCommerce shopping carts by default come with support for SSL certificates, so you do not have to do any type of manual configuration.
If you are a bit technical, you can easily download and install nopCommerce on your computer (local machine). Just follow the steps shown below or you can also watch the video published by us. You can also install nopCommerce automatically and securely with a single click using the Microsoft Web Platform Installer.
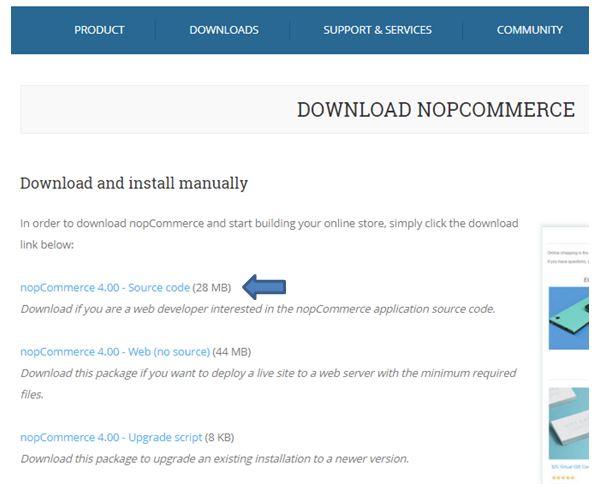
Let us discuss the best way to install nopCommerce the “Source code method” . Before we begin, make sure your system adheres to all minimum requirements to install NopCommerce. Also, make sure that you have already purchased your ecommerce domain name and hosting.
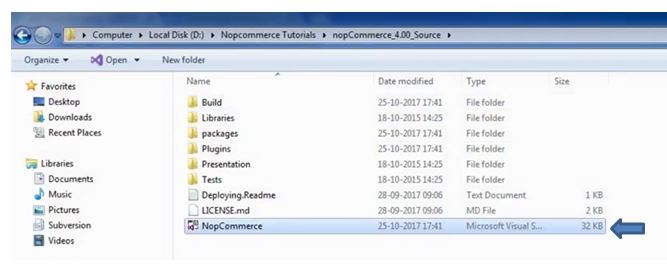
Step 1: Download the Latest version of NopCommerce.
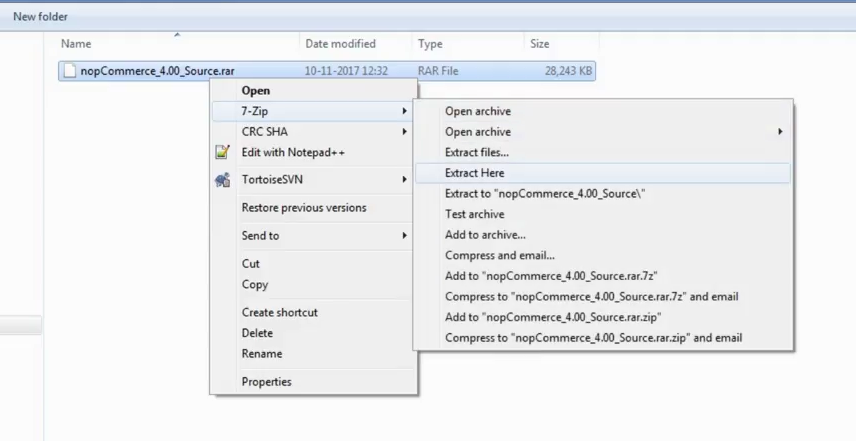
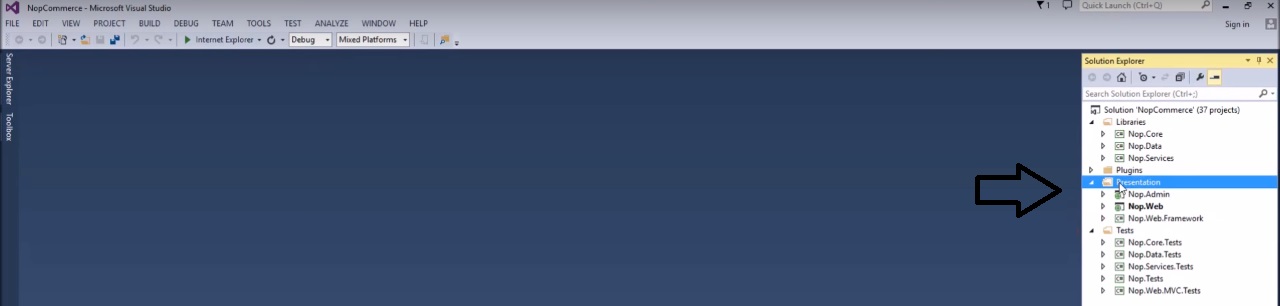
Step 2: Load NopCommerce Installation Screen.

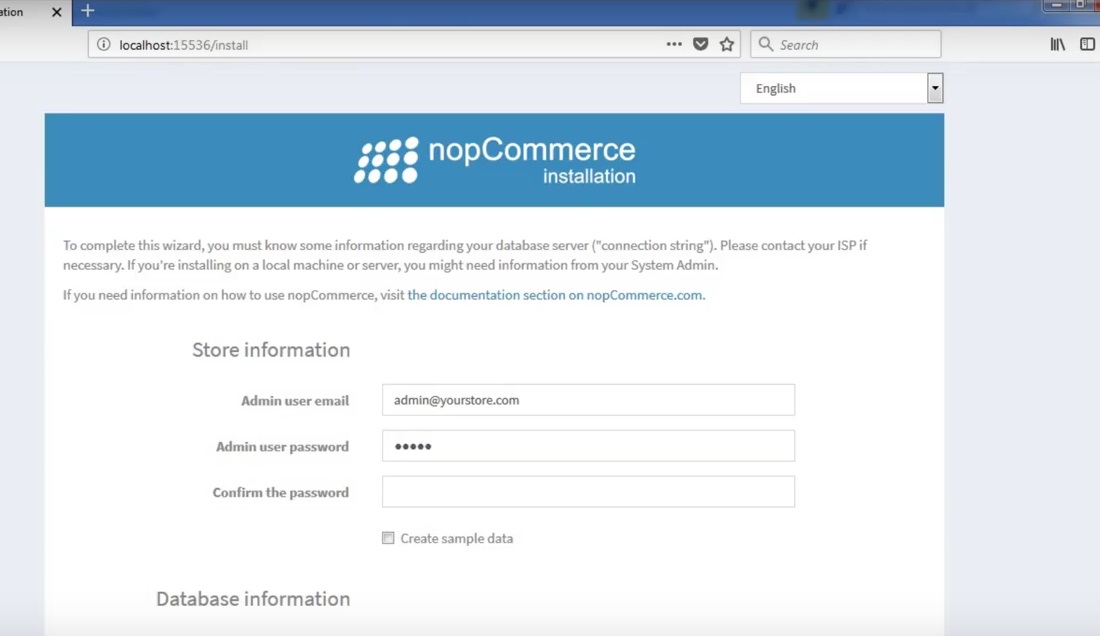
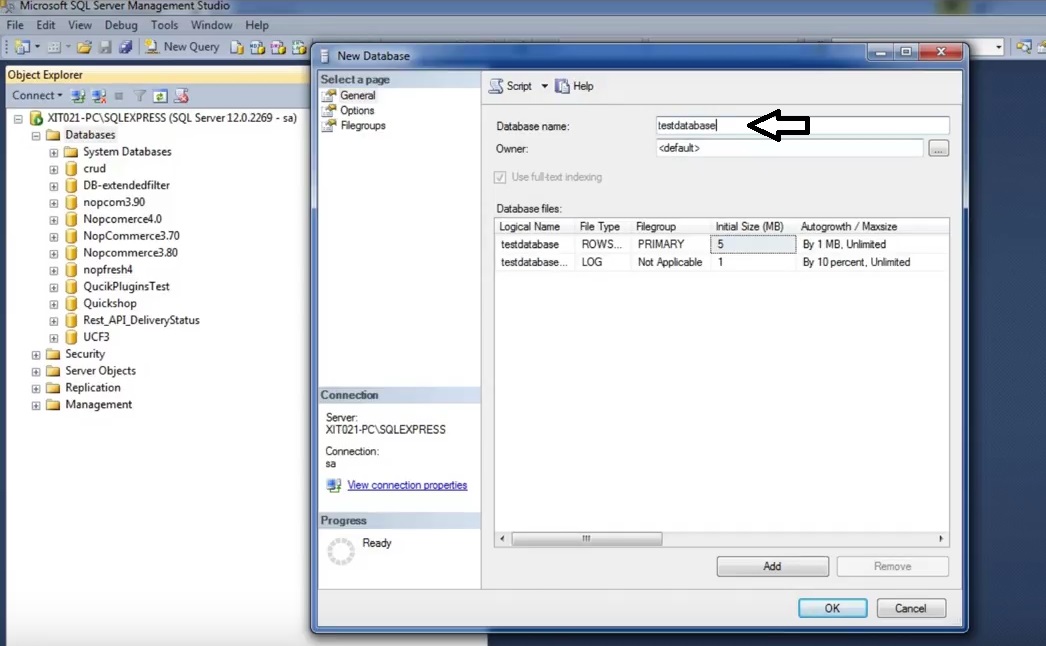
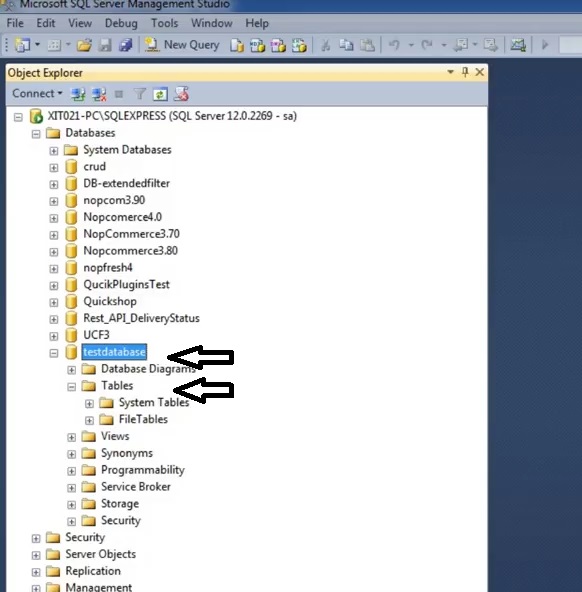
Step 3: Create Database to Install nopCommerce.


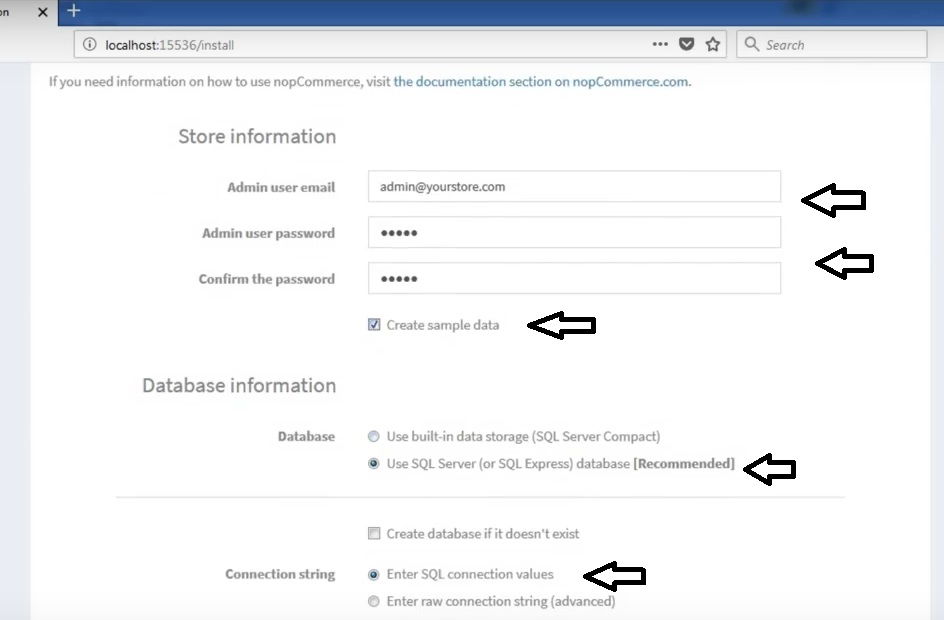
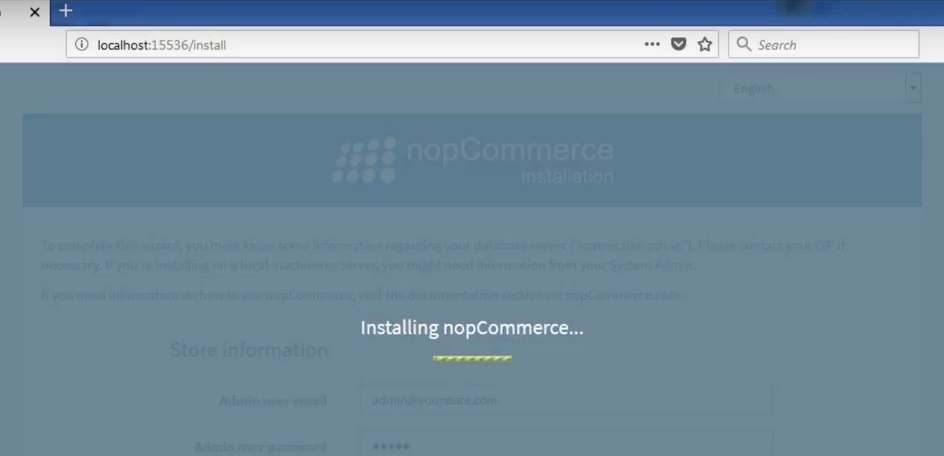
Step 4: Completing nopCommerce installation.
Important Note: Please make sure you note down Administrator credential, as they will be needed to make changes to your ecommerce website.


If the free features provided by nopCommerce are not good enough and you can shell some bucks and get premium add-ons to make your eCommerce website distinct. You can go for paid themes, extensions, support, plugins, skins, and designs that the NopCommerce marketplace offers.
Nopcommerce offers top quality free support to its users and developer through its comprehensive Documentation, Community Forums, Blogs, Release Notes, Events, and Webinars. NopCommerce user forums are lively and informative. Users regularly post suggestions, answer each other’s questions and request bug fixes. In response to user and market needs the developers continually release new versions, plug-ins, translations, and themes in the nopCommerce marketplace.

Most of your queries are sorted out at these platforms however if you need any personal support you can opt for Nopcommerce Premium Service or hire a nopCommerce professional services.
NopCommerce can be used free of charge under one condition that you allow the “Powered by nopCommerce” tag appear at the bottom of each webpage of your eCommerce website.

According to the terms of use, NopCommerce prohibits you to remove or hide “Powered by nopCommerce” statement. The only way you can remove or hide the “Powered by nopCommerce” statement if by purchasing a copyright removal key . There are 3 types of keys available that allows you to remove the tag:
In the ecommerce business, the speed of your website and its web page plays a vital role in its conversion rate. A study states, if an eCommerce website makes $100,000/day, a delay of 1 second in the page speed could possibly cost it $2.5 million in annual lost sales.
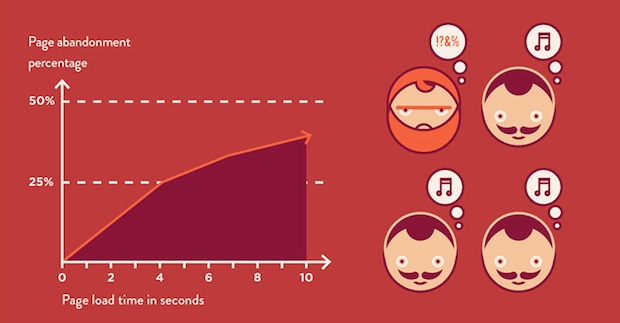
Source: fastcompany.com
You can avoid this performance nightmare by using Apache Solr based extension that transforms nopCommerce into high-performance e-commerce site thus delivering an excellent customer experience to the online shoppers visiting your ecommerce website.
NopCommerce gives you a lot of freedom to build an ecommerce website you desire. Besides being Free, NopCommerce has a host of effective tools and features, well organized and easy to navigate admin panel, scalable and easy to customize the design. It is a robust ecommerce platform , which caters to everyone needs. Be it a small startup looking for a quality but budget-friendly ecommerce website or a large well-funded business looking for a highly scalable and customizable e-commerce platform with superior functionality. NopCommerce easily stands its ground when compared with other top enterprise solutions and fits today’s highly competitive business environment.

Our Other Must Read Articles on eCommerce are:
Comments are closed.