Why Customer Service Automation Is One of the Most Valuable AI Use Cases in eCommerce
In our previous blog, we explored several AI use cases shaping modern eCommerce. Here, we’ll focus on one of the most valuable and widely adopted applications: customer service automation.
Most eCommerce stores start automation the wrong way. They implement a tool expecting it to solve every support challenge, only to find customers still frustrated and support tickets still growing months later.
The problem is not automation itself. Most stores simply automate the wrong things first or choose the wrong approach.
This blog explains what customer service automation actually means in eCommerce, what support tasks are worth automating, where stores go wrong, and how to implement it effectively.
What Customer Service Automation Actually Means in eCommerce
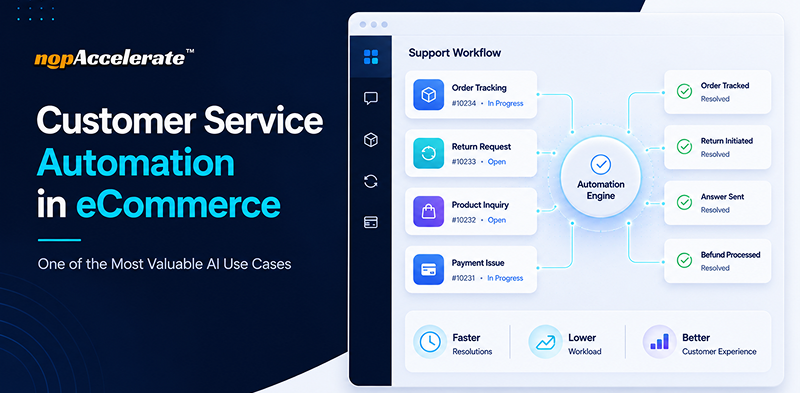
Customer service automation is not about replacing your support team. It is about removing repetitive, low-complexity tasks so agents can focus on conversations that require human judgment and problem-solving.
In eCommerce, that repetitive workload is significant. Questions like “Where is my order?”, “What is your return policy?”, “Do you ship to my state?”, and “How long does delivery take?” make up a large share of support requests.
These questions do not require experience or empathy. They require accurate information delivered instantly, which is exactly what automation is built for.
According to Salesforce, AI already resolves about 30% of customer service cases as of 2026, and that number is expected to hit 50% by 2027. That is not a future trend. It is already happening in stores that have identified the right support processes to automate.
Why Customer Service Became One of the First AI Investments in eCommerce
AI is transforming every area of eCommerce, from personalization and product discovery to inventory management and pricing. Yet customer service remains one of the first places businesses invest in AI.
The reason is simple. Customer support directly affects both customer experience and operational efficiency. Every unanswered question impacts the customer, while every support ticket adds pressure to the business.
Unlike many AI initiatives that take time to show results, customer service automation often delivers value quickly. It helps businesses reduce response times, handle repetitive inquiries at scale, and free support teams to focus on more complex conversations.
For many eCommerce companies, it is often the first step in their AI journey.
The Three Layers of Customer Service Automation in eCommerce
Before automating customer support, it helps to understand how support requests typically break down. Most eCommerce interactions fall into three distinct layers.
Layer One: Routine Information Queries
These are questions with clear, factual answers, such as shipping timelines, return policies, payment methods, order status, product availability, and size guides.
These queries can be answered instantly and accurately through automation, allowing support teams to focus on more valuable work.
Layer Two: Product Discovery and Guidance
This layer is more complex. A shopper searching for “waterproof boots for construction work under $80” needs a relevant product recommendation, not a link to a category page.
To handle these requests, the automation system must understand intent and search product data in real time. Basic automation tools often struggle here, while AI-powered solutions connected to your product catalog can provide meaningful answers.
Layer Three: Complex and Emotional Conversations
Some situations still require human involvement. A damaged order, a custom B2B request, or a frustrated customer after a delivery issue often needs empathy, judgment, and problem-solving.
The goal of automation is not to replace these conversations. It is to remove routine requests so support teams can focus on the interactions that matter most.
Why Customer Service Automation Is One of the Most Valuable AI Use Cases in eCommerce
For most eCommerce businesses, customer service automation solves a challenge that already exists: growing support volume.
Unlike AI initiatives that focus on a single function, customer service automation impacts multiple business goals at once:
- Faster customer response times
- Lower operational costs
- Improved support efficiency
- Better customer experiences
- Greater scalability as the business grows
That is why customer service automation is often one of the first AI investments businesses make and one of the easiest to measure.
Where Most eCommerce Stores Go Wrong With Automation
Stores that struggle with customer service automation usually make one of three common mistakes.
Mistake One: Choosing a Rule-Based Bot and Calling It Automation
There is a significant difference between a rule-based chatbot and an AI-powered support tool.
Rule-based bots rely on keywords and scripted responses. If a customer phrases a question differently, the bot often fails to understand the request, creating a frustrating experience.
AI-powered tools work differently. They understand intent, allowing them to recognize that “Can I get my money back if I do not like it?” and “What is your refund policy?” are asking the same thing.
Chatbot industry research shows that 88% of people used a chatbot in the past year, and over 80% had a positive experience. However, many businesses still rely on rule-based systems that often fall short of customer expectations.
Mistake Two: Automating Without Connecting to Store Data
A chatbot that cannot access store data is little more than a FAQ page with a chat window.
For automation to work in eCommerce, it must connect to product catalogs, inventory systems, order management platforms, and store policies. Without those connections, responses remain generic and often unhelpful.
Whether a customer is asking about a product, an order, or current inventory, access to real store data is what makes automation useful.
Mistake Three: Setting It Up Once and Walking Away
Customer service automation is designed to reduce manual work, not create more of it.
However, stores still need to review and update their automation periodically as products, policies, and customer questions change. In most cases, a monthly or quarterly review is enough to keep responses accurate and relevant.
If automation is never updated, response quality can gradually fall behind the business it is meant to support.
What Customer Service Automation Gets Right When Done Properly
When customer service automation is implemented with the right tools and integrations, the results are measurable.
According to Gartner, the average cost of a human agent interaction is $6.00, compared to $0.50 for an AI chatbot interaction. Studies also show that businesses using AI for customer service reduce support costs by an average of 30%.
For most eCommerce businesses, however, the bigger advantage is response time.
88% of customers expect faster responses than they did a year ago. Automation helps businesses meet those expectations by resolving routine inquiries instantly, regardless of support hours.
For example, a shopper visiting your store late at night may have a question about returns before completing a purchase. Instead of waiting until the next business day, they receive an immediate answer and can continue their buying journey.
The Types of Queries That Are Ready to Automate Right Now
The most successful automation projects start with the right types of customer inquiries.
Policy and Store Information
Return policies, refund timelines, shipping costs, delivery windows, payment methods, business hours, and contact details are ideal candidates for automation because the answers are consistent and rarely change.
Product and Catalog Questions
A shopper searching for “women’s running shoes in size 8” needs a relevant answer, not a category page.
Connected to product data, AI can handle product searches, specification questions, compatibility checks, and recommendations in real time. This improves product discovery while reducing support workload.
Order Status for Logged-In Customers
Order tracking is one of the most common support requests and one of the easiest to automate.
Customers should be able to ask “Where is my order?” and receive a real-time answer pulled directly from their account without requiring agent involvement.
Frequently Asked Questions
Sizing guides, care instructions, product compatibility, and other fact-based questions are ideal candidates for automation, freeing support teams to focus on more complex inquiries.
How to Figure Out What to Automate First in Your Store
Start by reviewing the last 30 days of support tickets or customer emails.
Most eCommerce businesses find that a small number of recurring questions generate the majority of support volume. In many cases, five or six topics account for 60% to 70% of all inquiries. Those are your best automation opportunities.
If the most common questions involve shipping, returns, policies, or order status, they can often be automated immediately. If product discovery questions are common, choose a solution that can access your catalog and understand natural language.
Once automation is live, review conversations periodically to identify gaps and improve responses. Businesses that achieve long-term success make small adjustments over time as customer questions, products, and policies evolve.
Conclusion
Automation is not a shortcut. It is a smarter way to run support. When you automate the right queries with the right tool, your team works better, your customers wait less, and your store runs smoother around the clock.
Next up, how AI chatbots specifically handle eCommerce customer support, what they can actually do inside your store, and what to look for before you choose one.