nopAccelerate

Faster, scalable and reliable nopCommerce.

nopAccelerate Blog - Updates, News, Tips & Tricks

Top reasons Why Your Ecommerce Conversion Rate Drops And How Better UX Reclaims Revenue – 2026

Ecommerce conversion rate drop shown with falling graph and abandoned shopping cart

If you ask most eCommerce teams why conversion rates fall, they usually point to pricing, marketing, or competition.

But when you study real shopper behavior across thousands of sessions, a surprising pattern shows up:

Most people never fail at buying, they struggle before they even start.

Get stuck at the login step.
Lose trust in the first 10 seconds.
Hesitate when the store asks for more than it gives.

And this small moment, the first interaction between your store and your shopper decides how many people stay, how many leave, and how many eventually buy.

In a world where the average cart abandonment rate is 70.19% (2025) and retailers lose roughly $18 billion each year because of it, improving the shopper’s ecommerce journey is no longer optional. It’s the only way modern stores maintain a healthy ecommerce conversion rate.

This blog explains, in simple terms, why conversions drop, what shoppers actually face, the issues most teams never notice, and the UX improvements that rebuild trust and revenue at scale.

The Hidden Drop-Off Zone That Sabotages Your Ecommerce Conversion Rate

For years, most teams assumed the real conversion bottleneck lived inside the checkout flow.

Payment failures, unexpected shipping costs, slow loading pages these were the usual answers everyone relied on.

But once companies started studying real behavior through deeper analytics, session replays, and shopper-journey mapping, a different picture became clear:

The biggest losses don’t happen during checkout, they happen much earlier, at the login or account-creation step.

And the reason is simple:

This is the moment where a shopper decides whether your store feels trustworthy, convenient, and safe enough to continue.

Too Many Stores Make Customers “Work” Before They Are Ready

We forget this :
Customers don’t come to your store to create an account.
Not to remember a password.
Don’t come to confirm an OTP.
But they come to shop. That’s it.

Every extra action you place between them and browsing creates resistance.

Many stores unintentionally add friction without noticing:

  • Mandatory signup before browsing
  • Login walls blocking key actions
  • Password requirements that feel too demanding
  • Multi-step OTP loops
  • Slow or confusing UI
  • Poor or slow site search
  • Forms that request personal info too early

These design choices may appear small, but in real user sessions, they push people away long before the cart appears.

Why Shoppers Lose Trust in the First FewMinutes

Trust is not some big psychological concept:  in eCommerce, it’s practical.
People decide within seconds:

“Is this store safe?”

“Will my information be secure?”

“Does this look like a store that respects my time?”

“Is this experience smooth enough that I won’t regret clicking checkout?”

If the interface looks outdated, complicated, or inconsistent, shoppers step back immediately.

Trust drops when:

  • The UI looks cluttered or inconsistent
  • Can’t find right product, search fails
  • Forms ask for too much information too early
  • The login or signup page feels “old-school” or unintuitive
  • Visual design doesn’t align with modern expectations
  • Page transitions feel slow or unstable
  • Password reset flows break the rhythm

Trust doesn’t come only from security features. It also comes from a clean UI, predictable interactions, and an experience that makes people enjoy shopping.

When Login Becomes the First Roadblock Instead of the First Welcome

Let’s talk about the reality of passwords today because your shoppers live this reality daily.

People reuse passwords even though they know it’s risky.

Research shows that weak or stolen passwords contribute to over 80% of hacking-related breaches, yet most users still repeat the same passwords across apps and stores.

This creates two major issues in eCommerce:

Issue #1: Shoppers are tired of passwords.

Not annoyed.
Not uncomfortable.
Just tired.

They deal with dozens of logins a week:  banking, apps, social media, work tools.
Your store becomes “another place to remember something.”

Most shoppers want to avoid creating one more password, and many simply back out when asked.

Issue #2: Password resets break the buying flow.

Picture a shopper trying to buy a product:

They enter the store excited.
Add an item to the cart.
The store asks them to log in.
They try two passwords — both wrong.
They hit “Forgot Password.”
Wait for an email.
They lose momentum.
The purchase is forgotten.

A process that should take 5 seconds becomes a 5-step distraction loop.

This hurts more on mobile, where shoppers have even less patience.

Guest Checkout Isn’t Enough, Shoppers Want Smart Convenience

Most teams use guest checkout to reduce friction and it helps.
But the real win happens when the experience stays fast and simple after purchase as well.

Here’s a real scenario from many stores:

A shopper checks out as a guest.

They return weeks later.

They want order tracking, returns, or reorders.

But they cannot access their information because the previous purchase wasn’t converted into an account.

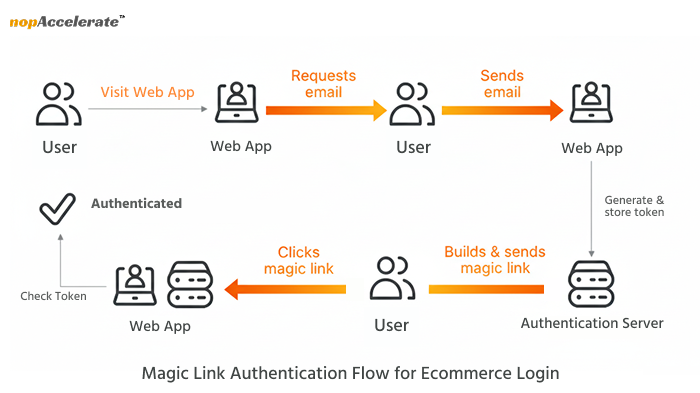
A practical solution some nopCommerce stores use is automatic guest-to-customer conversion.

In this approach, the system quietly creates an account after the order is placed and shares the login details (via email) with the shopper, without interrupting their buying flow. 

If you want to see how this works in detail, explore here’s .

This keeps the UX simple while still building long-term customer identity.

The UI Problems That Hurt Conversions More Than Checkout Errors

UI is not “just design.”
It’s the first handshake your store offers the visitor and it shapes whether they proceed or exit.

Here are the common UI issues that quietly reduce conversion rates:

1. Visual noise and too many competing elements

Too many buttons, colors, banners, or promotions confuse the shopper’s attention.

2. Login and signup boxes that feel outdated

An old-fashioned UI creates a security concern before users even think about the product.

3. Inconsistent mobile layout

Elements jump, pages reload awkwardly, or fields are hard to tap.

 4. Long forms asking for everything at once

When shoppers don’t yet trust you, they won’t share extra information.

5. Search results that feel irrelevant

If shoppers type a product name and still get unrelated items, they lose trust and leave quickly.

6. Micro-delays hurt conversions

Slow product page loads interrupt the browsing flow and cause quick drop-offs.

7. Lack of reassurance messages

Shoppers feel unsure when they don’t see small confirmations like “Saved,” “Added to cart,” or “Your details are secure.”

The 15-Second Rule That Shapes Every Ecommerce Conversion

Shoppers make their first decision fast, usually in the first 15 seconds.

Not about buying… but about staying.

Those first few seconds decide whether they feel comfortable, trust the store, and want to explore more products. If they don’t, they leave long before they reach the cart or checkout.

Here are the signals that shape those first 15 seconds and silently decide your conversion rate:

1. Clean, calm first impression

A neat layout without visual clutter helps shoppers settle in and explore freely.

2. Clear product discovery path

Users instantly see where to start — categories, search bar, recommendations.

3. Fast-loading visuals and product thumbnails

Images appear quickly and smoothly; shoppers don’t wait to see what matters.

4. Modern, consistent UI design

A familiar look and predictable interactions build instant trust without thinking.

5. No forced actions early on

No mandatory login, signup pop-ups, or unnecessary steps blocking browsing.

6. Mobile pages that feel natural to scroll

Nothing jumps around, fields are easy to tap, and navigation feels effortless.

7.  Relevant shopping offers in the banner

Seasonal or festival offers appear gently without overwhelming the page.

8. Progress that never suddenly resets

Saved carts and recent items stay visible, keeping the journey stable.

The Modern Shopper’s Expectations Have Changed — Have Stores Changed Too?

Your shoppers compare your store not only to competitors but to the apps they use every day:

  • Netflix
  • Amazon
  • Uber
  • TikTok
  • ChatGPT

These apps don’t force people to remember passwords.
They don’t interrupt the flow.
These apps increasingly offer passwordless or low-friction options.

And customers carry that expectation into every online shopping experience.

What users want today:

  • Faster entry
  • Fewer steps
  • A store that remembers them safely
  • Secure shopping experience without complicated security
  • Clean, predictable UI that feels trustworthy
  • Options — not restrictions

When stores meet these expectations, conversion rates improve naturally.

Why “Secure Shopping Experience” Matters As Much As Speed

Security and speed used to be separate priorities.
But now they work together.

A secure store isn’t just technically protected, it must also feel protected.

Users trust stores when:

  • UI elements behave consistently
  • Authentication flows feel smooth
  • Pages transition without errors
  • Communication is clear
  • No unexpected steps appear mid-journey

Even a well-secured store can seem unsafe if the experience feels outdated or unstable.

This is where many eCommerce businesses unintentionally lose trust.

Why Search Experience Plays a Bigger Role in Conversion

Search in ecommerce is the fastest way a shopper tells your store what they want. If the search experience feels slow, irrelevant, or confusing, it signals that the store might not understand them and that single moment creates doubt.

People don’t have patience to scroll endlessly or guess new filters. When a shopper types “blue running shoes” and gets jackets, or when search gives no suggestion, they simply step away.

Make sure your search understands customer search query types, because that decides whether they stay or leave.

And when Search works well, it acts almost like a silent salesperson.

The Connection Between UX and Modern Authentication Trends

“What does login experience have to do with conversions?”

A lot.

Authentication is not only a security checkpoint, it’s a UX moment.

If authentication is slow, confusing, repetitive, or old-fashioned, users leave.

If authentication is simple, seamless, and trustworthy, users stay.

Modern authentication methods (including the direction the industry is heading toward) focus on:

  • reducing steps
  • eliminating unnecessary fields
  • minimizing user effort
  • increasing identity confidence
  • combining trust + speed

This is why authentication experience is now considered part of UX, not just part of security.

And why stores with modern, smooth login experiences tend to outperform others in conversion rates, because the journey begins well.

The UX Principles Every Ecommerce Team Should Apply in 2026

These are not trends, they’re fundamentals that will define the next decade of digital commerce.

1. Reduce cognitive load

Make every step easy to understand and quick to complete.

2. Make identity effortless

Don’t force users to remember or manage unnecessary details early.

3. Build trust with consistency

UI consistency across pages is silent reassurance.

4. Limit requests early in the journey

Ask for more information only when needed.

5. Provide alternatives

Not all shoppers want the same login flow.

6. Prioritize mobile-first behaviors

Most drop-offs happen on mobile.

7. Design for re-entry, not just first-time visits

Returning customers expect instant access to history, tracking, and reorders.

Conclusion:

If your store struggles with performance, the problem doesn’t start at payment, it starts at the first interaction. Shoppers decide to trust you, stay on your site, and continue the buying journey based on how smooth, simple, and stable your experience feels.

A modern store:

welcomes users without forcing commitments
helps them browse effortlessly
makes login feel clear and easy
reduces steps before checkout
creates a secure shopping experience without complications
builds trust through consistent UI and predictable flows

When these elements work together, conversion rates boost naturally, because the experience respects the shopper’s time, expectations, and confidence.

Configuration Drift: How Development and Production Environments Fall Out of Sync and the Proven Way to Fix Them

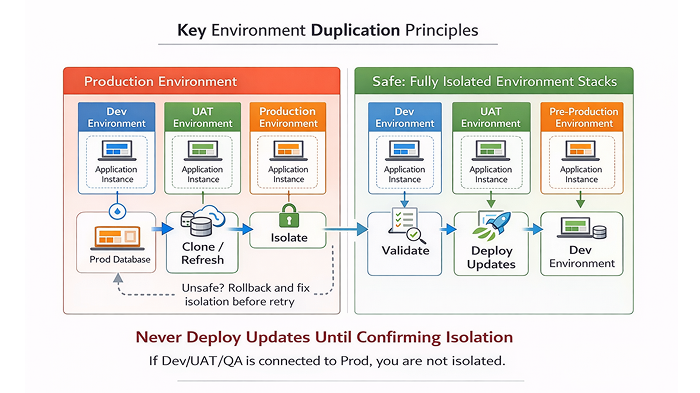
Configuration drift between development and production environments diagram

When “It Works on My Machine” Turns into a Production Crisis

Every development team has heard it at least once and usually more than once:

“But it was working perfectly on my machine…”

This sentence is often the first signal of a deeper and far more dangerous problem: configuration drift. It happens when your development, staging, and production environments slowly move out of alignment. At first, the difference may seem insignificant. Over time, however, this misalignment results in broken features, security vulnerabilities, failed deployments, and complete system instability.

In modern full-stack systems, where frontend frameworks, backend services, APIs, databases, caching layers, Docker containers, cloud platforms, and CI/CD pipelines all depend on configuration, even a tiny variation can cause massive issues.

Environment configuration mismatches are a leading cause of:

  • API failures
  • CORS errors
  • Authentication breakdowns
  • Wrong database connections
  • Missing or undefined environment variables
  • Build and deployment crashes
  • Inconsistent application behavior

According to current DevOps and cloud engineering trends, configuration drift is becoming more common as systems shift toward microservices, container orchestration, and multi-cloud architectures. The more complex your infrastructure becomes, the more vulnerable it is to misaligned settings.

This blog explains in real, practical terms, why these mismatches occur, how they impact your organization, and how you can fix them permanently using proven methods, clean architecture, and reliable automation. We will also explore advanced scenarios such as multi-tenant configurations, Kubernetes scaling, and observability tools for detecting drift in real time.

What is Configuration Drift?

Configuration drift happens when the settings, environment variables, dependencies, or system configurations in development, staging, and production environments slowly become different from one another. Over time, even small changes like a new package version, a modified environment variable, or an untracked server setting can cause your application to behave unpredictably across environments. This is why a feature might work perfectly in development but fail in production. Left unmanaged, configuration drift creates instability, increases security risk, and makes debugging slow and costly.

Now, to understand why this happens in the first place, let’s start with the foundation environment configuration and the role it plays in your application.

1. What Environment Configuration Really Means

At its core, environment configuration refers to all the values, secrets, and operational settings that an application needs in order to function properly in a specific environment.

These include:

  • API base URLs
  • Database connection strings
  • Authentication secrets (JWT, OAuth tokens)
  • Feature flags
  • Logging levels
  • Cache servers
  • Message queue details
  • Third-party service credentials

When these values are not managed consistently across environments, configuration drift occurs. This drift causes your application to behave differently in development than it does in staging or production and that difference is where bugs, failures, and vulnerabilities are born.

Common Types of Environments

EnvironmentPurposeKey Characteristics
LocalDeveloper machine for quick testingOften uncontrolled, may use mock data and Dockerized services
DevelopmentInternal team testingShared, includes debugging tools and test data
StagingPre-production simulationClosely mirrors production for final validation
ProductionLive environmentPerformance-optimized, secure, and actively monitored

Each environment has its own purpose. The problem begins when the configuration across them does not match in structure, naming, or values.

1.1 Understanding Environment Variables

Environment variables are key-value pairs used to configure an application without exposing sensitive data directly in code. They generally fall into two categories:

Build-Time Variables

These are loaded during the application build process and become part of the bundled output.

Next.js
NEXT_PUBLIC_API_URL=https://api.example.com

Vite
VITE_API_URL=https://api.example.com

React (Create React App)

REACT_APP_API_URL=https://api.example.com

These are ideal for non-sensitive values such as public API URLs or feature flags. However, they require rebuilding the application to change them, and they should never contain secrets.

Pros:

  • Efficient for static configuration
  • Easy to use for front-end

Cons:

  • Not suitable for secrets
  • Not flexible at runtime

Runtime Variables

These are loaded when the application starts and can be changed without rebuilding the application.

Node.js:
const dbUrl = process.env.DB_URL;

Used in Docker:
environment:
 - DB_URL=mongodb://db:27017

Used in serverless platforms like AWS Lambda or Vercel.

These variables are ideal for database connections, secrets, access tokens, and dynamic configurations.

However, if they are missing or incorrectly named, they can cause immediate runtime failures.

Feature Flags as Environment Variables

Environment variables can also be used to enable or disable features dynamically:

ENABLE_NEW_DASHBOARD=true

Platforms like LaunchDarkly and ConfigCat allow teams to manage feature flags centrally without deploying new code.

This is extremely useful when combined with structured environment management.

1.2 Where Configuration Data Comes From

Configuration is rarely stored in a single place. Instead, modern systems use a layered approach:

  • .env files (.env.local, .env.production, .env.staging)
  • Cloud secret managers (AWS Secrets Manager, Azure Key Vault, GCP Secret Manager)
  • CI/CD pipelines (GitHub Actions, GitLab CI, Jenkins)
  • Docker and Kubernetes (Secrets and ConfigMaps)
  • Operating system environment variables
  • Secure parameter stores (AWS SSM, HashiCorp Vault)

A runtime variable may load in the following order:

  • OS environment variable
  • CI/CD injected variable
  • .env file
  • Cloud secret manager

If one layer overrides another incorrectly, configuration drift is created instantly.

For safety, secrets should always be encrypted in transit and at rest and managed through role-based access control.

2. Why Configuration Mismatches Happen

Configuration drift is not random. It happens for very specific reasons that repeat across teams and projects.

2.1 API URL Differences

Developers often use this locally:
http://localhost:5000/api/users

Then production expects:
https://api.company.com/users

If this value is hardcoded or incorrectly configured, the application fails.

Common causes:

  • HTTP vs HTTPS mismatch
  • Domain differences
  • Missing or misconfigured CORS rules
  • Forgotten environment variable

Studies suggest 30–60% of deployment failures are caused by incorrect API configuration, with
misconfiguration widely recognized as a leading root cause.

2.2 Missing Environment Variables

If something like JWT_SECRET is undefined in production, authentication fails immediately.

This can happen when:

  • The variable isn’t added in the hosting dashboard
  • The wrong .env file is used
  • The deployment process doesn’t restart the application
  • The CI/CD pipeline never injected the variable

In some cases, applications fall back to default values creating severe security risks.

2.3 CORS Differences Between Local and Production

Local environment:
http://localhost:3000 → http://localhost:5000

Production:
https://frontend.com → https://api.frontend.com

Browsers are forgiving locally, but strict in production. If domains are not explicitly allowed, requests are blocked automatically.

Using wildcard rules is unsafe and should be avoided.

2.4 HTTP and HTTPS Mismatch

If your website uses HTTPS but your API uses HTTP, modern browsers will completely block the request. This often looks like a silent front-end failure.

The solution is to enforce HTTPS in every environment, including local.

2.5 Database Connection Errors

Local:
mongodb://localhost:27017

Production:
mongodb+srv://cluster.mongodb.net

If a wrong database URL is used, your application either:

  • Connects to the wrong database
  • Fails completely
  • Overloads a cluster due to misconfigured pooling

2.6 Authentication & JWT Problems

If the JWT_SECRET changes between environments, tokens signed in one environment won’t be valid in another. This leads to:

  • Broken logins
  • Session failures
  • Possible security exposure

OAuth systems face similar problems with redirect URIs and mismatched credentials.

2.7 Environment Files Not Loaded

If the server expects .env.production but only .env.local exists, the application will start without required values.

Monorepos make this even more complex due to multiple .env files.

2.8 Operating System Differences

  • Windows uses set VAR=value
  • Linux/Mac uses export VAR=value
  • One system is case-sensitive, the other is not
  • Time zones often differ

These small differences cause surprisingly large problems.

Tools like cross-env can unify variable handling across platforms.

2.9 CI/CD Injection Failures

Secrets may not be passed correctly due to:

  • Incorrect naming
  • Wrong permissions
  • Formatting issues (especially multiline secrets)
  • Branch-based restrictions

Each CI/CD platform behaves differently, which increases mismatch risk.

2.10 Docker and Kubernetes Misalignment

Sometimes .env files aren’t copied into the container or mounted correctly. In Kubernetes, ConfigMaps and Secrets may be created but not attached to the correct pods.

This results in variables that exist but are never actually used.

2.11 Cache and Multi-Cloud Differences

Local caching may use Redis on localhost, while production uses AWS ElastiCache. Different ports, passwords, and network rules easily break connectivity.

Multi-cloud setups introduce provider-specific variables (AWS_REGION, GOOGLE_CLOUD_PROJECT) that must be perfectly synchronized.

The Proven Step-by-Step Fix for Configuration Drift

This is the system that prevents mismatch permanently.

Step 1: Create structured environment files
.env.local, .env.development, .env.staging, .env.production

Step 2: Define a configuration schema
This acts as a contract for required values.

Step 3: Validate variables at startup
Use tools like Zod or Joi to stop the app from running with missing values.

Step 4: Enforce frontend rules
Use proper prefixes such as NEXT_PUBLIC_, REACT_APP_, and VITE_.

Step 5: Centralize backend configuration loading
Use dotenv with explicit environment selection.

Step 6: Strictly configure CORS
Allow only required domains and methods.

Step 7: Enforce HTTPS everywhere
Use valid certificates, even in local testing.

Step 8: Never hardcode database URLs
All database connections must use environment variables.

Step 9: Correct Docker configuration
Use correct env_file and copy logic in Dockerfile.

Step 10: Secure CI/CD pipelines
Inject secrets properly using secure variables.

Step 11: Use dedicated cloud secret managers
Rotate secrets and control access via IAM.

Step 12: Create a master config file
This standardizes access across your entire app.

Step 13: Monitor continuously
Use Datadog, Sentry, or Prometheus to detect drift.

Step 14: Test in staging
Always simulate production behavior before release.

Best-Practice Checklist for Zero Drift

  • Never commit .env to version control
  • Validate environment variables at app startup
  • Separate public and private configs
  • Keep naming consistent everywhere
  • Use staging for real validation
  • Encrypt and rotate secrets regularly
  • Monitor changes in configuration

Final Thoughts: From Chaos to Control

Configuration mismatch is one of the biggest silent killers of productivity in software development. It causes:

  • Long debugging cycles
  • Broken deployments
  • Data exposure risks
  • Frustrated teams and users

However, once your organization adopts a clear, structured, and automated configuration strategy, everything changes.

Your systems become:

  • Predictable
  • Secure
  • Scalable
  • Easier to manage

This guide has provided:

  • Root-cause analysis
  • Real-world scenarios
  • Code-level solutions
  • Scalable architecture principles

Any developer, architect, or IT leader can now confidently maintain alignment between development and production environments.

Talk to our experts for stable, scalable development and deployment solutions.

API Development Best Practices for Secure and Scalable .NET Applications

API development best practices for secure and scalable .NET applications

APIs (Application Programming Interfaces) are the backbone of modern digital ecosystems. They connect systems, power mobile and web applications, and enable seamless communication between cloud services, IoT devices, and enterprise platforms.

But building an API that simply works is no longer enough. Today, scalability, security, and developer experience define software success. Every API must be treated as a product consistent, well-documented, and built for growth.

Whether you’re developing microservices in .NET, integrating AI-driven automation, or managing enterprise systems, following proven API best practices ensures your APIs stay stable, secure, and easy to extend.

This guide explores modern API development best practices from endpoint design and versioning to security, documentation, and performance featuring practical examples and .NET-focused recommendations to help you deliver APIs that scale with confidence.

1. Design Clear and Consistent API Endpoints

A good API starts with clear and predictable endpoints. When developers can instantly understand your structure, they build faster and make fewer mistakes.

Use Nouns, Not Verbs

Endpoints should represent resources, not actions. Let HTTP methods (GET, POST, PUT, DELETE) define what happens.

Good: GET /customers/123/orders

Bad: GET /getOrdersByCustomerId/123

In ASP.NET Core, attribute routing keeps endpoints readable and organized:

[ApiController]
[ApiVersion("1.0")]
[Route("api/v{version:apiVersion}/customers")]
public class CustomersController : ControllerBase
{
    [HttpGet("{id}/orders")]
    public IActionResult GetCustomerOrders(int id)
    {
        var orders = _orderService.GetOrdersByCustomer(id);
        return Ok(orders);
    }
}

Follow Naming Conventions

1) Use lowercase letters for endpoint paths

Good Example: /user-profiles

Bad Example: /UserProfiles or /user_profiles

2) Use Hyphens for Multi-Word Names:

Good Example: /order-items

Bad Example: /order_items or /orderItems

3) Keep URL depth simple (2–3 levels)

Good Example: /customers/123/orders/456/items

 Bad Example: /customers/123/orders/456/items/789/details

Use Query Parameters for Filters

Keep routes short by using query parameters for filtering or sorting:

GET /orders?customerId=123&status=pending

Reflect a Clear Resource Hierarchy

Design routes that show logical relationships — e.g., /customers/{id}/orders makes it clear orders belong to a specific customer.

.NET Tip: Organize controllers by feature (CustomerController, OrderController) instead of technical layers. This mirrors real-world API usage and improves discoverability.

2. Version Your API

API versioning is essential for long-term stability. As your system grows, you’ll introduce changes that may break existing integrations. Versioning allows you to improve your API without disrupting current users.

Use Clear, Simple Version Numbers

The easiest and most widely accepted approach is adding the version directly in the URL:

/api/v1/customers

/api/v2/customers

Use a new version only when a breaking change is introduced, such as renaming fields, modifying response structures, or changing required parameters.

Follow a Consistent Versioning Strategy

  • Start with simple versions like v1, v2.
  • Keep minor additions (like optional fields) within the same version.
  • Maintain a clear changelog so developers know what changed.
  • Avoid having too many active versions, each version adds maintenance overhead.
  • Deprecate older versions gradually and communicate this early.

Use .NET Tools for Versioning

ASP.NET Core provides built-in support for API versioning using the package Microsoft.AspNetCore.Mvc.Versioning.

[ApiController]
[ApiVersion("1.0")]
[Route("api/v{version:apiVersion}/[controller]")]
public class CustomersController : ControllerBase
{
    [HttpGet]
    public IActionResult Get() => Ok("API Version 1.0");
}

// And Program.cs configuration (required for versioning):

builder.Services.AddApiVersioning(options =>
{
    options.DefaultApiVersion = new ApiVersion(1, 0);
    options.AssumeDefaultVersionWhenUnspecified = true;
    options.ReportApiVersions = true;
});

This helps manage multiple versions cleanly without duplicating logic.

3. Secure Your API

Security is one of the most important parts of API development. APIs often handle sensitive business and user data, so even a small weakness can cause major issues. A secure API protects your application, your users, and your reputation.

Always Use HTTPS

All API traffic should be encrypted. HTTPS prevents attackers from intercepting or modifying data in transit.
In ASP.NET Core, enabling HTTPS and HSTS is simple:

app.UseHsts();
app.UseHttpsRedirection();

Use Strong Authentication and Authorization

Your API must verify who is accessing it and what they are allowed to do.

Common authentication methods:

  • OAuth 2.0 for secure delegated access
  • JWT (JSON Web Tokens) for stateless authentication
  • API Keys for service-to-service communication

Example: Authorization: Bearer <jwt-token>

Best practices:

  • Make tokens short-lived
  • Rotate keys regularly
  • Restrict sensitive endpoints to specific roles or scopes

Validate All Inputs

Never trust incoming data. Input validation protects against injection and script attacks.

Example in .NET: 

public class UserRequest
{
    [Required, EmailAddress]
    public string Email { get; set; }
}

ASP.NET Core automatically handles validation and returns structured error responses.

Encrypt Sensitive Data

  • Encrypt data in transit (HTTPS).
  • Encrypt sensitive data at rest (e.g., AES-256).
  • Never store plain-text passwords, use hashing algorithms like bcrypt or PBKDF2.

Monitor and Audit Your API

  • Security is not a one-time setup.
  • Use rate limiting to prevent abuse.
  • Add logging for authentication attempts and failed requests.
  • Monitor unusual traffic patterns.
  • Use API gateways like Azure API Management, Kong, or NGINX for centralized control.

4. Standardize Errors and Responses

Clear and consistent responses make your API easier to integrate and debug. When every endpoint returns data in a predictable format, developers know exactly what to expect and can handle errors faster.

Use Standard HTTP Status Codes

Stick to well-known status codes so clients immediately understand the result of each request.

Common examples:

  • 200 OK – Request completed successfully
  • 201 Created – A new resource was created
  • 400 Bad Request – Invalid or missing input
  • 401 Unauthorized – Authentication required or failed
  • 404 Not Found – Resource doesn’t exist
  • 500 Internal Server Error – Unexpected server issue

Using these codes consistently builds trust and makes debugging smoother.

Return Structured Error Responses

Every error message should follow the same structure across your entire API. This helps developers quickly identify what went wrong and how to fix it.

{
  "error": "InvalidRequest",
  "message": "Email field is required.",
  "statusCode": 400
}

This format works well because it’s simple, readable, and easy to parse.

Use Centralized Error Handling in .NET

ASP.NET Core makes it easy to ensure consistent error responses across all controllers.

app.UseExceptionHandler("/error");

Inside the /error endpoint, you can shape all error messages into one predictable format.

Document All Error Scenarios

Good documentation should include:

  • A list of possible error codes
  • A description of why each occurs
  • Sample error responses
  • Notes on how clients should handle or recover from the error

This reduces support requests and helps developers troubleshoot independently.

5. Document Everything

Good documentation is one of the biggest factors in making your API easy to adopt. Clear and complete documentation helps developers understand how to use your API without guessing, reduces support requests, and speeds up integration for new teams.

Use Interactive Documentation Tools

Tools like Swagger (OpenAPI) automatically generate interactive API documentation from your code.
Developers can see available endpoints, try requests, and view sample responses, directly from the browser.

In ASP.NET Core, integrate Swagger using Swashbuckle.AspNetCore:

builder.Services.AddSwaggerGen();
app.UseSwagger();
app.UseSwaggerUI();

This creates a visual interface where developers can explore your API instantly.

Provide Sample Requests and Responses

Examples make documentation more understandable and actionable.

For every endpoint, include:

  • Example request body
  • Example response body
  • Common error responses
  • Required parameters and headers
GET /api/v1/users/123

{
  "id": 123,
  "name": "John Doe",
  "email": "[email protected]"
}

Explain Authentication Clearly

One of the most common developer issues is misunderstanding how to authenticate.

Document:

  • How to obtain tokens
  • How to refresh tokens
  • Which endpoints require authentication
  • Required headers and scopes for each call

Keep Documentation Updated

Outdated documentation is worse than having none at all.
Whenever you change an endpoint, add a new version, or update behavior:

  • Update your API docs immediately
  • Add notes in the changelog
  • Mark old versions or fields as deprecated
  • Encourage Feedback

Add a way for developers to report issues or suggest improvements (email, form, Git repo). This helps you catch unclear areas quickly.

6. Use Environments and Collections

Managing multiple API environments is essential for smooth development, testing, and deployment. Using environments and collections keeps your workflow organized and prevents mistakes, especially when switching between Dev, Staging, and Production.

Use Separate Environments

Always maintain separate environments for different stages of development:

  • Development – For building and testing new features
  • Staging – For final testing before release
  • Production – For live users

Each environment should have its own:

  • Base URL
  • Authentication tokens
  • API keys
  • Configuration values

This prevents accidental requests to the wrong environment and keeps sensitive data secure.

Use Environment Variables Instead of Hardcoding

Never hardcode URLs or sensitive information like API keys in your requests.

{{baseUrl}} = https://dev.example.com
{{token}} = your_dev_token

// Then your request becomes:

GET {{baseUrl}}/api/v1/customers
Authorization: Bearer {{token}}

If you switch to staging or production, you simply update the environment variables, no need to rewrite your requests.

Organize API Requests Using Collections

Collections group related API calls in one place. This keeps your workflow structured and makes it easy for teammates to understand how the API works.

Example:

Customer API Collection: GET, POST , PUT

Order API Collection: GET, POST

Collections help you:

  • Test different endpoints quickly
  • Share API workflows with your team
  • Keep your API calls organized by feature or module

Best Practices for Environments

  • Do not store passwords or tokens in plain text, use secure storage where possible.
  • Refresh and rotate keys frequently.
  • Use global variables only when absolutely necessary; prefer environment-level variables.
  • Clean up old or unused environments to avoid confusion.

7. Enable Pagination and Filtering

As your API grows, some endpoints will return large sets of data. Without pagination and filtering, responses can become slow, heavy, and difficult for clients to process. Implementing these features keeps your API fast, efficient, and scalable.

Use Pagination for Large Datasets

Instead of returning thousands of records at once, split the data into smaller, manageable chunks.

Example: GET /products?page=1&limit=20

 This returns 20 products from page 1.

Common pagination parameters:

page → which page to load

limit → how many records per page

Add Filtering and Sorting Options

Filtering allows clients to narrow down results, and sorting makes it easy to display data in the right order.


GET /orders?status=completed
GET /orders?status=pending&sort=date

Filtering reduces load on the client, and sorting ensures consistent presentation of results.

Return Metadata with Results

Include additional details in your response so clients know how to paginate properly.

{
  "data": [ ... ],
  "meta": {
    "total": 150,
    "page": 1,
    "limit": 20
  }
}

Metadata such as total records and current page allows clients to build accurate navigation controls and improves user experience.

Use Efficient Queries in .NET

In ASP.NET Core, use Skip() and Take() with LINQ to fetch only the required records.

var items = db.Products
              .Skip((page - 1) * limit)
              .Take(limit)
              .ToList();

This ensures only the needed data is retrieved, improving performance and reducing server load.

Conclusion

Building a reliable API is more than exposing data, it’s about creating a product developers trust and businesses can scale with confidence. When your API follows clear design principles, proper versioning, strong security, consistent responses, and complete documentation, it becomes much easier to maintain and integrate.

Applying them helps reduce technical debt, improve developer experience, and ensure your API grows smoothly with your system whether you’re building microservices, enterprise platforms, or AI-driven solutions.

At nopAccelerate, we help teams build secure, scalable, and future-ready .NET APIs using the same best practices shared here. If you’re upgrading existing APIs or developing new ones, our engineering team can support you with practical, real-world expertise.

If you’d like to discuss your API requirements or explore how we can help strengthen your architecture, feel free to reach out, we’re always ready to assist.

How to Use Claude AI with Selenium (Python) for Smarter UI Testing

AI-assisted UI automation testing process improving software quality

Modern QA and development teams are constantly seeking faster, smarter ways to test web applications. By combining Claude AI, a conversational coding assistant by Anthropic, with Selenium (WebDriver for Python), you can automate UI test creation, execution, and refactoring with minimal manual effort.

In this guide, you’ll learn how to set up Claude AI in Visual Studio Code, generate a working Selenium login test in Python, and apply reusable prompt recipes to accelerate your automation workflow.

This hands-on approach helps you:

  • Eliminate repetitive test scripting
  • Improve code reliability and readability
  • Shorten regression cycles using AI-assisted generation

Whether you’re a QA engineer, developer, or automation lead, this guide shows how to turn Claude AI into a practical co-pilot for your Selenium test framework.

TL;DR:
This guide walks you through setting up Claude AI in VS Code and pairing it with Selenium (Python) for AI-assisted UI automation. You’ll install dependencies, create your first login test using Claude prompts, and learn reusable patterns to speed up test case generation and maintenance.

Setting Up Your AI-Powered UI Testing Environment

To start building our AI-assisted UI automation setup, we’ll use Python with Selenium, supported by Claude AI inside Visual Studio Code. This stack helps automate common web UI flows like login, signup, and checkout quickly and reliably.

Tools You’ll Use

ToolPurpose
Claude Code (Anthropic)AI assistant accessible via CLI or VS Code extension; can scaffold tests, explain errors, and refactor code.
Selenium WebDriver (Python)Industry-standard library for browser automation and UI test execution.
Python 3.10 +Scripting language; tested with Python 3.10 and newer versions.
Visual Studio CodeLightweight IDE with integrated terminal and extensions for AI coding.
Webdriver-managerAutomatically downloads and keeps browser drivers updated, no manual setup needed.

Tip: Make sure you’re logged in to Claude AI before running any terminal commands.

Step-by-Step Installation

Follow these steps to get your environment ready:

1. Install Python and VS Code

Visual Studio Code welcome screen after installation

Welcome screen of Visual Studio Code after installation.

2. Install Claude AI Extension in VS Code

Claude AI extension installed in Visual Studio Code for AI-assisted coding.

Navigate to Extensions in VS Code to install Claude AI.

Claude AI extensions shown in Visual Studio Code Marketplace

Search and install the Claude AI extension from VS Code Marketplace.

  • Open VS Code → Extensions pane → search for “Claude AI”.
  • Click Install, then Sign In to Anthropic Account when prompted.
Top-right Run and Debug menu in Visual Studio Code

Use the top-right menu to open a new integrated terminal.

3. Verify Claude CLI Access

Claude
Opening Command Prompt in Visual Studio Code terminal

Select Command Prompt in VS Code terminal before running Claude CLI.

You should see a command-line prompt ready to accept AI instructions.

VS Code terminal showing Claude AI Selenium prompt

Enter your natural-language prompt here for Claude to generate code.

4. Set Up Your Python Environment

pip install selenium webdriver-manager

These packages install Selenium WebDriver and webdriver-manager.

5. Create a New Project Folder

mkdir ai_ui_tests && cd ai_ui_tests
 code

Start a Fresh Script (with AI Help)

With Claude configured, you can now scaffold a new test script directly from the terminal or VS Code chat.

In the terminal, type:

claude

When prompted, enter something like:

Create a Python Selenium test that opens https://example.com/login, enters email and password, and verifies the dashboard loads.

Claude will instantly generate the boilerplate test, import statements, and setup/teardown functions.

Why it works:

Claude AI interprets your intent and converts it into executable code, saving you the effort of writing repetitive boilerplate.

Tip: Provide context such as element locators, expected outcomes, and environment details so Claude produces accurate selectors.

Inspecting email input field using Chrome DevTools

Inspecting the Email field in Chrome DevTools to copy its locator.

Inspecting password input field using Chrome DevTools

Inspecting the Password field in Chrome DevTools for locator path.

Example: Login Test (Page Object Model)

Claude can create structured code following the Page Object Model (POM) pattern for maintainable tests.

Here’s an example output you might receive:

from selenium import webdriver
from selenium.webdriver.common.by import By
from webdriver_manager.chrome import ChromeDriverManager

class LoginPage:
    def __init__(self, driver):
        self.driver = driver
        self.email_input = (By.ID, "Email")
        self.password_input = (By.ID, "Password")
        self.login_btn = (By.CSS_SELECTOR, "button[type='submit']")

    def login(self, email, password):
        self.driver.find_element(*self.email_input).send_keys(email)
        self.driver.find_element(*self.password_input).send_keys(password)
        self.driver.find_element(*self.login_btn).click()

def test_login():
    driver = webdriver.Chrome(ChromeDriverManager().install())
    driver.get("https://example.com/login")
    login_page = LoginPage(driver)
    login_page.login("[email protected]", "secure123")
    assert "Dashboard" in driver.title
    driver.quit()

Claude Prompt Example:

Write a Python Selenium login test using Page Object Model for example.com and verify dashboard title.

This modular approach separates page elements from logic, making your tests easier to maintain.

Prompt Recipes You Can Reuse

GoalSample Prompt
Refactor an existing test“Refactor my Python Selenium login test to use Page Object Model and add wait conditions.”
Generate edge-case tests“Create negative test cases for invalid login inputs and assert error messages.”
Explain errors“Explain the Selenium NoSuchElementException in this stack trace and suggest a fix.”
Optimize selectors“Replace XPath locators with stable CSS selectors for better test reliability.”
Integrate with CI/CD“Show how to run these tests in GitHub Actions with pytest.”

Tip: You can chain prompts like:
“Generate login test → Add assertions → Refactor to POM → Integrate with pytest.”

Conclusion

AI is steadily transforming how modern teams approach testing.
By combining Claude AI’s natural-language code generation with the reliability of Selenium (WebDriver for Python), you can eliminate hours of repetitive scripting, improve coverage consistency, and release faster with fewer regressions.

This workflow doesn’t replace human testers, it augments them. Claude takes care of scaffolding, refactoring, and documenting test logic, so engineers can focus on creative problem-solving, edge-case design, and performance validation.

As AI-assisted development matures, tools like Claude, Selenium, and VS Code will become the backbone of agile, quality-driven software delivery.

Next Steps

Try out the prompt recipes in this guide and adapt them to your project’s login, checkout, or dashboard flows.

Integrate Claude-generated tests into your CI/CD pipeline using pytest or GitHub Actions.

Keep exploring AI-powered testing techniques to improve reliability and speed in your releases.

If you or your team are exploring how to integrate AI into development or testing workflows, contact our engineers at nopAccelerate , we would be glad to share practical insights or collaborate on your next automation challenge.

How to Build an AI-Powered Code Assistant in Visual Studio with .NET 9 and Semantic Kernel

AI-Powered Code Assistant in .NET 9 using Semantic Kernel

Artificial Intelligence (AI) is transforming how developers write, review, and optimize code. From smart completion to automated refactoring, AI is now a genuine teammate in every modern IDE.

Tools like GitHub Copilot or ChatGPT already boost productivity. But what if your AI assistant actually understood your project, your architecture, naming conventions, and design patterns?
That’s where building your own custom AI-powered code assistant makes sense.

In this guide, you’ll learn how to create one inside Visual Studio using .NET 9 and Microsoft Semantic Kernel, Microsoft’s open-source SDK for integrating large-language-model intelligence into .NET apps. By the end, you’ll have a working assistant that can generate C# snippets, answer project-specific questions, and even live inside your IDE.

TL;DR: Learn to build an intelligent code assistant using .NET 9 + Semantic Kernel with OpenAI integration, reusable prompts, and Visual Studio extensions.

With .NET 9, Microsoft delivers its most AI-ready stack yet  introducing Microsoft.Extensions.AI, Tensor enhancements, and faster Native AOT. Whether you’re an engineer experimenting with AI tooling or a tech lead exploring automation in dev workflows, this tutorial will walk you through each stage of creating, extending, and securing your own assistant.

Why Build a Custom AI Assistant?

Most developers rely on general-purpose assistants. They’re useful, but they don’t know your domain, internal frameworks, or project constraints. Building your own gives you control.

Key advantages:

  • Tailored Functionality: Customize prompts to match your team’s coding style or project needs
  • Flexible Deployment: Use cloud APIs (OpenAI, Azure OpenAI) or local models (ONNX, ML.NET) for offline support.
  • Deep Integration: Connect with your .NET projects, libraries, or CI/CD pipelines.
  • Cost & Control: Leverage free-tier API limits or local models to manage expenses.

A 2025 survey found around 80 % of teams now use AI in development workflows, reporting 15–20 % productivity gains. A custom assistant lets you keep those gains while maintaining your code quality and security standards.

For .NET teams and software consultancies especially those building enterprise or eCommerce solutions this is a strategic investment in developer efficiency and knowledge reuse.

Prerequisites

Before you start, make sure your environment is ready.

You’ll need:

  1. Visual Studio 2022 (v17.10 or later) with the .NET 9 SDK → Download .NET 9 SDK
  2. OpenAI API key or Azure OpenAI credentials
  3. Basic C# and NuGet familiarity
  4. Internet access (for API calls), optional if using local models with ONNX Runtime or ML.NET

Tip: Create a dedicated solution just for AI experimentation so you can debug and iterate freely without affecting production code.

Step 1: Set Up Your Project

Let’s start with a basic console application that will power your assistant.

1 Create a New Project

  • Open Visual Studio 2022 → Create a new project → C# Console App
  • Name it CodeAssistant, set target framework to .NET 9.0
  • Click Create

2 Install Semantic Kernel

dotnet add package Microsoft.SemanticKernel

(Optional) Add the new AI extension library:

dotnet add package Microsoft.Extensions.AI

These packages make connecting to AI models straightforward and reusable.

3 Build the solution (Ctrl + Shift + B) to confirm setup.

At this point, you’ve laid the foundation for a C# AI assistant now ready to connect with OpenAI.

Step 2: Connect to OpenAI

Now let’s teach your assistant to “talk” to GPT-4 using Semantic Kernel.

Get an API Key → platform.openai.com → View API Keys → Create new secret key.

Store it securely (using User Secrets or Key Vault):

dotnet user-secrets set “OPENAI_API_KEY” “your-api-key”

Configure Semantic Kernel:

using Microsoft.SemanticKernel;
var builder = Kernel.CreateBuilder();
builder.AddOpenAIChatCompletion(
 modelId: "gpt-4-turbo",
apiKey: Environment.GetEnvironmentVariable("OPENAI_API_KEY")
);var kernel = builder.Build();

Console.WriteLine("Connected to OpenAI successfully!");

Run (F5): You should see Connected to OpenAI successfully!

Security Best Practice: Never commit API keys to source control. Use environment variables for safety and portability.

Step 3: Create a Code Assistant Skill

Here’s where it gets fun, turning natural language into real code.

using Microsoft.SemanticKernel;
using Microsoft.SemanticKernel.ChatCompletion;
using System;
using System.Threading.Tasks;

var builder = Kernel.CreateBuilder();
builder.AddOpenAIChatCompletion(
    modelId: "gpt-4o-mini", // cheaper for dev
    apiKey: Environment.GetEnvironmentVariable("OPENAI_API_KEY")!
);
var kernel = builder.Build();

// Create function from prompt
var generateCode = kernel.CreateFunctionFromPrompty(@"
You are an expert .NET 9 and C# assistant.
Generate clean, production-ready C# code.
- Follow PascalCase, async/await
- Add XML documentation
- Output code only in ```csharp block

Request: {{$input}}
");

// Interactive loop
while (true)
{
    Console.Write("Request (or 'exit'): ");
    var input = Console.ReadLine();
    if (input?.Trim().ToLower() == "exit") break;

    var result = await kernel.InvokeAsync(generateCode, new() { ["input"] = input });
    Console.WriteLine("\n```csharp\n" + result.GetValue<string>() + "\n```");
}

Now you can type something like:

“Create a repository class for products using async methods.”

…and watch it generate ready-to-paste C# code with proper naming and XML docs.

Think of this as your own lightweight Copilot but customized to how your team writes code.

Step 4: Extend with Project Knowledge (Optional)

So far, your assistant creates generic code. But what if it could understand your project?
That’s where embeddings come in. They turn text into vectors, letting the AI “remember” your own files.

Add the Embedding Connector

dotnet add package Microsoft.SemanticKernel.Connectors.OpenAI

Store Project Information

using Microsoft.SemanticKernel.Memory;

var kernel = new Kernel.CreateBuilder()
    .AddOpenAIChatCompletion("gpt-4o", apiKey)
    .AddOpenAITextEmbeddingGeneration("text-embedding-3-large", apiKey) // any live embedding model
    .Build();

await kernel.Memory.SaveInformationAsync(
    collection: "project-docs",
    text: "Customer repository uses interface ICustomerRepository with async methods.",
    id: "repo-notes-1");

Retrieve Relevant Context

var query = "generate a method that works with ICustomerRepository";var results = kernel.Memory.SearchAsync("project-docs", query, limit: 2);await foreach (var item in results)
    Console.WriteLine($"Relevant: {item.Metadata.Text}");

You can inject these results into your prompt before invoking the model, so it writes code that fits your existing architecture.

You’re not training a model; you’re teaching it context on demand like a shared memory for your solution.

Best Practices:

  • Avoid embedding any secrets or config files.
  • Use a persistent vector store for larger projects (Azure Cognitive Search, Qdrant, pgvector).
  • If indexing your repo, ingest only meaningful C# files (classes, interfaces, DTOs).

Step 5: Integrate with Visual Studio (Optional)

You can run your assistant as a console app, but embedding it inside Visual Studio makes it part of your daily workflow.

Create a VSIX Project named CodeAssistant.VSIX.

Add a Tool Window: A dockable panel with prompt input and output fields.

Share your logic: Move the Semantic Kernel code into a shared class library (CodeAssistant.Core) so both the console and VSIX can use it.

Connect it:

private async void RunButton_Click(object sender, RoutedEventArgs e)
{
    var prompt = PromptTextBox.Text;
    try
    {
        var result = await _kernel.InvokeAsync(
            _codeAssistant["Generate"],
            new KernelArguments { { "input", prompt } });

        OutputTextBox.Text = result.GetValue<string>();
    }
    catch (Exception ex)
    {
        OutputTextBox.Text = $"Error: {ex.Message}";
    }
}

Use async to avoid blocking the UI.

This creates a dockable assistant window inside Visual Studio, a familiar experience for your team.
You can later expand it to read the active document, auto-suggest snippets, or analyze selected code.

For internal use, distribute your VSIX through your organization’s private feed so everyone can install it securely.

What More Can You Do?

Your assistant is now a solid foundation. Here are ideas to extend it:

  • Refactoring Suggestions: Prompt the AI to suggest improvements for selected code (e.g., “simplify this method”).
  • Unit Test Generation: Ask the AI to generate unit tests for your methods using frameworks like xUnit or NUnit.
  • DocumentationHelper: Generate XML documentation or README files for your projects.
  • CI/CD Integration: Use the assistant to review code before pull requests in tools like Azure DevOps or GitHub Actions.
  • LocalModels: Explore ONNX Runtime or ML.NET for offline AI capabilities. See https://onnxruntime.ai/ for setup.

Once you’ve stabilized a few features, treat your assistant as a reusable internal tool version it, share it, improve it like any library.

Troubleshooting Tips

  • API Key Errors: Check OPENAI_API_KEY variable, no spaces or typos.
  • Quota Limits: Add retry logic and monitor usage dashboard.
  • Unexpected Output: Refine prompts, update Semantic Kernel packages.
  • Build Conflicts: Ensure .NET 9 SDK + VS 2022 v17.10+ are installed.
  • Debugging: Use ILogger or Console.WriteLine to log AI requests and responses.

Keep logs during experiments, you’ll learn how different prompts affect output quality and latency.

Conclusion

With .NET 9 and Microsoft Semantic Kernel, building a custom AI-powered code assistant in Visual Studio is no longer just an idea, it’s a practical reality.

You’ve connected OpenAI, generated C# snippets, added memory with embeddings, and explored IDE integration. What began as a console demo can evolve into a powerful AI companion that mirrors your team’s coding standards and architecture.

AI isn’t replacing developers, it’s amplifying them. By offloading repetitive tasks and suggesting patterns, AI frees engineers to focus on design and innovation.

Start small, experiment openly, and refine your workflow. When ready to bring your assistant to production or extend it into enterprise-grade tools, partner with experienced .NET and AI developers who understand both sides of modern software engineering.

Fill in form

and we will contact you

How can we help ?

Schedule a quick call, 15-minute meeting with one of our experts:

Thank You !

Our consultant will contact you in 24 hours.

Delivering generous mobile apps for Entrepreneurs, Startups & Businesses


Have a look at nopAccelerate Demo Store with 80,000+ products with nopAccelerate Solr and CDN Plugin.

download-trial Start Trial