Why eCommerce AI Often Feels Smart, but Fails When It Matters
If you’ve ever implemented an AI chatbot or search tool on your eCommerce store, you’ve probably had this moment:
A customer asks something totally reasonable, “Is this shoe waterproof?” or “When will the large size be back in stock?” and the AI either gives a generic answer, a wrong one, or worse: it makes something up.
Now imagine that happening hundreds of times a day across thousands of users. That’s not just poor UX: it’s lost trust, higher bounce rates, more support tickets, and ultimately, lost sales.
This problem isn’t due to lack of effort or budget. The truth is, most AI in eCommerce today runs on a flawed assumption: that a model trained once can handle a business that changes by the hour.
The typical Large Language Model (LLM) can’t see what’s going on in your ecommerce store. It doesn’t know what’s in stock, what’s trending, what just got returned, or what was asked last week.
And that’s where most AI projects hit a wall.
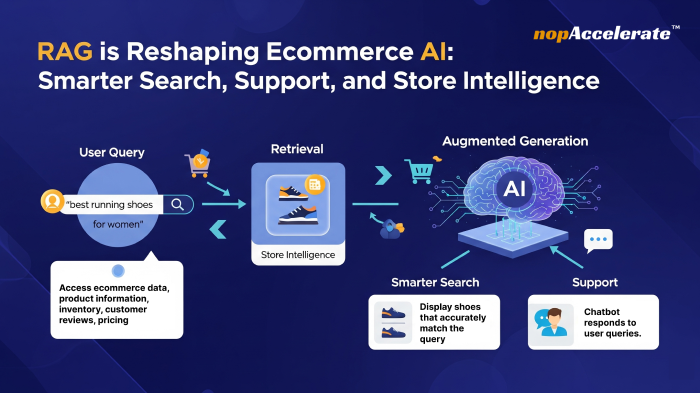
The Missing Link: AI That Retrieves Before It Responds
If your eCommerce store had a super-smart team member who could read every support ticket, product feed, catalog update, and customer review and answer questions based on that exact context, wouldn’t that change the game?
Unlike traditional LLMs that generate answers from frozen training data, RAG systems look things up in real time, just like a smart human would, before they respond.
It’s the difference between guessing and knowing.
Let’s Talk Results: Why RAG Is a Breakthrough, Not a Buzzword
RAG isn’t just another industry buzzword; it’s a proven technology delivering quantifiable results for e-commerce businesses. These aren’t theoretical experiments but real-world applications driving significant improvements in customer experience, operational efficiency, and ultimately, revenue.
A global beauty brand implemented a RAG-based assistant trained on 10,000+ product pages, returns policies, and customer support logs. Result? First-response accuracy went from 68% to 94% in under a month and average resolution time dropped by 37%.
An apparel startup used RAG to power an intelligent search feature that could understand color preferences, price brackets, and availability in real time. Bounce rates on search pages dropped by 22%, and conversion on search-led sessions jumped by 15%.
A B2B business trained RAG on internal sales documents, FAQs, and specification sheets. Their support agents now use it as a sidekick tool, answering customer emails faster, with 40% fewer escalations.
These aren’t experiments, they’re growing edge strategies that help eCommerce players compete in a landscape where UX, accuracy, and immediacy directly influence revenue growth.
So what exactly is RAG? (Without the Buzz)
In simple language: RAG lets AI consult your store’s live data before answering.
Technically speaking, RAG breaks down into two interconnected layers:
Retrieval: The system fetches relevant data (from product databases, help docs, CRM notes, even customer reviews) based on the user’s question.
Augmented Generation: That retrieved data is fed to the LLM to shape a better-informed, accurate, and contextual response.
You can update the knowledge base anytime, no retraining required. Add a new product, change pricing, publish a blog post, your AI will reflect it immediately.
This also means you can run AI across functions without worrying about outdated knowledge or inconsistent tone.
Where RAG Delivers the Most Impact in Ecommerce
Here’s Key Applications of RAG in eCommerce, where RAG isn’t just useful, it’s transformational:
1. Search that Actually Understands What Users Want
Instead of keyword-based search that misses nuances, RAG-powered search understands intent:
“Laptop under 80K that supports 3D design”
“Shoes like the ones I bought last month”
“Jacket in olive color, waterproof, size L”
2. Product Q&A That Doesn’t Guess
Automated responses can now reflect:
Real-time inventory
Return eligibility for specific users
Product use cases from reviews
3. Chatbots with Context and Memory
A customer who chatted yesterday doesn’t have to repeat everything. Your AI knows the history, the product they viewed, the coupon they used and what didn’t work last time.
4. Support That’s Actually Helpful (Internally Too)
Customer agents and internal teams can ask:
“How do I set up a new payment gateway?”
“Where are the latest integration notes ?”
The answers come from the store’s documentation, not some generic AI guess. This significantly reduces training time, improves agent efficiency, and leads to faster, more accurate resolutions for complex customer inquiries.
Why RAG Matters for eCommerce Store Owners
In eCommerce, speed, accuracy, and relevance make or break the customer experience. Retrieval-Augmented Generation (RAG) helps your store deliver all three, without needing constant manual updates or retraining.
Here’s how RAG adds value:
1. Smarter Search That Understands Product Context
Use Case: A customer types “waterproof running shoes for rainy season” into your store search.
With RAG: The AI pulls results not just by keyword, but by understanding your product descriptions, tags, and even reviews, surfacing items that truly match the intent, like “waterproof trainers” with high grip.
2. Real-Time Answers That Don’t Break During Campaigns
Use Case: You just launched a seasonal discount on select items. Your catalog updates daily, and customers are asking about updated prices and stock.
With RAG: The AI assistant pulls live pricing and inventory directly from your backend. No delays, no outdated info, so customers always get current, accurate responses.
3. Faster Support Without Extra Headcount
Use Case: Customers frequently ask about return eligibility, delivery time to their pincode, or warranty claims.
With RAG: The system responds using your actual return policy, logistics partner data, and product metadata. This reduces pressure on your support team while improving resolution speed.
4. Boost Conversions by Making Product Discovery Easy
Use Case: A shopper is browsing phone accessories but isn’t sure what fits their model.
With RAG: It cross-references product compatibility from your catalog, past queries, and product manuals. This offers accurate matches, reduces uncertainty, and increases likelihood of purchase.
5. Personalized Experiences Without Complicated Systems
Use Case: A repeat customer is back to buy again but wants something similar to what they purchased two months ago.
With RAG: The assistant recalls their past orders and suggests complementary or upgraded products, creating a personalized feel without needing a custom-built recommendation engine.
The Takeaway: It’s Time for AI That Works With You, Not Around You
RAG flips the script on what’s possible with eCommerce AI.
It brings credibility to customer support. Support for complex eCommerce search queries. Relevance to automation. And speed to internal operations.
If your AI can’t answer questions grounded in what’s true right now about your store, then it’s time to rethink the foundation.
This blog isn’t just a trend piece. It’s a clear indicator of what high-performing eCommerce teams are already implementing.
Looking to Explore AI That Fits Your Ecommerce Store?
If you want using AI to drive revenue, reduce support load, or unlock smarter digital experiences, RAG is the playbook you can’t afford to ignore.
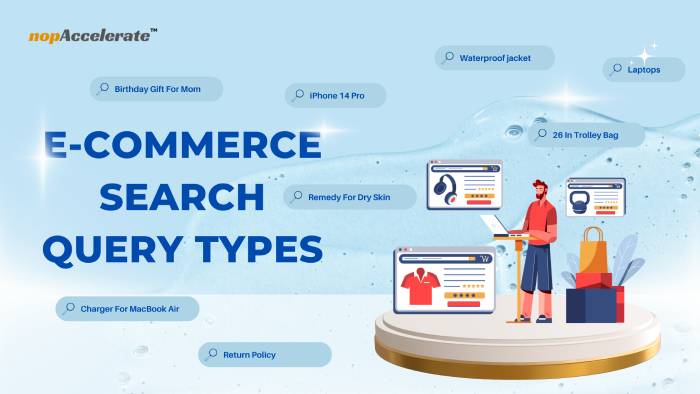
From E-commerce UX to Revenue: Exploring the 8 Essential E-commerce Search Query Types
Let’s face it—search is the heart of any e-commerce site. In today’s competitive online marketplace, having a smart, efficient search functionality isn’t just a nice-to-have; it’s what makes or breaks the customer experience. In our previous blog, we discussed how 41% of e-commerce sites are still getting their search wrong, leading to missed revenue and frustrated customers. Whether users are searching for specific products or browsing product categories, they expect seamless, fast, and relevant search results.
We talked about the 8 essential e-commerce search queries that form the backbone of a successful online store’s search experience. Now, it’s time to dive deeper into all those e-commerce search query types to understand their importance, the common pitfalls sites face, and how you can optimize them to ensure a smooth and satisfying customer journey.
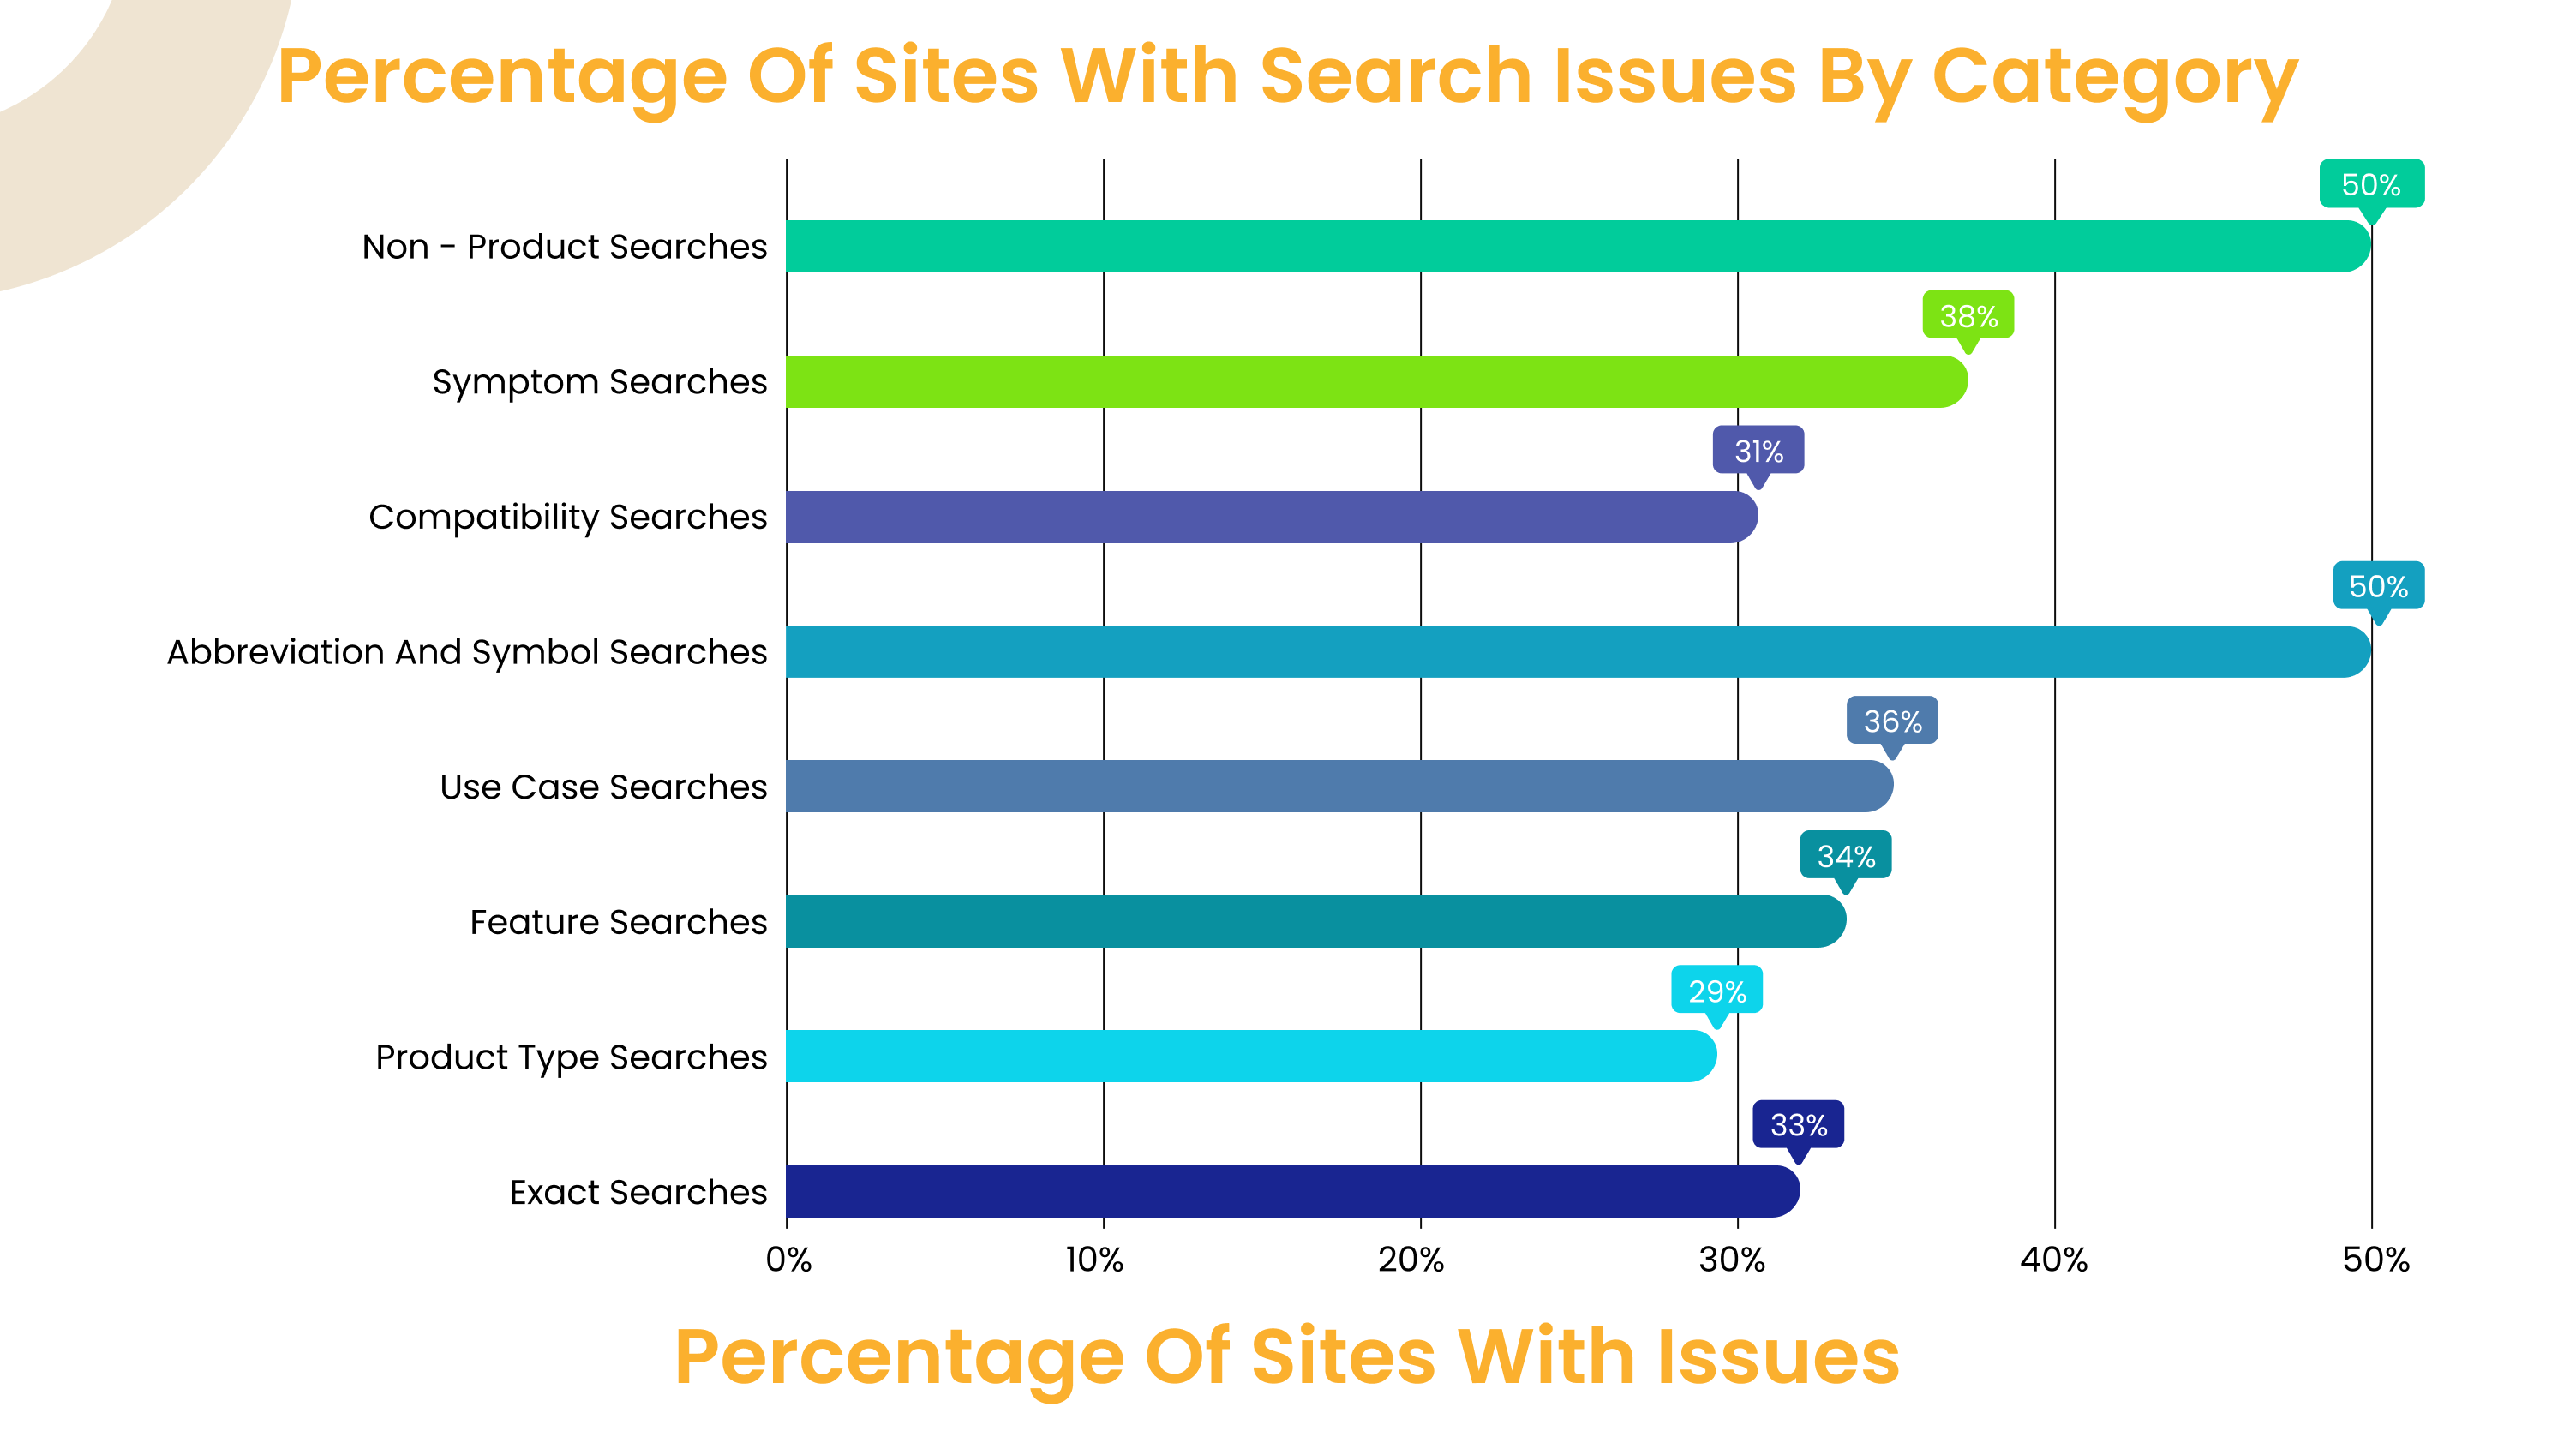
1. Exact Searches: Precision and Purchase Intent
Exact searches occur when users know exactly what they want. These searches typically involve specific product names, models, or SKUs (e.g., “iPhone 14 Pro” or “STH2000DM004”). The intent here is clear: the user is already well-informed and looking for the exact product and is more likely to make a purchase when it is found.
Why It Matters: Users conducting exact searches are highly valuable because they are often at the final stage of their purchasing journey. They’ve done their research and are now ready to buy. If your site fails to return precise results for these searches, you risk losing a sale to a competitor who can deliver what the customer is looking for.
Common Pitfalls:
Inconsistent Product Listings: If product names, SKUs, or attributes are not consistent across the site, users may not find the exact product they’re searching for.
Lack of Full-Text Search: If your e-commerce search engine is not supporting full-text search like Amazon or Google offers, then most likely products are not found when the product name or SKU code doesn’t match exactly the search query.
Improper use of Tokenizers: Without proper tokenization of your product contents and search query, the exact search may likely fail resulting in “no product found”.
No Auto complete or Search Suggestions: Without search suggestions, users may type the exact product name but misspell it slightly, leading to zero results.
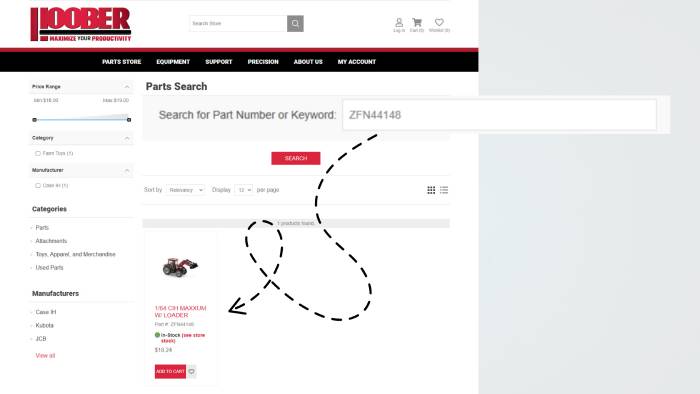
Let’s see if I can search my model number… Yes, there it is—so good!” This participant appreciated being able to search by SKU (model number) on hoober.com.Providing SKU-based search ensures users can quickly find the exact model they’re looking for, enhancing their overall shopping experience.
Optimizing Exact Searches:
Maintain Accurate and Standardized Product Data: Ensure that SKUs, product names, and models are consistent and up-to-date across all listings, and are tagged appropriately.
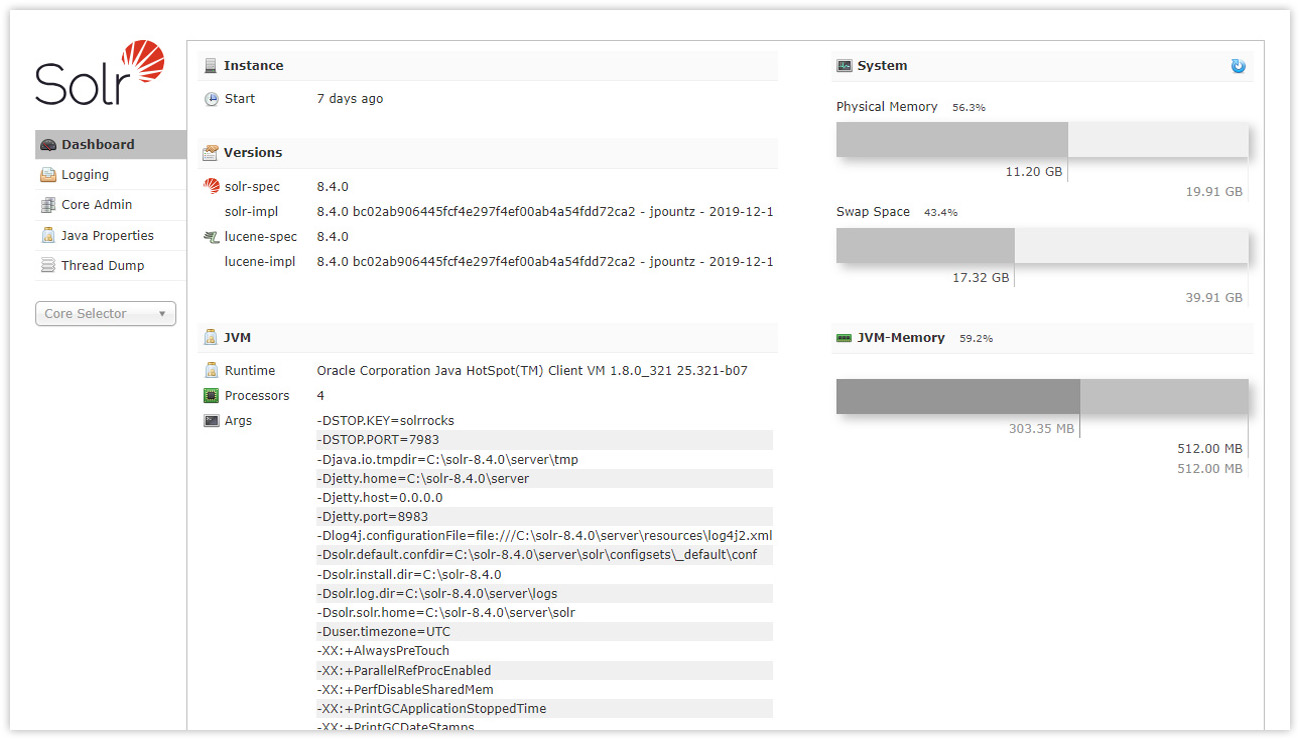
Implement Full-Text Search: Make sure to implement full-text search for your e-commerce store using dedicated search platforms like Apache Solr, Elastic Search, or Algolia, which supports advanced text analysis and helps you improve your search results. Look for a full-text search plugin for the platform you’re using to find something that is readily available.
Understand and Implement Tokenizers as per your need: Not all stores are equal. Similarly, find what your visitors are searching for and optimize how you use tokenizers to support various formatting, synonyms, stop words, etc. You can also implement phonetic tokenization to improve it more.
Implement Auto complete: Help users by providing relevant search suggestions as they type, guiding them quickly to the exact product they seek.
Implement Search Suggestion: You could also use the spell check feature of the search platform you’re using that helps you offer relevant search suggestions in case of misspelled search queries.
Prioritize Exact Matches in Search Results: Ensure that exact matches appear at the top of the results to prevent users from having to scroll through irrelevant products.
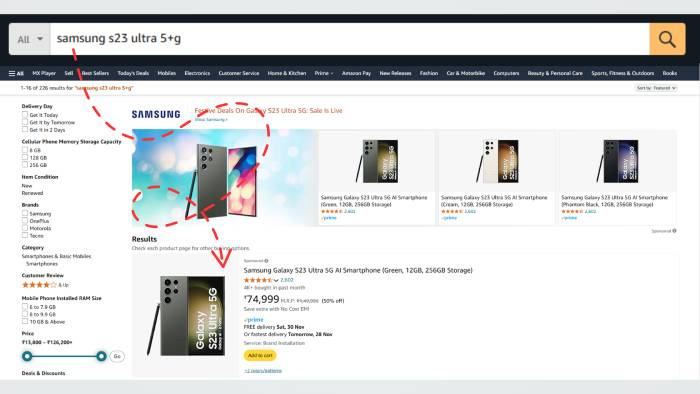
Let’s search with mobile model name… Yes, it shows the result! When users search with the (full text query) exact model name, they get accurate results. The tokenization and search features work seamlessly on amazon.com, making it easy for users to quickly find the same product they’re looking for.
2. Product Type Searches: Simplifying the Browsing Process
Product type searches involve users searching by a general product category, such as “women’s sneakers” or “laptops.” These users may not have a specific product in mind but are exploring a range of options.
Why It Matters: Product-type searches are often the starting point for users who are still in the decision-making process. Relevant search results that are offered in a well-organized and easily navigable way help guide users to the right products quickly, building trust and encouraging exploration.
Common Pitfalls:
Overwhelming Search Results: Presenting too many irrelevant or loosely related products can overwhelm users and discourage further exploration.
Lack of Clear Product Categories: If your categories are not clearly defined or logically organized, users will struggle to find the products they are interested in.
Optimizing Product Type Searches:
Clear, Intuitive Product Categorization: Organize your products into straightforward categories with intuitive navigation paths to make searching simple and effective.
Effective Filtering Options: Allow users to refine their product searches based on various attributes such as brand, price, color, and size. Such multi-faceted filters make product type searches manageable and tailored to user needs so they can find products faster. Most search platforms offer options to implement such multi-faceted filters out of the box.
Etsy Website has advance search features, like “Product Type Search” make exploring easier. For example, if someone’s browsing laptops without a specific choice in mind, helpful filters guide them to options they’ll love—boosting chances of a purchase.
3. Feature Searches: Targeting Product Attributes
Feature searches occur when users look for products with specific attributes or characteristics, such as “waterproof jacket” or “Bluetooth headphones.” They know the product type but want a specific feature.
Why It Matters: Supporting feature searches ensures that users with specific needs can find the products that match their criteria. If users can’t filter or search by the features they want, they’re likely to leave the site and look elsewhere.
Common Pitfalls:
Limited Attribute-Based Filters: Not offering sufficient filters for key product features can lead to frustration when users can’t narrow down results.
Irrelevant Search Results: If the search algorithm doesn’t prioritize products based on the requested feature, users may be presented with irrelevant results, leading to abandonment.
Optimizing Feature Searches:
Comprehensive Filtering Options: Ensure that feature-related filters (e.g., waterproof, wireless, eco-friendly) are available and easily accessible on search result pages.
Feature-Rich Search Indexing: Make sure your search engine indexes product features properly, so users searching for specific attributes find accurate results.
Display Feature Highlights: Show key product features prominently in search results to help users quickly identify the items that match their needs.
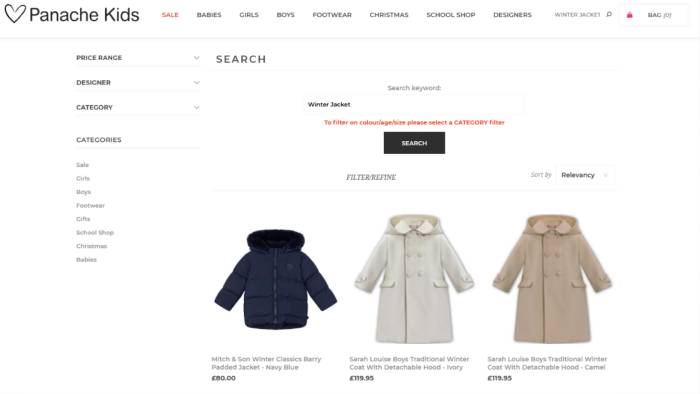
Panache Kids website offers an intuitive search experience with “feature-based queries” and advanced filter options. Visitors can easily select specific categories and attributes, ensuring their search queries deliver relevant results tailored to their needs.
4. Use Case Searches: Matching Products to User Intent
Use case searches happen when users are looking for a product to fulfill a specific need or occasion, such as “travel backpack” or “birthday gift for mom.” These users are focused on the context in which they’ll use the product.
Why It Matters: Use case searches are highly contextual, allowing you to tap into user intent directly. If you can serve results that match these scenarios, you’ll increase the likelihood of engagement and conversion, as users feel you understand their needs.
Common Pitfalls:
Misaligned Product Suggestions: When search results don’t match the intended use case, users may feel disconnected from your offerings.
Limited Focus on Contextual Queries: If your site doesn’t consider different use cases, it may fail to cater to a wide range of customer needs.
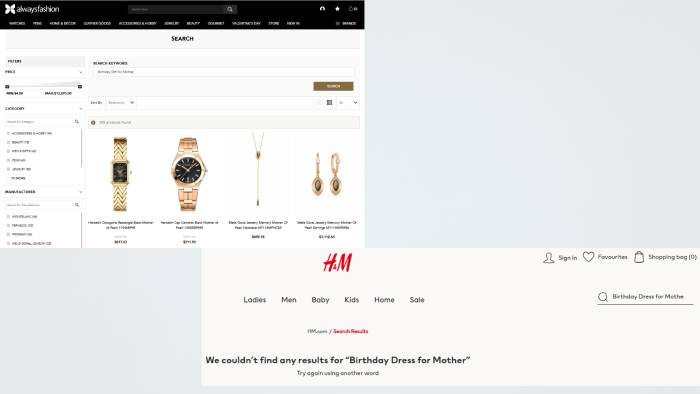
Websites like H&M, which sell clothing, are among the most popular brands. However, when searching with a use case like ‘Birthday Dress for Mom,’ their search functionality often fails. On the other hand, websites like alwaysfashion.com provide relevant results, showcasing the effectiveness of their search functionality. These websites utilize readily available plugins to ensure visitors get accurate and relevant results.
Optimizing Use Case Searches:
Curated Recommendations: Use personalization or curated lists to present products that match specific use cases (e.g., “top travel gear” or “gifts for moms”).
Tailored Content for Occasions: Consider building occasion-based content on category pages (e.g., “best backpacks for travelers”). Ensure to index this content for searches, making it easy for users to find products tailored to their needs.
User Intent Recognition: Ensure your search engine recognizes the intent behind queries and delivers results that align with those specific contexts.
5. Abbreviation/Symbol Searches – Catering to Modern Search Behavior
Abbreviation and symbol searches occur when users input shortened forms or symbols instead of full product names (e.g., “26 in trolley bag” instead of “26 inch trolley bag”). As mobile shopping continues to grow, users prefer these shorter inputs to save time and effort.
Why It Matters: In the dynamic world of e-commerce, efficiency is what customers prioritize most. When users search with abbreviations or symbols, they expect results that match their intent quickly. If your search engine cannot interpret these abbreviated terms correctly, users will see irrelevant results or, worse, nothing at all. This frustration can drive them away, possibly to a competitor’s site.
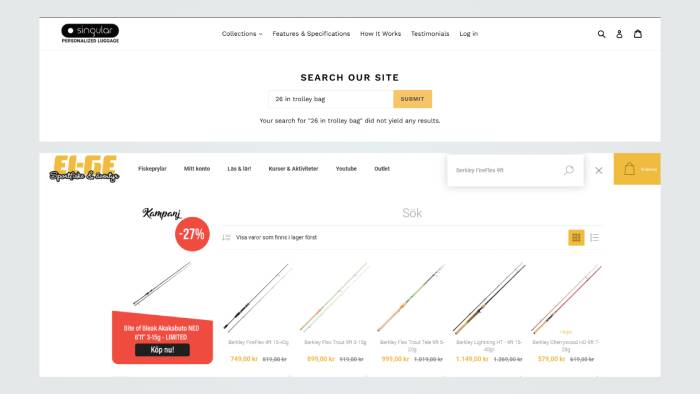
One online store selling bags and luggage fails to support search terms with abbreviations like “in” for “inch,” causing searches to fail and visitors to leave without purchasing. In contrast, other websites effectively handle abbreviations like “ft” for “feet,” ensuring a smoother search experience and better user retention.
Common Pitfalls:
Lack of Abbreviation Recognition: Many e-commerce sites fail to map common abbreviations (e.g., “in” for inch) to the full terms, resulting in missed opportunities to connect users with the right products.
Limited Flexibility in Search Algorithms: If your search engine doesn’t accommodate the variations in user inputs, such as symbols or shorthand, you risk returning irrelevant or no results.
Optimizing for Abbreviation/Symbol Searches:
Develop a Comprehensive Dictionary of Abbreviations: Ensure your search system recognizes common abbreviations and symbols used by customers. For example, map “cm” to “centimeter” and “kg” to “kilogram” so that users find relevant results regardless of how they input their queries.
Implement Dynamic Auto-Suggest: As users begin typing, provide real-time search suggestions that include both full terms and their abbreviated versions. This not only guides users quickly but also reinforces your search engine’s flexibility.
Regularly Update and Test Search Capabilities: Monitor search logs to identify any new abbreviations or shorthand that users commonly use. Continuously refine your search algorithm to incorporate these patterns, ensuring the search experience remains intuitive and responsive.
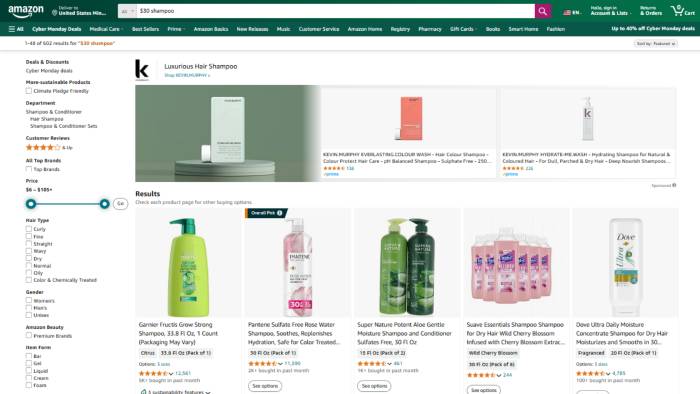
As this store supports abbreviations and symbols while also offering “multi-faceted filters” options, visitors can easily refine their searches. Filters like price, hair type, gender, and brands make it simple for users to find exactly what they’re looking for, improving their overall shopping experience.
By accommodating abbreviation and symbol searches, you create a more user-friendly search experience that aligns with modern browsing behavior, particularly on mobile devices.
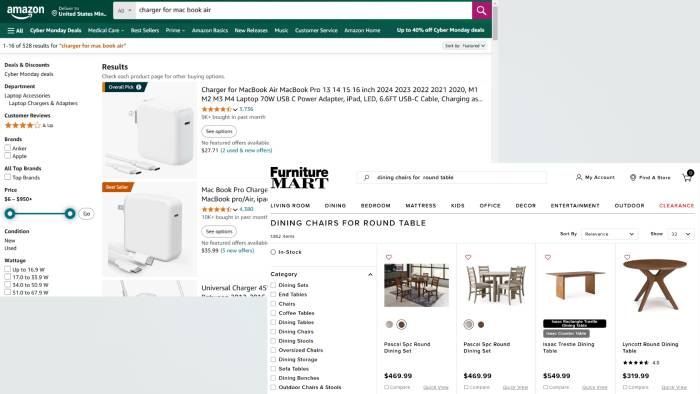
Compatibility searches are when users look for products that work together, such as “charger for Mac Book Air” or “case for iPhone 14 Pro.” These searches often occur when users are trying to find accessories or add-on for products they already own.
Why They Matter: Customers who conduct compatibility searches are often highly intent-driven, seeking to complete their purchase with additional products. This presents a prime opportunity for cross-selling and up-selling compatible items, boosting overall sales and customer satisfaction.
Common Pitfalls:
Insufficient Product Linking: If your site doesn’t effectively link related or compatible products, users may struggle to find the accessories or additional items they need.
Limited Filtering Options: Without filters that allow users to refine their search based on compatibility criteria, such as brand or model type, users may face difficulties narrowing down their options.
Amazon continues to lead the way with its smart compatibility searches. Take thefurnituremart website, for example. Sure, they show results, but are they really relevant? Let’s say a visitor searches for ‘Dining chairs for a round table.’ The website should understand that the user likely already owns a round table and is now searching for matching accessories or add-ons.
Optimizing for Compatibility Searches:
Cross-Link Products in Descriptions: Ensure that product pages include detailed compatibility information and cross-links to accessories or related items. For example, if a user views a laptop, they should see suggestions for compatible chargers, cases, and peripherals directly on the product page.
Develop Compatibility Filters: Add filters that enable users to specify compatibility criteria such as “works with Mac Book Air” or “fits iPhone 14 Pro.” These filters streamline the search process, it’s all about helping users find the right product without any trouble.
Personalize Product Recommendations: Use customer browsing data to suggest compatible products based on their past purchases or current searches. For example, if a user has previously bought a phone, show them cases or accessories compatible with that model.
By optimizing for compatibility searches, you not only help customers find what they need efficiently but also create opportunities for increasing average order value through effective cross-selling strategies.
7. Symptom Searches – Providing Solutions, Not Just Products
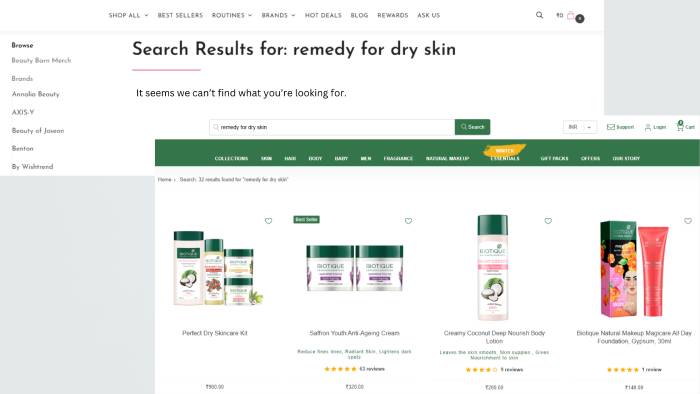
Symptom searches occur when users look for solutions to specific problems rather than searching for a product by name (e.g., “remedy for dry skin” or “cure for headaches”). These users often describe a need or symptom they want to address, seeking guidance and relevant product options.
Why They Matter: Symptom searches are highly solution-oriented. When users search for solutions rather than products, they are likely in need of assistance and may not know exactly which product suits their needs. Meeting these customers’ needs builds trust and credibility, positioning your brand as a problem solver and increasing the likelihood of conversion.
Common Pitfalls:
Inadequate Mapping of Symptoms to Solutions: If your search engine doesn’t recognize symptom-based queries, you miss the opportunity to present relevant solutions.
Limited Educational Content: Without supportive content (e.g., guides or articles) accompanying product listings, you may miss the chance to engage users and build trust.
Optimizing for Symptom Searches:
Integrate Products with Content: Tag relevant products with educational content that addresses common symptoms. For example, include blog posts or guides on how to manage dry skin, accompanied by recommended moisturizers or skin care products.
Create a Symptom-Based Index: Train your search system to recognize and respond to symptom-related queries. By mapping terms like “back pain relief” to ergonomic chairs or back supports, you can match users with the products they need.
Build Symptom-Specific Landing Pages: Develop dedicated pages that target common symptoms or needs (e.g., “Solutions for Dry Skin”). These pages can house related products, customer reviews, and expert tips, making it easy for users to find solutions in one place.
Bothwebsites sell skincare products, but found that only one supports ‘Symptom Searches.’ What does that mean? It means that having a visually appealing layout and great design isn’t enough to succeed in e-commerce. When users don’t get relevant search results, you fail as an online seller.
Supporting symptom searches effectively can transform your site into a trusted resource, encouraging users to return and explore more products.
8. Non-Product Searches – Addressing User Questions Beyond Products
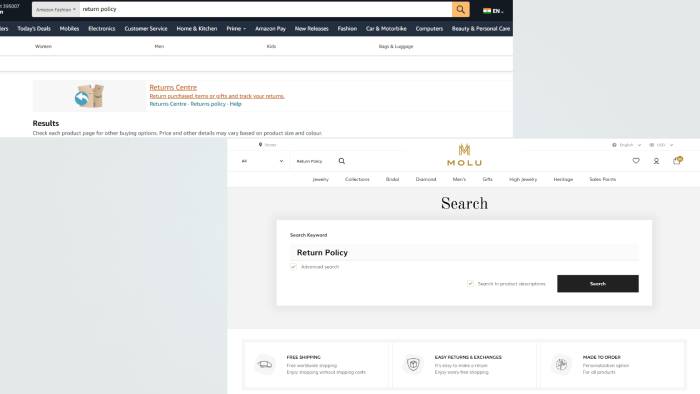
Non-product searches involve users seeking information about your site’s policies, services, or other details unrelated to specific products (e.g., “return policy,” “gift wrapping options,” or “shipping information”).
Why They Matter: Non-product searches are crucial for building customer trust. Customers often look for reassurance before making a purchase, and if they can easily find answers to their questions, they are more likely to proceed with their order. Supporting these queries also shows transparency, which can improve brand loyalty.
Common Pitfalls:
Inadequate Informational Pages: If users cannot find clear, detailed information about your site’s services or policies, they may become frustrated and leave.
Poor Indexing of Non-Product Content: Focusing search algorithms solely on products without indexing FAQ and policy pages can lead to missed search results when users look for non-product information.
Searching for “return policy” on Amazon yields “Returns Center” links, along with a short description of the return policy and a set of links to relevant Help sections. On molu.com, a search for “return policy” directs users to the relevant result, where numerous return-related FAQs are available.
Optimizing for Non-Product Searches:
Build a Comprehensive FAQ Section: Ensure that all common questions related to policies, shipping, and services are answered in a well-organized FAQ section. This makes information readily accessible and improves user satisfaction.
Index Policy Pages and Guides in Your Search Engine: Include these non-product pages in your search index so that users can access relevant information directly through the search bar.
Offer Quick Links and Search Shortcuts: Incorporate shortcuts or quick links within the search bar that direct users to key information like “Returns” or “Shipping Information,” ensuring users find answers quickly.
By optimizing for non-product searches, you not only enhance the user experience but also build trust and reduce potential friction points in the buying process.
An optimized search experience not only enhances user satisfaction but also drives conversion rates, customer retention, and overall revenue growth. When your search engine delivers fast, accurate, and relevant results, it builds trust and loyalty, encouraging users to return for future purchases.
Stay tuned for more insights and practical strategies to enhance your e-commerce business. Your customers’ search experience is your gateway to revenue—make it exceptional!
Why E-commerce Search Query Types Decide If Customers Stay or Leave
Introduction
It’s no secret that search functionality is the backbone of any successful e-commerce site, as it directly impacts the customer experience and conversion rates. When customers land on your site, they aren’t just browsing—they’re actively searching for products. If they can’t find what they need quickly, they’ll leave, and are unlikely to return. Here’s the kicker: 41% of e-commerce sites are still getting their search functionality wrong.
It’s not just about having a search bar on an e-commerce website. It’s about understanding the types of search queries your users are making and optimizing your e-commerce site to respond accurately to each one.
In this post, we’ll break down the common e-commerce search query types and reveal why most e-commerce sites get it wrong.
Why Search Queries Matter
Research shows that 69% of online shoppers go straight to the search box when visiting an e-commerce site. The way users search it’s revealing their intent and search patterns, and in e-commerce, search intent is the golden ticket to conversion. If you don’t understand customer search patterns and fail to deliver relevant results based on that intent, you’re losing money—plain and simple.
However, why do so many e-commerce sites struggle with search? One major issue is that many e-commerce businesses don’t fully understand the different types of search queries and how they work. Let’s explore search query types so you can begin optimizing your site’s search functionality.
In our next blog, we’ll dive deeper into customer search intent and how it influences search query types in e-commerce.
Search Query Issues Across E-commerce Sites
Breaking Down the Common E-commerce Search Query Types
According to the Baymard Institute’s UX research, there are eight essential e-commerce search query types that customers rely on to find the products they need. Unfortunately, many e-commerce sites perform poorly in supporting these search queries.
Here’s a breakdown of these common search query types and how they function:
Exact Searches: These are searches where users know exactly what they want (e.g., “iPhone 14 Pro” or a specific SKU like “STH2000DM004”).
Product Type Searches: Customers often search by product category (e.g., “women’s sneakers” or “laptops”).
Feature Searches: Some customers search for products based on specific attributes (e.g., “waterproof jacket” or “Bluetooth headphones”).
Use Case Searches: Users searching for products for a specific purpose (e.g., “birthday gift” or “travel backpack”) rely on this query type.
Abbreviation/Symbol Searches: Customers may use shortened or symbolic terms (e.g., “26 in trolley bag” instead of “26 inch trolley bag”).
Compatibility Searches: These are searches for products that are compatible with others (e.g., “charger for MacBook Air”).
Symptom Searches: Some users search based on problems they want to solve (e.g., “cure for dry skin”).
Non-Product Searches: These include queries about policies or information (e.g., “return policy”).
Each of these search types is critical for creating a seamless online shopping experience. Failing to support these queries can frustrate users and result in site abandonment.
Why 41% of E-commerce Sites Get It Wrong
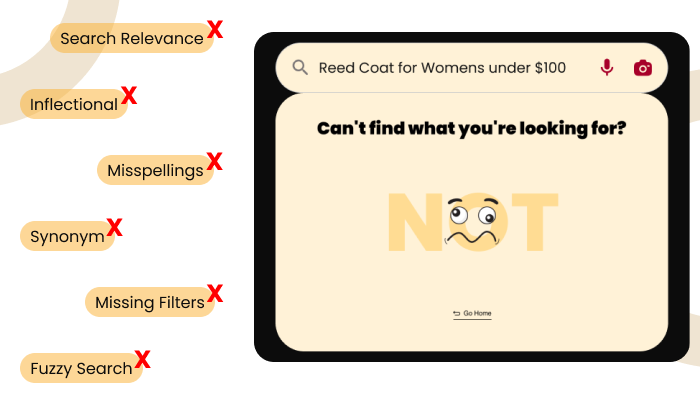
Despite the clear importance of search functionality, many e-commerce sites fail to fully support these critical search types. Here are some of the key reasons why this is happening:
Lack of Synonym Support: Customers may use different terms to search for the same product (e.g., “jacket” vs. “coat”), but many sites don’t provide relevant results for alternate terms.
Misspellings and Typos: Without typo tolerance, even minor spelling errors can result in no search results, driving customers away.
Irrelevant Results: Poor search algorithms often return unrelated products, even for simple product type or feature searches.
Missing Filters: The absence of useful filters (such as size, color, or price) makes it difficult for users to refine their search results.
Slow Search: If search results take too long to load, users will abandon your site.
Fuzzy Search: Fuzzy search compensates for typos and misspellings, ensuring relevant results are shown even when users make small errors (e.g., “bluetooh” instead of “Bluetooth”), but many sites still don’t utilize it effectively.
Search Relevance: A well-tuned relevance engine ensures the most appropriate results appear first, based on user queries and behavior.
Inflectional Search: Inflectional search recognizes different grammatical forms (e.g., singular/plural) to return accurate results regardless of word variations and is often overlooked by sites.
Poor Search Functionality and Missed Revenue Opportunities
“Poor search functionality leads to 80% of users leaving e-commerce sites, with 39% abandoning them entirely when they can’t find what they need, often switching to competitors. This issue costs retailers up to $300 billion each year.”
Conclusion
Baymard’s research shows that 41% of e-commerce sites still struggle with search functionality, but those that get it right see a notable increase in both sales and customer satisfaction.
In our next blog series, we’ll provide a detailed look at each of the eight essential e-commerce search query types, discuss common usability issues observed across the industry, and explore how mastering these queries can dramatically improve your e-commerce search experience.
Installing Apache Solr using Docker on a Linux system can significantly streamline your setup process. Whether you’re a developer, a system administrator, or just dabbling in search technologies, using Docker can help you maintain a clean and manageable working environment. This step-by-step guide will walk you through the entire process, from removing existing packages to creating your very own Solr core.
Prerequisites
Before we get started, you’ll need a Linux system with internet access and sudo privileges. For the purposes of this guide, we will assume you are using a CentOS-based distribution. And same should also work for RHEL as well as AlmaLinux.
Step 1: Remove Existing Podman
First, it’s good practice to remove any existing installations of Podman that might conflict with Docker:
bash
sudo dnf remove -y podman
Step 2: Install Docker Dependencies
Next, install the necessary Docker dependencies:
bash
sudo dnf install -y dnf-plugins-core
Step 3: Add Docker Repository
Add the Docker repository to your system to ensure you get the latest version:
And there you have it! Your Solr instance should be up and running on Docker, and you’ve successfully created a new Solr core. This setup not only keeps your environment clean but also makes it easy to manage Solr instances across different projects. Feel free to experiment with different Solr configurations and explore its extensive features to enhance your search capabilities.
By following these steps, you can efficiently manage your Solr instances with Docker, ensuring a scalable and reliable search service architecture. If you have any questions or need further assistance, don’t hesitate to reach out or consult the extensive Docker and Solr documentation available online. Happy searching!
E-commerce, or e-business, has drastically transformed customers’ shopping experience through e-commerce websites that provide 1000+ products. nopCommerce platform is one of the eCommerce solutions that businesses can consider to meet their online store needs. Do you know? The open-source platform nopCommerce supports around 60 thousand e-commerce websites today.
This reliable platform gives developers access to a massive number of add-ons, 500+ integration options, and features that make shopping more enjoyable and let customers do more. The best thing about the nopCommerce platform is that it allows multiple payment ways, SEO tools for multiple businesses, and shipping. nopcommerce also lets sellers reach more customers and boost their sales, while customers can buy all their favorite goods in one place.
Have you not jumped on the e-commerce bandwagon yet? Give nopCommerce a try. Include this excellent e-commerce solution in your top list for these reasons.
Keep reading this blog to learn the reasons to use nopCommerce for your eCommerce!
Here are 5 reasons to use the nopCommerce platform for your eCommerce
1. Open source platform
The open-source nature of nopCommerce means that the software’s source code is available to everyone, which gives developers the freedom to modify and enhance the platform to meet the specific needs of their businesses.
The platform gives developers a complete set of APIs and hooks that they can use to add third-party apps to their websites. You can also share these tools with other people. This could mean more plugins and extensions for the platform can be downloaded and added to make the store do more. Also, developers can add features like custom payment gateways, shipping providers, or any other functions they need for their online store.
2. Mobile-friendly
A mobile-friendly website provides customers with an improved shopping experience, ultimately leading to increased sales. nopCommerce provides a mobile-friendly experience that allows customers to browse, shop, and checkout from their mobile devices. According to research by Gartner, mobile devices are responsible for 19.4% of all B2B sales.
Additionally, nopCommerce comes with mobile-friendly features like responsive design, mobile payment gateway integrations, and optimized image sizes to provide an excellent user experience on mobile devices. It even supports touch-friendly features like swiping, zooming, and scrolling, making the shopping experience more intuitive.
3. SEO-friendly
SEO is a must if a company wants to be seen more often in search engine results. SEO is a primary focus in the development of nopCommerce. Several elements integrated within the platform facilitate spidering and indexing by search engines.
Some of these features include customizable URLs, meta tags, and sitemaps. This means that this platform allows businesses to create search-friendly URLs, edit meta tags, and add keywords to product descriptions.
The nopCommerce platform also supports third-party SEO plugins, which help businesses further optimize their websites for search engines. It is integrated with Google Analytics, which helps them track their website traffic and identify areas for improvement.
4. User-friendly
Customers can find what they need on the app quickly and easily because it is simple and easy to use. With the nopCommerce platform, customers can make accounts, save their tastes, and keep track of their orders. At checkout, there are no difficulties or extra steps. By making an easy-to-use interface, businesses can make customers happier, increasing sales and bringing back old customers.
nopCommerce supports +50 payment gateways and options (Paypal, SagePay, BluePay, etc.), allowing customers to choose their preferred payment and delivery method. It also has a robust search function that lets customers swiftly find products based on keywords, categories, or attributes.
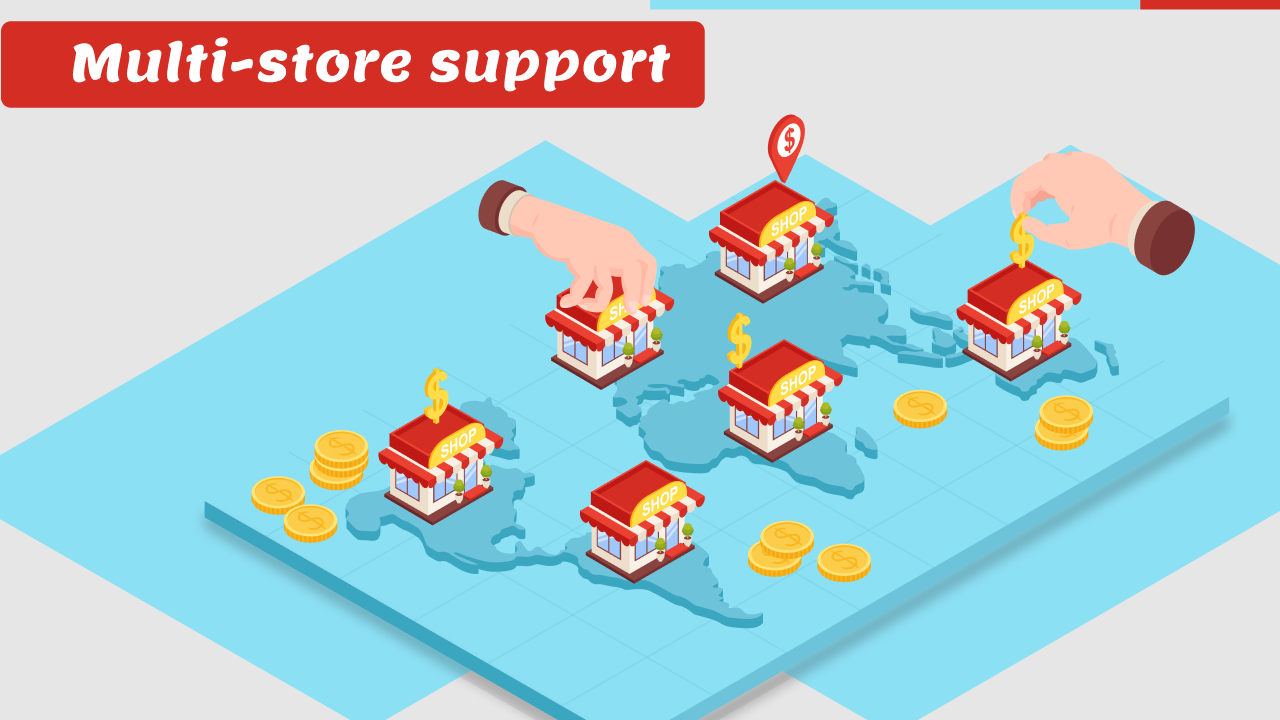
5. Multi-store support
Many companies now have multiple online stores, each with its own needs. Keeping track of many online shops can be tricky and take a lot of time. But with nopCommerce’s centralized interface, businesses can handle many outlets with a single view of inventory, sales, and customer information.
The platform can handle many stores, so retailers can set up and run multiple websites, each with its look, inventory, and prices. This feature lets business owners quickly set up and run multiple businesses catering to different customer groups. By using a consolidated method, the company can save time and money that can be used in other ways.
Wrapping Up
nopCommerce will continue as a leading e-commerce platform for numerous businesses in 2023. This open-source platform’s adaptability, search engine optimization, and user-friendliness allow businesses to expand their online presence and gain more customers. In addition, nopCommerce supports multiple stores, meaning that a single admin interface may be used to oversee multiple online outlets. Get the most out of this robust platform by working with a professional nopCommerce developer to launch your online store. With the help of nopCommerce development services, business owners may thrive in the cutthroat eCommerce market.