nopAccelerate
Install Solr using HDS
Introducing HDS
HDS (Heliosearch Distribution for Solr) is a free, production-ready distribution for Apache Solr packaged with Apache Tomcat. HDS is pure Open Source: 100% Apache Solr. The difference is in the way it’s packaged. HDS is a Tomcat/Solr distribution that is both agile and production ready.
So basically, its the same Apache Solr, but packaged in way that makes it really easy to deploy for production use.
Now Coming to the point, how you can use it
Step 1: Download HDS
Just go to this link HelioSearch and download the HDS. Select the choice of OS you wish to use. We are assuming you’re installing this on Windows.
Step 2: Copy HDS
Extract the downloaded file somewhere and give the folder name as you want, (Assuming you extracted it to “C:\” drive and gave folder name “HDS”, So your HDS path becomes “C:\HDS”).
Step 3: Install JAVA Latest Version
Go to this link Download and Install the latest Java version. You can choose the version as per your system requirements but we prefer “Windows Offline (64-bit)” setup.
(a) How to check JAVA path?
- For Windows 32 bit: “C:\Program Files (x86)\Java”
- For Windows 64 bit: “C:\Program Files\Java”
After successful JAVA installation, it’s time to define the “JAVA_HOME” Environment Variable which will helps HDS to find the JAVA location.
(b) Steps to define “JAVA_HOME” Environment Variable
- Go to My Comuter > Right Click > Properties > Click Advanced system settings from left
- One “System Properties” popup will open then select “Advance” tab, click on “Environment Variables..” button at the end of popup
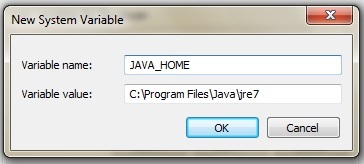
- Another “Environment Variables” popup will open, go to the last “System Variables” list > New > Enter the following details in “New System Variable” popup
- Click OK, you will see the newly added Variable name “JAVA_HOME” in the list.
Step 4: Start the Server
To start the Server, all you need is to run few commands on your command prompt. We are assuming you’ve extracted the HDS folder to “C:\HDS”
C:\>cd\
C:\>cd C:\HDS\server\bin
C:\HDS\server\bin>startup
Step 5: Stop the Server
To stop the server, same thing you need to follow but slide change in command.
C:\>cd\
C:\>cd C:\HDS\server\bin
C:\HDS\server\bin>shutdown
Step 6: Now you are ready to Go!
You’re ready. There are no more steps. You’re now ready to start using Solr!
To verify it’s up and running, you can point your browser at the admin page: Solr
Advanced Help with Apache Solr using HDS
Proceed with next step to Configure HDS to use with nopAccelerate→
Need more help?
- Ask your question in the Forums (free with your plugin purchase)
- Go back to Documentation
Latest Posts


Our Products
Support
Latest Blog Posts
Contact Info