nopAccelerate
Performing Full Solr Indexing for nopCommerce 3+
Steps for performing full Solr indexing for your nopCommerce store products from nopAccelerate Admin area.
Applicable to:
- nopAccelerate
- nopAccelerate Search
When you need to do Full Indexing?
- If you’re using nopAccelerate for a first time, then you need to perform a Full Solr Indexing operation.
- Full Solr Indexing may also require if changes are being made to Solr Schema file, especially new fields are added or declared in Solr Schema.
Performing Full Solr Indexing
If you’re performing Full Solr Indexing for first time, ensure following:
- Before proceeding with this stage, make sure you’ve everything ready including correctly configured nopCommerce, nopAccelerate Plugin Settings & Solr Schema & Solr Config files.
- Ensure that Solr Search Plugin is not enabled. If it is enabled visitor might see no search results found while performing search.
- Ensure that Solr Product Plugin is not enabled. If it is enabled visitor will see a blank catalog listing pages without any Products.
Hint: You may not need to perform this step manually
Most stores does not need to perform this step manually because the Solr Admin Plugin does the job automatically. It has a scheduled task created during installation to perform Indexing at every hour which take care of indexing.
Hint: You may not need to perform this step manually
Most stores does not need to perform this step manually because the Solr Admin Plugin does the job automatically. It has a scheduled task created during installation to perform Indexing at every hour which take care of indexing.
Now, log in to the Administration panel of your nopCommerce store. And open Solr Admin Area for your store.
You can open it by going to nopCommerce administration area menu Plugins > NopAccelerate Solr Core Admin and click on Settings.

Start Solr Indexing Process Manually
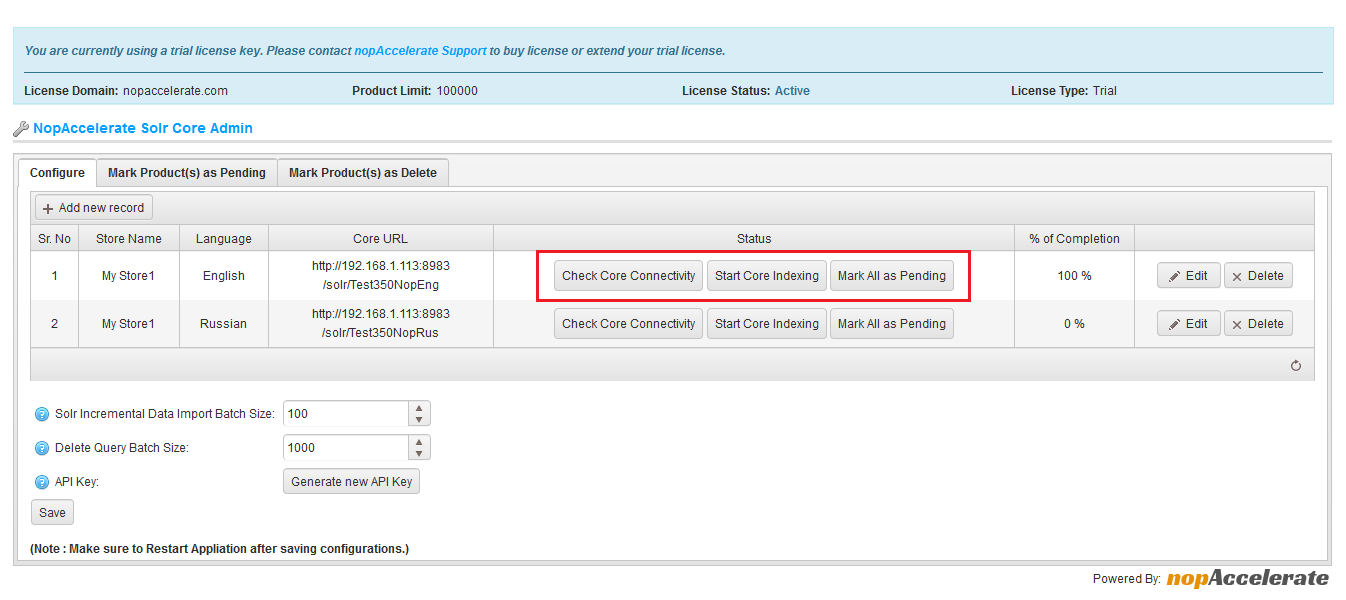
You’ll find a three buttons here, Check Core Connectivity, Start Core Indexing, and Mark All as Pending.
Click on “Check Core Connectivity” button from specific row to check the core connectivity before start indexing process. It will ensure us that there is no connectivity issue with this core configuration and now we are ready to go ahead and perform indexing. You’ll be notified with a Pop-up with response return from Solr Server. If your Solr Core Connection is unsuccessful, then please check your “Core URL” and repeat this step again until you get success message.
Once Solr Core Connectivity is done, click on “Start Core Indexing” button from same row to start Indexing process manually. It will take quite some time during performing full indexing.
If there are fewer products, you’ll be notified with a Pop-up with Process Completed! message. For larger catalog, it might take couple of hours.
Hint: For larger catalogs, Indexing process can take couple of hours. However, the Indexing process runs in the background, and you can close this window or work on other area of nopCommerce admin.
Moreover, Full Indexing is resource intensive and we suggest to make limited use of nopCommerce admin panel during this time.
The “Mark All as Pending” button will mark all the products as pending for re-indexing process. You should use this button only when something is wrong and you need to perform a full re-indexing.
You can monitor the Indexing Process from Log tab. The Log detail contains the Product ID processed during each batch along with cycle id & start & end time stamp.
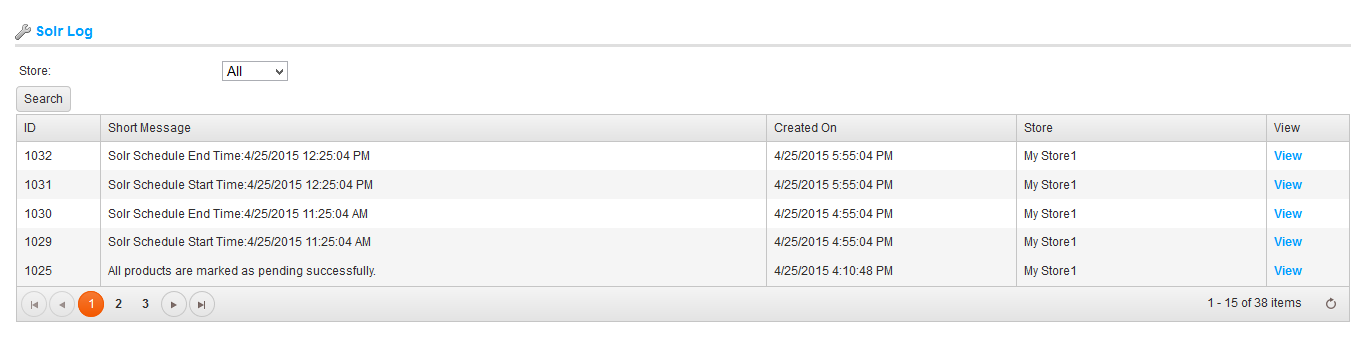
Check Solr Log and Product Status
To Check Solr Log, go to Plugins > NopAccelerate Solr Core Admin > Solr Log.
You’ll see a screen like this. If some time has already passed, you’ll also notice a few Log entries created by the Solr IDI Process.
You can also filter the log records by Store by selecting a store.
Now Click on Product Status page by going to Plugins > NopAccelerate Solr Core Admin > Product Status.
You will now see a grid containing list of Product ID, Solr Status, Is Deleted, Store, Language & Time with filter.
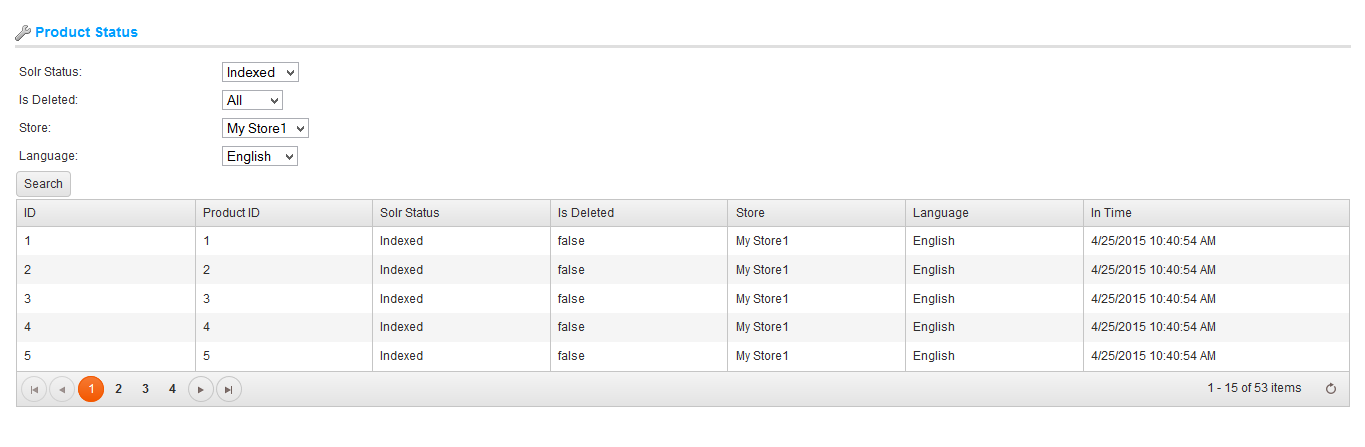
The “Product ID” refers to the Product ID from the Product table of nopCommerce.
The “Solr Status” can be Pending or Indexed. Pending means the Products are not yet indexed in Solr, once its indexed it will be updated with Indexed status. Moreover, when any product is updated, it will be marked as Pending.
The “Is Deleted” can be true or false. Only Products with false status will be indexed by Solr. When you UnPublish or Delete product from nopCommerce, it will be marked as true and the product will be removed from Solr Index.
The “Store” field is there for some internal use. Moreover, using the same you can filter and find particular product’s status whether its indexed for that store or not.
The “Language” field is also used for internal use. Moreover, you can use this filter with Store to find particular product’s status whether its indexed for that Store and Language or not.
Once, indexing is done you’re now ready to power your nopCommerce store Search and Faceted Navigation from Solr.
If you’ve performed a full indexing for the first time, you can now move to the next stage which involves enabling Solr Search & Solr Product Plugin.
Hint: Finding Error Log
If there are any errors encountered during Indexing Process, it will be logged into nopCommerce Error Log, which you can access by going to menu System > Log to proceed with troubleshooting the same.
← Back to Configuring nopAccelerate Solr Plugin for nopCommerce
Proceed with next step to Enabling nopAccelerate Advance Search & Catalog Navigation Features in nopCommerce →
Need more help?
- Ask your question in the Forums (free with your plugin purchase)
- Go back to Documentation
Latest Posts


Our Products
Support
Latest Blog Posts
Contact Info